Every builder knows that a solid foundation is a guarantee of durability and strength of any construction. Even such very light and small constructions as gazebos also need a solid foundation under them. It is clear that the foundation for a heavy house and for a small structure will differ, but one should not neglect some rules and approach the construction process with irresponsibility. After all, if you do not arrange a quality base under the gazebo, you can enjoy the rest in it for a very short time, the structure can be damaged and, in extreme cases, collapse. Foundations come in different types. Therefore, in this article we will consider: what are the grounds, how do they differ, which one to choose and how to do it correctly.
Types of foundations and their choice
Different types of foundations are used for both the construction of residential buildings and the construction of arbors. They differ in design, materials for manufacturing and device technology. Their choice depends on many factors, the main of which are:
- the total weight of the structure;
- the nature of the soil at the construction site;
- the level of groundwater.
Nevertheless, when building the foundation, your main task is to make it sufficiently reliable and durable. To do this, let's look at the different types of bases.
Pile type - better suited for viscous soil with high clay content. The presence of clay gives the soil a high level of deformation, so the foundation on piles would be ideal in this case.
 Arbor on screw piles
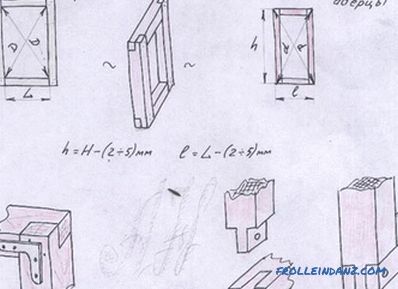
Pillar foundation. This type of base is most common. When your soil is rocky or sandy, it is recommended to do this type of foundation. This type of soil is called non-cracking, as it undergoes minimal deformation. Even those who have never come across such works before can do this kind of foundation, because this is the simplest and most economical method that does not require professional knowledge and skills. The technology of the base arrangement is simple: columns of various materials should be installed evenly along the entire perimeter, a wooden frame (grillage) will be installed on them, on which vertical bars for the floor will be placed.
 Arbor construction
A slab or solid foundation. It can be called the most versatile type that can be used on any soil and with any gazebo weight. The essence of the work lies in the construction of the drainage site base by laying blocks of concrete. Such a monolithic reinforced concrete slab is resistant to various deformations. Often this type of foundation is used at high groundwater levels.
 Using the slab
Belt foundation. As for the construction of houses, a fairly reliable and common type of foundation, repeats the structure of the load-bearing walls. If you make it under the gazebo, it will last much longer than the building itself. It's all about strength. To build such a foundation, you need to dig a trench, formwork and fill the entire perimeter with concrete.
 On the tape footing
The foundation of the tires. With the growth of prices for building materials, such grounds become very popular among summer residents, as they do not require special investments, but are quite reliable. This design is quite simple and looks unusual, but impressive.

These types of bases will help your arbor to serve for a very long time. But remember that the "miser pays twice." To prevent this from happening to you, it is better to take care of a good foundation. Maybe some of you have already had cases when the building was made without a solid foundation. Share how long she stood? How satisfied are you with your decision? Write it in the comments so that all readers can learn from your valuable experience.
 From asbestos-cement pipes
Having decided to make the foundation, tune in to the fact that even without building experience This is feasible if you strictly adhere to the recommendations, technology, make the right calculations, plan and follow them.
The first type of foundation that we will consider is a columnar one, which is used in most cases because of the simplicity of the structure and its relatively low cost. Due to its design and features, it can be installed on quicksand and other difficult soils. You can build it from a variety of materials, such as brick, metal and asbestos cement pipes. Foundation construction is possible in such options:
- Installation of asbestos-cement pipes that need to be dug into the ground, rammed and poured with concrete mix with reinforcement. This version of the base is suitable for a wooden arbor, frame construction.
- Installation of metal pipes that do not require pouring concrete mixture after mounting.Such pipes are strong in and of themselves, therefore it is enough to deepen them into the ground and properly tamp. To protect the metal from corrosion, it must be coated with a special anti-corrosion agent.
- Installation of wooden pillars, thanks to which it becomes possible to build an open country type base from a wooden frame. Such pillars can even be used on floating grounds.
- Installation of concrete blocks. Such a base is one of the most durable and reliable, therefore it is suitable for heavy, massive gazebos of the closed type with capital walls.
- Installing support columns made of brick is the most common, inexpensive and simple option of all. It is universal and suitable for the construction of any gazebos.
 Of brick
But in order to properly make a columnar foundation, you need to follow some rules:
- The supporting pillars must be installed on each corner of the external walls of the entire building so that the load is distributed evenly. If the gazebo is large and has a partition, an additional pillar must also be installed under it.
- It is necessary to set up pillars along the perimeter with a pitch of 1.2-1.5 m, depending on the size and weight of the gazebo.
- In the case when a closed gazebo has a large mass (some gazebos are equipped with a brazier, barbecue, or heavy furniture) and its walls are made of brick, it is recommended to lay a brick base between the pillars. Then the foundation will become more reliable and strong, able to withstand the load of the arbor.
- When the foundation is made on clayey soil, it is necessary to mount support columns only along the perimeter. Installing the pillars inside, you will contribute to the fact that in the winter when the ground freezes, the foundation will be strongly distorted, this will lead to very unpleasant consequences.
- To prevent poles being pushed out when heaving the ground and to provide waterproofing, it is necessary to wrap the poles with materials such as PVC film or roofing material. For brick pillars, you can use other materials that provide waterproofing and soil slippage from the surface.
 Layout of a rubble foundation with a brick base
So, when all the rules are known, the choice material is made, you can proceed directly to the construction of the column foundation. The front of the work is as follows:
- cleaning the site;
- digging or drilling holes for poles;
- preparing holes for installing columns;
- mounting columns and pouring them with concrete.
And now about everything in order and in stages.
Pillar foundation
 Pillar
To complete the work, you can not do without such materials and tools:
- rope and pegs for marking;
- a drill of the required diameter for digging wells;
- a hammer;
- scrap for stony soil;
- gravel and sand;
- tape measure;
- ready-mix concrete (cement, sand, crushed stone, water);
- concrete mixer or kneading container manually;
- Bulgarian;
- shovel;
- fittings Ø10 or 12 mm;
- hand rammer;
- level and fishing line;
- asbestos-cement or metal pipes, bricks or blocks - material IAL optionally be made from which the supporting columns; to
- waterproofing material (roofing, waterproofing, Akvaizol); to
- , wooden beams or metal channel that will serve as the foundation raft for binding.

After everything is ready, get to work. To simplify the task, we will divide the work on the construction of the column foundation into several stages:
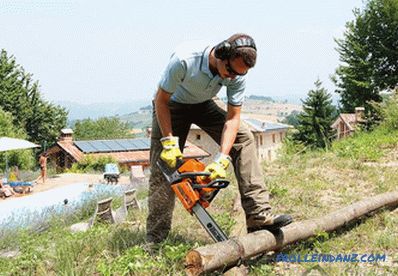
- First you need to do the preparatory work. The site must be removed and cleaned of debris and everything that will interfere. Based on the size of the future gazebo, make a markup on the ground. In the right places, mark the places where you need to dig wells under the pillars (if these are concrete blocks or brick pillars, then the holes may be square).
- Now you need to dig holes of the necessary depth, which depends on the mass of the arbor, the type of soil and the depth of the groundwater. Wells can be made by hand or mechanized drill or conventional shovel. Their width should be slightly larger than the width of the pillars to be installed.
- Pour a layer of sand of 100-150 mm at the bottom of the dug hole, moisten it and firmly tamp. Then pour 50-100 cm layer of a mixture of gravel and sand, also having thoroughly tamped it. To determine the thickness of the layer, use a wooden stick, which you must first mark. Or make the necessary marks in the pit itself.
- Further, the procedure will be different, depending on the material from which the foundation will be made. For example, when using asbestos-cement pipes, they should be installed exactly in the wells. To achieve perfect vertical evenness between all the pillars, stretch the fishing line, which will serve as a guide.After that, the space outside the pipe must be filled with soil to fix the pipe. Now it remains to fill the pipes from the inside with a concrete mix, but not to the end, but a little more than half. To form a concrete pad, all pipes need to be slightly raised. Then pour the concrete all the way. In order to provide more reliability to the base, a grid of Ø10 or 12 mm reinforcement should be placed in the pipe before pouring.
- If the pillars will be built of concrete blocks or bricks, you first need to fill the concrete layer on which the blocks or bricks will be laid to the desired height.
- The last step is to tie down the support pillars (grillage). But before that, they need to lay 1 or 2 layers of waterproofing material, such as roofing material, waterproofing or akvaizol.
Concrete will dry for about a month. On this basis, your gazebo will stand for a long time. Sinking for such a foundation is minimal, since sand, gravel and concrete pillows were piled on the bottom. Now it is possible to carry out work on the construction of future structures.
Making a slab base
 Slab foundations
Solid or slab concrete foundations need perform in the case when the gazebo is equipped with a brazier or barbecue stove and large closed walls, which gives it a lot of weight. Before work, prepare such tools and materials:
- trench digging tools;
- cord and pegs for marking;
- gravel, sand and broken bricks;
- tape measure;
- hammer;
- bars of fittings Ø12 or 14 mm;
- concrete mortar;
- boards, nails or screws;
- reinforced concrete slabs;
- hand rammer;
- scrap for stony ground;
- flexible wire;
- concrete mixer or container for concrete mixing by hand;
- facing material;
- waterproofing (roofing material, waterproofing or akvaizol).
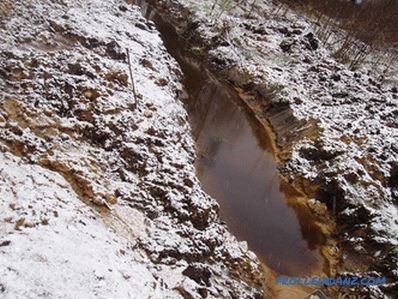
To begin with, clear the space for the foundation. Mark the area with pegs and cord. Then you need to dig a ditch of the same shape as the future gazebo. Its depth varies from the height of groundwater. To simplify the task, the pit can be dug by triggering an excavator. So, you will save your strength, but you have to pay for its rent. If you want to save money, take a shovel, ask for help from friends or relatives and do it together.
When the groundwater is close to the surface, the device of the drainage layer is obligatory. At the bottom you need to lay a layer of rubble, broken bricks and sand. All this is a good tamp hand rammer. After that, the surface around the perimeter is covered with a waterproofing layer, on which reinforced concrete slabs will be installed.
 Monolithic
If you want to make a monolithic concrete pouring, you first need to lay the framework on the drainage layer of reinforcement. Formwork is made around the perimeter of ordinary planks, which are knocked down with nails or twisted with screws. To make the reinforcement mesh, you will need Ø12 or 14 mm reinforcement rods, which are connected using flexible wire. Lay the reinforcement and fill all with concrete.
A plasticizer can be added to improve the quality of concrete.
The entire surface needs to be leveled, expelling air, and waiting a month until the concrete attains full strength. To protect the foundation from external factors and mechanical effects, cover all with plastic wrap. For 10-12 day formwork can be removed, and if the weather is very hot, the concrete can be slightly dampened so that it does not crack. After drying, it can be decorated with decorative tiles or wooden planks.
Construction of the tape base
The strip foundation is especially good for gazebos in that its structure allows the construction of any structure, shape and type. Moreover, it is able to withstand heavy loads and serve for a long time. A shallow foundation can be arranged for brick, wooden and frame arbors with a large mass. Thanks to its device, the entire load is evenly distributed over the entire surface. If you plan to put a barbecue or barbecue oven inside, you can make a concrete pillow under them separately.
 Structure
A concrete mix, bricks, or blocks can serve as a tape. To make such a foundation, you will need:
- a rope and pegs for marking,
- a trench digger;
- scrap for stony ground;
- building level and plumb;
- sand and gravel;
- boards or plywood for formwork;
- concrete solution, bricks or blocks, depending on the choice;
- if the tape is made of blocks or bricks, make a masonry mortar;
- roofing material to ensure waterproofing;
- bars of Ø12 or 14 mm;
- trowel;
- facing material;
- tape measure;
- hammer.
 Reinforcement framework
Again, we divide all the works in stages:
- As always, the site needs to be cleaned, markup based on the project. Stakes need to score at the corners of the building, respecting the size of the gazebo. They are connected with a cord, which is used for orientation. Everything needs to be measured with a tape measure, sides and diagonals, and if everything came together, retreat 200-400 mm from all sides and make exactly the same marking.
- Now dig a trench around the perimeter, focusing on the markup. Do all the work with a shovel, checking the verticality of the walls with a plumb line. The bottom of the trench should also be flat. The depth of the trench depends on the mass, soil and the occurrence of water and can vary from 600 mm to 1500 mm.
- Pour a sandy cushion of 100-150 mm on the bottom and tamp it down. Then again 50-100 mm of gravel, which is also rammed.
- Further work depends on the support material. If you pour all the concrete, then above the pit along the entire perimeter you need to make a formwork, which height is 300-400 mm. It can be knocked out of the boards or use plywood. Inside the frame is made of reinforcement and everything is poured with concrete. It must be tamped down, gently tapping with a mallet on the formwork and bayoning concrete. The surface is aligned and waiting for its time. As usual, the concrete will dry for a month. For this period, it should be covered with plastic wrap.
- If the tape of the foundation is made of blocks or bricks, then there is no need for formwork. In this case, knead the masonry mortar, additionally reinforcing rows.
- When everything is ready, you need to cover the building with waterproofing material. The ideal options in this case would be a ruberoid, which is put in 2-3 layers.
It is recommended to remove the upper fertile soil layer inside the space between the ribbons.
Now you can install your pergola on the finished foundation. After the final work on its construction, the outer surface of the base can be revetted. Decorative coating is selected based on the material that was used in construction. This can be both decorative tile and wooden slats, then the gazebo will find a completely different look and will look very noble.
Automobile tire

Increasingly, the owners of country houses began to use automobile tires for the foundation. This is an inexpensive and easy way to make a good basement under the gazebo. This method has several advantages:
- Durability. It's no secret that rubber is a durable material that is not exposed to various external influences. She is not afraid of moisture, frost and heat. You will have a solid foundation with a long service life.
- Reduced stress. The advantage of rubber can be called the fact that it can deform without losing its integrity and properties. Therefore, with a heavy load, automobile tires will be able to alleviate the pressure by evenly distributing all the weight over the surface.
- Significant savings. Other materials mentioned above (pipes, blocks, concrete, etc.) cost a lot, especially since it is not enough to get along with the material, you need to purchase a whole complex. But everyone can get tires almost for nothing. Due to this, much less effort and expenses will be spent on the arrangement of the foundation, which, if desired, it is better to additionally invest in the building itself and its design.
- Car tires have their own waterproofing.
 Solid
Solid
The only disadvantage of this method is that when air temperature rises, rubber emits harmful substances. Although this disadvantage can be easily eliminated by protecting the tires from direct sunlight.
Make such a base of tires under the force of each. All you need is tires and knowledge that you can draw from this article. Please be aware that there are two types of tire foundations:
- Columnar.
- Slab (solid).
If you want a gazebo on this basis to stand for a long time, the device should follow these rules:
- You should not deepen the base below the freezing point of the soil. It is better to make a shallow foundation that will perfectly show itself in winter.
- When installing the bottom layer of tires, be sure to check with a level whether the surface is level. If at this stage to miss such an important point, then fix something later will be very difficult. Your task is to install the tires so that their upper edges are in the same plane.
- When choosing tires, it is better to dwell on those with a larger diameter, since these tires are much stronger.
- When the foundation is ready, its protruding parts are covered with decorative material.
It is clear that not everyone is able to immediately decide to build such a tire construction.But it should be said that this technology has been used for a long time and there are examples that prove the success of this method. Moreover, it is appropriate to build a tire base on problem soil with a high degree of heaving. If you decide to build such a foundation, let's consider the technology of its construction.
Of tires
As always, before construction you need to know which tools to prepare. The set is almost standard:
- shovel and scrap;
- concrete mixer;
- marking materials;
- level and tape measure;
- sand, crushed stone or broken brick;
- car tires;
- boards, screws and nails for formwork;
- hammer and screwdriver;
- roofing material;
- Ø12 or 14 mm fittings;
- hand rammer.
 Backfilling of the foundation with tires
To make the slab version of the foundation, you need to clear the area : remove stones, debris, and tree roots. Be sure to remove the top fertile soil layer, the depth of which is 200-300 mm. Now begin to place the tires in two layers to provide a strong base. When laying the first layer of tires, be sure to check the horizontal surface level building. If necessary, substitute under the tires pieces of boards for alignment.
All voids, both inside the tires and outside, need to be filled with broken brick, rubble or gravel or other improvised materials.
It is not necessary to fill the voids only with sand, as with a heavy load the foundation can shrink strongly.
On the finished coating of tires you need to lay 1-2 layers of roofing paper, which will provide waterproofing. A formwork sticks around tires along the perimeter. The height of its sides should not exceed 100 mm. A reinforcing mesh is installed on top of the waterproofing material and all this needs to be filled with concrete. The concrete is stuck, leveling and, as usual, will dry for a month. Cover it with polyethylene for this period.
 Column variant
The column foundation of tires is slightly different from slab. Tires are used as pillars, into which concrete solution is poured. The order of execution is as follows:
- Cleaning the site, removing the topsoil, digging the trench and filling it with gravel or rubble.
- Marking the area and installing tires by level.
- A waterproofing layer is placed on the bottom of the tire, everything is filled with rubble or gravel, and a pillow is formed, which should be tamped down.
- Inside tires, rubble should be moistened and poured with concrete.
- After 4-6 days, when the concrete gets a little stronger, you can install a timber for formwork.
As a result, you get a strong and durable foundation, which evenly transfers the load to the rubble. It will stand for a long time, so do not worry about its shrinkage or deformation.
If you like this article, let us know in the comments. We will also be glad to hear constructive criticism and additions, if any. You can also share your experience and write which version of the foundation is better. After all, "iron sharpens with iron," so these tips will help all readers.
Search
Related Articles
Wardrobe from own lining without much difficulty
For storing things most often used cabinets that are made with your own hands. Many people think that it is very difficult to make a closet with your own hands and this is only possible for people...
How to sharpen a chainsaw - sharpen a chainsaw
Sooner or later, even the best quality chainsaw will need sharpening. You can sharpen the tool chain yourself. The main thing is to determine in time that it is time to start sharpening. Circuit s...
7 best impact drills - rating models for home and work

In order to choose a hammer drill, the master often needs a lot of time. And if you really need the best impact drill, we recommend using our rating, which will help reduce the time spent searching....
How to make a wind generator with your own hands

The ability to use alternative energy sources often attracts people. Therefore, attempts to get energy from the power of nature were made before the Common Era. In this article we will explain how t...
Drainage system in the country with their own hands
In some areas where the soil absorbs water poorly for one reason or another, there is a danger of flooding of houses. Excess moisture accumulating in the ground, can significantly harm both building...