The plinth is the final element of the floor covering. With its help all the irregularities and defects at the junction of the floor and the wall are hidden. In addition, under the baseboard, you can hide the cable and wires (for this, special cavities must be provided). Nowadays, plastic baseboards are increasingly used. However, wooden products also remain quite popular.

The plinth allows you to hide the defects that arise when the wall and the floor meet.
Features of wooden plinths

One of the advantages of wooden plinth is its environmental safety.
The wooden plinth has certain advantages and disadvantages. The advantages of the products include their environmental safety, durability, strength, elasticity. The disadvantages are higher cost compared to baseboards made of other materials, they do not have cavities for cable laying, the installation of wooden baseboards is quite complicated. .
To choose the right wooden baseboard, you need to know about its features.
- They are divided into 2 types depending on the material: veneered and massive. Massive fully made of solid wood. Most often used for this oak, ash or cherry. Veneered plinth is made, as a rule, from solid pine or spruce, and the top is covered with veneer from more expensive and valuable wood species. Naturally, the second option is cheaper.
- Material quality. If wet wood was used for manufacturing, then such a plinth will not only last for a short time, but the surface will also have protruding fibers and cracks. Over time, the product will begin to dry and deform.
- Breed of a tree. Coniferous species (pine, larch, fir, etc.) are resistant to moisture, and therefore do not deform or shatter. In addition, they are easy to handle and install. Softwood hardwood swells and deforms due to high humidity, and solid wood begins to crack when dried.
Preparatory operations

Wooden plinth installation scheme.
Before installing the wooden plinth, it is necessary to carry out preparatory operations. For installation, you should prepare all the necessary tools and materials:
- drill;
- screwdriver;
- U-shaped body;
- construction level;
- hammer;
- hacksaw;
- spatula;
- nails without caps;
- dowel-nails;
- pencil;
- liquid nails;
- brush;
- plaster;
- varnish.
It is worth remembering that you should cut wooden baseboards with your own hands only at an angle of 45 ° and use the block for this.
It is only necessary to cut wooden baseboards at an angle of 45 degrees.
Before installation, you must prepare the baseboards themselves. Wood, as is well known, is a natural material with a heterogeneous surface and natural defects. In addition, the individual strips may differ slightly from each other. Therefore, before installation, you should choose the baseboards in tone, and the most defective places are better identified in the places where the furniture is installed.
It is possible to additionally provide for thermal insulation of the plinth. To do this, heat insulating material is stuck on its lower part. You can buy a special insulation or do simple linoleum. Insulation strips are better to stick small size (about 5 cm), leaving between them small gaps.
After all these preparatory works, you can begin to install wooden baseboards.
Trimming and docking of baseboards

The scheme of joining a wooden baseboard.
Installation of wooden baseboards is more difficult than plastic ones. This is due to the fact that special elements are not used for joining products and installing them in the corners. All this greatly complicates the process. The miter box is used for trimming, which ensures a high-quality connection of all elements. Since corners and walls rarely differ in evenness, after trimming the ends of the plinth should be further processed. To do this, you can also use a miter box and a hacksaw for wood, sometimes a bar and emery paper are enough. When connecting it is necessary to check the evenness of the position of the elements with the help of the building level.
It is worth remembering that no matter how hard you try, you are unlikely to achieve an ideal result. Therefore, to obtain an aesthetic appearance, special putty and sealants of a single color with a plinth are used.
Often along the length of a room, a single plinth is not enough. In this case, you need to match 2 or even 3 separate products. For the treatment of the joints, colored sealants and putties are also used.
The qualitative connection of individual elements depends largely on the baseboards themselves. There should be no knots at the junction. The product must be the same size.
Assembling wooden skirting with your own hands
Fastening of solid and veneered skirting boards is slightly different.

Plinth mounting scheme.
Massive skirting is best attached to the screws. After all the trimming is done, markings are applied to the product under fasteners. The distance between the marks should be the same. As a rule, it is taken 800-1200 mm.
To make the fastener unobtrusive, you can use special long and thin self-tapping screws. Their hats differ in small size. When using such elements, it is not necessary to carry out preliminary countersinking, that is, to prepare holes for the screws for drowning the cap.
Next, the screws are screwed into the baseboards until the tip appears on the other side. After that, the product is applied to the wall, tightly pressed against the wall and floor, each fastener is screwed to the stop. Then the plinth is removed, recesses are drilled through the remaining holes, into which dowels are then inserted. And the final stage is the installation of the plinth on the prepared place and the final screwing of the screws into the dowels.
It is possible to fasten wooden baseboards and finish nails. The principle of operation is similar, only nails are used instead of screws, and wooden ones instead of plastic dowels. However, it is worth noting that wooden dowels are poorly retained in some walls (with strong unevenness, loose surface material).
Veneered skirting can be fixed in 3 ways.
- Screws are used as fasteners, and the principle of operation is similar to the above method of mounting a massive plinth.
- Gluing the product. It should be borne in mind that the walls should be perfectly smooth. Even a slight irregularity will lead to the formation of cracks, which will adversely affect the appearance. Gluing is as follows. Initially, the walls are thoroughly polished, and then they are glued to the baseboards. As an adhesive, various means are used. However, liquid nails are most commonly used. With this method of installation on the surface of the product there are no holes, it remains solid.
- Fastening the veneered plinth on clips. However, with this method of evenness of the walls, even more attention is paid. The advantage of the method is the possibility of removing the baseboard when laying the cable.
Finishing

Each layer of putty is applied after the previous one has dried.
The final stage of installation is the finishing of the baseboards. Initially, the product should be cleaned from dirt and dust, oil and grease stains (removal using a solvent). Next, putty is applied to the surface. In color, it should match the shade of the plinth. Otherwise, the composition will be ugly to stand out on the surface.
Putty is applied 2-3 layers. Each subsequent layer is applied after drying the previous one. After drying of all layers, the surface is polished, the dust after the process is removed with a cloth.
The next stage is varnishing. It is recommended to apply the 1st layer before installing the baseboard. Subsequent layers are applied only after puttying. The varnish is applied with a brush. Apply 2-3 coats. Each previous layer should be completely dry, otherwise the exterior and the quality of the finish can deteriorate significantly.
After the varnish has dried, installation of wooden plinths is completed, the product is completely ready. Also, instead of varnish, you can use special impregnations that give the product a certain shade and increase its protective properties.
The plinth, like the fillet, allows you to get a complete image of the room, hides all the shortcomings of the floor, wall and ceiling finishing.
Didn't find the answer in the article? More information on the topic:
-

How to flatten the floor in an apartment?
How to level the floor in an apartment: collecting information, working with the level and marking, the necessary building materials and tools. Self-leveling floor: step by step instructions.
Search
Related Articles
How to collect houses from CIP panels
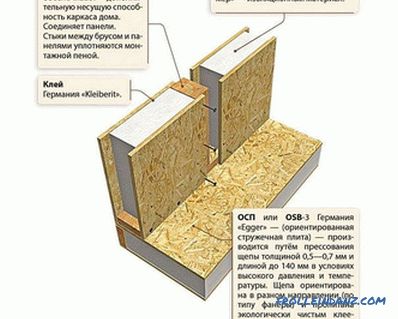
CIP panel is a building material inside which there is a layer of insulation, and the outer part is a layer of OSB. Insulators Inside the panel there can be different types of insulators, each o...
The best heat guns - rating electric, gas and diesel models

Heating of premises during the cold season is a rather urgent problem. Such tasks can occur both in production and in private homeowners, if necessary, quickly heat a certain room. For these purpose...
Garden table do it yourself from natural wood

Garden furniture can be diverse, it is not difficult to do it yourself. The big plus is that you can independently decide what kind of appearance it will take to fully match the style of the garden...
Greenhouse butterfly do it yourself - design features and installation

Only experienced gardeners know that a butterfly is not only a beautiful insect, but also a reliable greenhouse with a large number of advantages. This word is called gable design. Inside, the entir...
Provence style in the interior - the secrets of creation and photo ideas for the realization of design
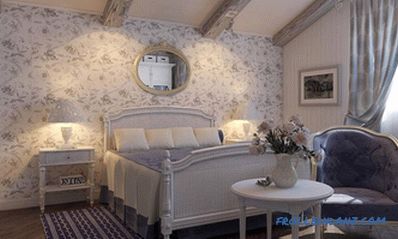
Provence, or "French country", as it is also called, is not just a style in interior design, but a unique opportunity to plunge into the atmosphere of peace and comfort, to feel the lightness and cl...