A large and convenient box for tools is the dream of any master. It is understandable, because in such a repository you can compactly put all your tools. Today they are not so expensive, so one of the options is to buy in a store or create a similar masterpiece on your own. Which option is acceptable for you? Of course, the purchase has certain dimensions, but the tools can be much larger than can fit in it. But one way or another, you have to put up with it or run to the store again and buy a new one. It’s quite another thing to do it yourself: I picked up the necessary material and calculated it for all the available tools and even with a perspective. Conveniently? Most likely, you will agree with this argument. Therefore, we will talk in this article about how to make such a box at home.
How should it be?
 The box is made according to individual needs
If This is a home box, then it can be a regular box with a handle. Well, if you, for example, a plumber, it is clear that you will need a box that is more functional, roomy and durable. This role is successfully performed by the organizer. However, in this article, as an example, we consider a simple home version - a box with a pen. So, we will assume that we have decided on the type of the box, where we will hold all the tools we need or almost everything.
Where do we start? First, we select the material. It can be plywood, wood or even metal, then we will make calculations. Only after that you can start drawing up a detailed drawing. This can be done in the classical way, that is, on a drawing paper with the help of a well-sharpened pencil, ruler, compass, square, etc.
 Box Design
 Drawer drawing
Non-classical method - using a special computer program. "AutoCAD" and "Compass" are just "sharpened" to make a professional accurate drawing. The advantage of such programs is that they help to avoid errors in the calculation and, moreover, you can see in advance what you get from all this.
These programs will serve well only if you have certain skills in working with them.
The material was picked up, and now for manufacturing it remains to collect all the tools we need. Of course, the types of tools are individual. It all depends on what kind of box you want. They, too, are different. But, anyway, there are universal tools. They are always needed. This is a measuring tool:
- fasteners;
- hammer;
- screwdriver.
Getting down to manufacturing
 Choosing wood
We take the traditional material - edged conifer board. As for processing, it is the simplest and most accessible material, which also has good strength properties.
As planned, this will be a wooden box, and our task now is to materialize the drawing itself into material. For this case, we need a ruler and a pencil. After this, we perform marking on the material and using a hacksaw or jigsaw to cut out the component parts of the product. If we have planned the usual non-closing option, then we need to make five planes: four walls and a bottom.
 We need 5 parts
When assembling, as a rule, it is better to use wood glue . The joints must be cleaned, and only then apply glue, after which we firmly squeeze the parts together. Be sure to give completely dry glue.
After this operation, we can additionally strengthen the box with self-tapping screws. Secured. Now you need to make a pen. This may be a regular wooden lath, which we need to nail or fasten to the upper edges of the side elements.
 The box is ready
So we made the box. Further, so to speak, to taste, you can slightly polish the edges of the product with an emery paper of different grain sizes and even open the product with varnish and then, one might say, the product is ready for use.
 Tools in the box
Organizer
Following the principle "from simple to complex ", now let's talk about the organizer. It is clear that a large tool can be put into the open-top box, which was written above: a handsaw, a hammer, a mallet, and much more.
And what to do with small things? All there are screws, bolts, gadget, etc. This small fixture tends to be lost or not to be at the exact moment when it is especially needed. This is where we need the organizer.
 Wooden box with organizer
As already noted, this type of box is most functional in its design. operation.What is he like? This kind of, like a box on the box, or rather, a lot of drawers in one section for storing not only medium-sized tools, but also every little thing. Of course, at first glance, it may seem that to make such a construction would not be easy. But it only seems. Basically, difficulties arise in the manufacture of sliding mechanism. Everything else is much easier to do. Now more about manufacturing technology.
- We start with the manufacture of the main body. It must be open and deep so that we can put in it various medium-sized tools (hammers, wrenches, etc.). It can be said that the design of this main body is quite simple, but in essence it is a regular box, which can be divided into several sections using vertical planes.
- The next step is to make 4 smaller boxes. You, probably, noticed that the number of these sections is even, and we mentally divide them into pairs, trying to adhere to the sizes of their lower big fellow when making them. They will be mounted on each other. One pair of boxes (top) will be with covers. They will be either folding on piano loops, or sliding on the type of Soviet school pencil case.
- Now it remains to connect these boxes together. We will do this with metal strips. We will need 6 pieces. On the one, and also on the other, we cling along one plate (short) in order to connect the two lower boxes - small and large. Two more plates (long) will connect all the boxes together. And finally, the longest bar will serve as a handle, and at the same time connect the two upper floors of the organizer. As you can see, there is nothing complicated here, and the sliding mechanism is utterly simplified, as it is presented on the example of a metal organizer - the principle is the same.
Production of metal case for tools
 Metal tool box
Let's talk now about the metal case homemade. Do not immediately conclude that this is impossible. Of course, you can make an organizer of metal yourself only by an experienced mechanic and with special tools and the appropriate material. Factory metal boxes are usually made of light types of metal, such as aluminum, so that such a box itself is not heavy. At home, working with aluminum is difficult.
 Metal organizer
In principle, a metal box for is loudly said. Rather, a regular box will be made of metal. The material that is needed for the manufacture of such a box - the usual soft galvanized (about 0.3 mm thick). From the tools we need:
- square;
- caliper (razmetochny);
- sharpened small core or marker;
- ruler;
- hammer;
- anvil (wide metal bar);
- file;
- pliers.
Then everything follows the same scenario: drawing, marking. The most interesting thing is that all this can be done right on the galvanized sheet with the help of a sharply sharpened core (or marker), whatever. We then mark those places with a marker on the metal that we will have to remove.
 The markup on the metal
After that, we proceed to pruning using metal shears.
 Cut off the excess
After trimming all the excess, we get such a complex geometric figure ("winged rectangle").
 Workpiece
Now let us work with the blacksmiths for a bit. For this case, we have an anvil, and tapping with a hammer, we will gently bend the edges of our workpiece. It is better to do it not chaotically, but in a certain order.
 Bend the edges of the workpiece
First, we bend one sidewall, and then we bend the other.
 Bend the rest of the parts
Now the sides take turns.
 Bending of protruding petals
After that we will be engaged in bending of protruding petals. They will make the structure more rigid, and it will not “play”.
 Crimping bends
Pliers can be used to wrap the protruding parts on top of the box.
After such manipulations, one should thoroughly walk the whole product with a hammer, having finished it.
In this case, it turned out a small box. But after all, according to this principle, you can do the same - more, and in the end you will get such a metal tool box.
 Finished box
So, if desired, anything is possible.
We hope that this article will be useful for you, dear readers. If your tools order, then complement it with the manufacture of a conventional tool box.If your tools do not have a permanent "place of residence", then consider building a two- or even three-storyed "transformer house" for it. Try to do this, and your instrument will always be in place, and you yourself will be pleased to use in your household product made by yourself.
Video
This video shows how to make a tool box and out of scrap materials:
See how you can make organizer cases yourself for tool:
Search
Related Articles
Shutters for the sanitary cabinet in the toilet
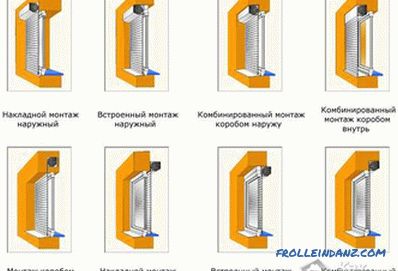
We are accustomed to meet with a similar design solution on windows and doors, but roller blinds for the sanitary closet in the toilet will not only complement, but also improve the appearance of th...
How to make shelves on the wall
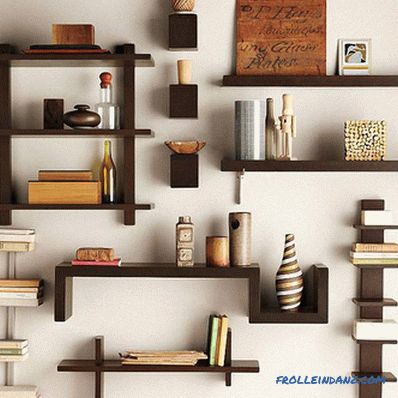
Self-made shelves allow efficient use of space and create an individual interior. Home craftsmen are not limited in their imagination in the choice of form and material, but we must not forget about...
Installation of adjustable floors - a sequence of actions (video)
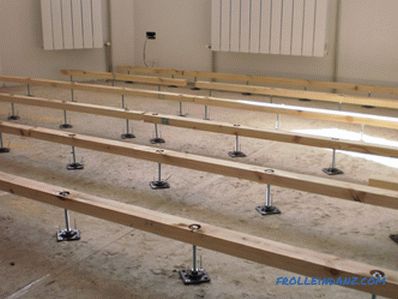
Innovative base leveling methods were developed in order to optimize the speed of finishing work and reduce labor costs. Recently started installation of adjustable floors. The design provides owne...
How to choose paint for the walls of an apartment or house

Repair is a complicated and sometimes lengthy process. Its success depends not only on the skill of the workers, but also on the quality of the materials and their correct choice. Manufacturers of p...