If you set up a bath, you probably already thought about how to hide all the communications under it. One of the possible options - put the screen. As a rule, this design is intended only to improve the aesthetics of the bathroom. Modern models of baths are often supplied with screens. But, if you purchased a bath without this configuration - do not despair. You can always make the screen yourself.
Purpose

Not everyone likes to close the bath with various skins. A simple way to solve the problem is to purchase a bath with beautiful legs and finished, presentable sides. But it also happens that it is not possible to hide sewer and plumbing structures.
Acrylic baths are usually accompanied by ready-made screens that cover the space under them to a minimum. The design features of such baths differ from their cast-iron / steel counterparts in that they do not form large voids under them.
The space under the bathroom can be used more efficiently, having built a screen with shelves or sliding doors under it. So, you can store detergents under the bathroom, for example.
 Mosaic bath screen
Among other things, these skins help to improve sanitary conditions in the bathroom . Thanks to them, on the floor under the bathroom does not accumulate moisture, provoking the reproduction of bacteria and fungi.
Modern design developments provide an opportunity to decorate the bath in an original and beautiful way. With their help, you can create a simulation of, for example, the underwater world or an aquarium.
Materials used for linings

In a damp bathroom environment it is important to use moisture-resistant materials. There are plenty of them on the market today. Among this set can be distinguished:
- brick;
- plasterboard;
- MDF / OSB;
- plastic;
- installation the complete set consisting of a frame and sliding doors.
All materials, except for plastic and the finished set of the screen, should be finished, for example, with plaster, tiles, wallpaper, etc. after installation.
Some requirements for constructions

The main requirements for the material:
- To the main sewer and plumbing components there should be a revision opening, closed by a door / plug.
- The bathroom floor must be hermetically insulated from the rest of the bathroom. This is the only way to avoid the formation of dampness, and as a result, fungi and mold under the bath.
- The bath should not rest on the screen, because it is a non-load bearing structure.
- In order for the screen not to interfere with the legs in it, you need to organize a notch made under a slope.
If you have enough free space under the bathroom, make a screen with a drawer or a small cabinet in which you can store detergents and household chemicals.
Species

The screens are:
- deaf;
- with a niche for legs;
- with sliding doors;
- with a revision door for troubleshooting plumbing.
When choosing a screen, the peculiarities of the room design, personal preferences of the owner of a house / apartment, and financial possibilities are taken into account.
Of the dry

Drywall does not load the floor, unlike heavy brickwork. It is easy to handle. The design of drywall can last from 20 to 25 years. If necessary, the screen of the drywall can be repaired by repairing the damage with putty or by replacing the entire fragment.
For these purposes, you must use moisture-resistant drywall. Due to its moderate vapor permeability, the drywall screen maintains an optimum level of humidity.
Work with the pump does not require any special equipment. Everything you need is usually in the composition of the home set of tools.
Marking and assembling the frame

In the process of calculating the structure, you should take into account access to sanitary fixtures. The inspection door can be closed with a plastic sash. To use the bath more comfortable, the lower part of the screen should be shifted under the bath by 10-12 cm. The screen is not a supporting structure, as mentioned above, so it should not hold onto the weight of the bath. The only thing is if the design provides shelves or cabinets, then the frame must withstand their weight along with the filling.
First you need to install the support frame. The most affordable option is a system assembled from a pre-treated assembly bar. Installation of a metal profile will cost you more, however, given its high operational properties, the costs justify the investment.
Whichever way you decide to install the screen from the drywall, dowel fasteners will be used as the fastener.Giprok is fixed with metal screws.
 Bath frame
On the wall that adjoins the side of the bath, apply markup on which the side profile will be installed. If you use tiles as a lining, then indent this extra. It should be equal to the total thickness of the tile and panel. Mark the length of the bottom of the screen on the floor. For markings to be accurate, use a plumb or construction level.
The grooves for the legs are usually formed in the center of the bath at the bottom of the screen. The middle of the floor profile must be made U-shaped configuration. To do this, you need to install vertical racks with an appropriate slope.
 Cladding of the bath screen
Before installing the drywall, install the profile in accordance with with markup. First fix the UD profile. At the same time the lower part of it is put on the moisture-resistant sealant. Fix the vertical CD profile to the support profile with an equal interval of 60 cm. Where the revision door is to be installed, install additional racks.
Additional Recommendations

To cut moisture-proof gypsum, use a handsaw with fine teeth. So, you get a clean cut. In the manufacture of the screen, it is important to ensure indentation from the side of the bath, equal to 10 mm deep. Thus, screen contact with water will be excluded.
If the wall thickness of the frame is 0.55 mm, then standard self-tapping screws for metal should be used to fix the plasterboard. If the profile wall thickness is equal to 0.8 mm, then it is better to use fasteners with a drill bit.
Drywall can be trimmed with tiles, decorative plaster, film decor or moisture-proof wallpaper.
Curvilinear construction of plasterboard

Before you make the frame, you need to give the profile a semicircular shape. To do this, make cuts on the metal profile and bend it. Make two such arcs. Secure them with screws. Then install the vertical slats, which will give the frame rigidity.
The frame should be installed on a certain indentation from the side of the bath: thickness is gyro + tile thickness + thickness of glue.
In order for drywall to get the desired shape, for example, to become arcuate, it needs to be slightly moistened and gradually bent. The tile must be laid on elastic glue, leveling the distance between the plates with crosses during the laying.
From MDF or OSB of plates

The framework manufacturing principle is indistinguishable from his fellow, provided for the installation of the drywall. The only cancellation is the need to install additional ventilation slots, located in the opposite side of the revision door. This should be a small slot, closed with a plastic grill. Another option is to make neat round holes arranged in random order.
Brick

The space under the bathroom can be closed with a brick wall lined with tiles. Cope with the masonry can every person who knows how to handle a home tool. Laying should be done in 1/4 or 1/2 of the brick on the cement-sand mortar in a ratio of 1: 3.
Before laying, you need to mark the position of the screen, taking into account the tiling. Ultimately, the side of the bath should be flush with the screen. On the edge of the bath, lower the plumb line, and then mark the line from which the thickness of the tile and the masonry mortar will be deposited inside the bath. In accordance with this guide, you need to make a brickwork. In addition, you should repel the vertical lines of the screen construction on opposite walls of the bathroom.
If at the top of the screen bricks will not fit entirely, they will need to be adjusted in height and thickness.
With a niche for legs

If you want to make a structure with a niche for legs in the laying of the lower row (or several rows), then you will have to leave an opening in the masonry, overlapping steel strips having a thickness of up to 6 mm. So, retention of bricks of the top row will be provided.
A niche can be made with a sloping wall. However, such a laying is technically more difficult. To do this, mark on the floor the lower contour of the niche. Set aside the height and depth of the niche on paper. Connecting the dots, you get a pattern. On it will need to cut the brick for the side walls. Cut brick can grinder or diamond wheel. The laying of the inclined wall is performed with the dressing of bricks with side walls and between themselves.
The upper row of brick walls with a slope must be brought to the level of the horizontal row, and then cut with a grinder. You should get a horizontal. Further process of laying is similar to the previous method.
Installing the revision door

After completing the masonry, install the revision door.To simplify the task, you can purchase one of the plastic in the hardware store. Another option is to independently manufacture it from a galvanized / aluminum profile, which can then be sheathed with plastic panels or other otelochnye materials.
Plastic

To manufacture the frame, you will need to install a bar or metal profile, and then install the starting profile, on which the plastic paneling will be mounted.
To make the construction more rigid, you need to install profiles in the middle of the screen. This should be taken into account, because the paneling can be deformed and lose its shape due to the smallest mechanical loads.
The lower profile must be screwed to the floor and treated with a sealant. Plastic batten should be cut into strips equal to the height of the screen. They need to get the edges in the starting profile. So, gradually the entire screen will be filled with clapboard. In the place of installation of the revision door you need to cut a rectangle. Then you can install the door, which can be purchased in the same store as the wall paneling.
Installing a sliding screen

If you need additional shelves, you can install them under the bathroom. If you wish to close them from prying eyes, install a sliding screen. It can be made so that the shelves open vertically.
Vertical structures are fixed on gas lifts or other fixtures used in furniture production.
If you have to choose one of the models of standard sliding screens and install it under the bathroom, then we suggest you familiarize yourself with some features of the products of this plan. The standard screen length is 1.5 and 1.7 m. Versatile designs can be reduced in length. The height they are - 50.6 cm, 55 and 56 cm. The designs are equipped with adjustable legs.
 Sliding screen
A simple version of the sliding screen is a finished construction that consists of aluminum / plastic frames with two panels. More sophisticated models are additionally equipped with drawers with shelves for the storage of detergents and household chemicals. Panels are glass or Plexiglas.
If you need to install a bath screen in a small room, you can install a mirror structure to visualize the increase in space.
The bath screen should be selected depending on the needs and features of the interior design. Everything depends on the budget and personal preferences. If you still have questions on the topic, then ask them to our expert. If you want to share personal experience, write comments to the article.
Video
Photo
 Openwork
 Shutter-screen
 Grid
Grid
 Sliding
 Original screen
 Screen with a notch for the legs
 Under the bath with the door
 Tiled
Tiled
 From the mosaic
 Wooden screen
Search
Related Articles
Installation of basement siding do it yourself
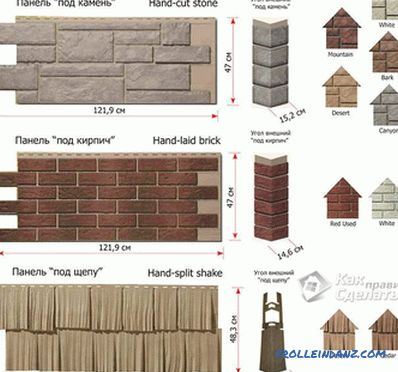
When facing the facades of private residential buildings, special attention should be paid to their basement, the decoration of which is used not only for decorative purposes, but also helps protect...
Finishing a wooden house inside and outside with their own hands (photos and video)
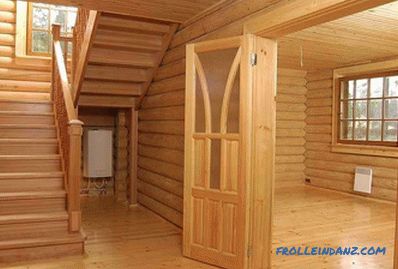
After you have made the foundation, erected the walls and installed the roof, you still need to solve a problem such as finishing a wooden house inside and outside. If you built your own wooden ho...
Bottom connection of radiators of heating - the scheme of the lower connection of a radiator
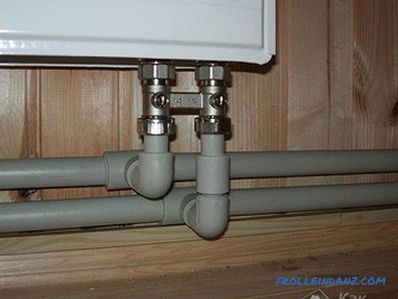
What should I do when the heating system spoils the look of the room? If you can also hide cast iron batteries behind the screen, or install more modern ones - bimetallic or steel ones, instead of t...
How to remove paint from a pipe
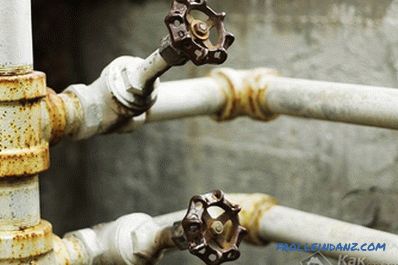
A good owner and a master of his craft will not raise a hand to put fresh building materials on top of old ones. Any paints, including oil or pentaphthalic PF-115, so widely known since Soviet times...
where to begin? Preparation before starting work, diagrams (video)
Balcony cladding with clapboard is by far the most popular and optimal finish for this part of the apartment. This is due to the fact that the material is environmentally friendly, has sound and th...