To ensure proper rest in a country house or in the country build baths or saunas. The most important element in the construction of the bath is the floor. Tree is traditionally considered to be the best material for flooring in a bath. It is an environmentally friendly material, easily processed, has a low thermal conductivity. When heated, the tree emits healthy phytoncides and pleasant aroma.
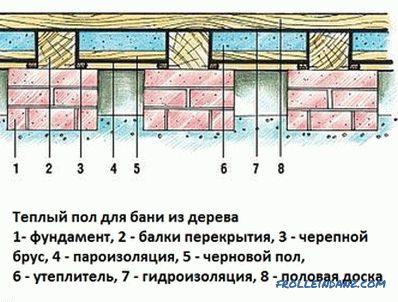
The scheme of the warmed wooden floor in the bath.
Floor coverings in the bath are exposed to moisture and large temperature drops. From the quality and competent device wooden floor in the bath depends on its service life and comfort of bath procedures.
Wooden floors in the bath are of 2 types: leaking and solid (not leaking). Sometimes they arrange concrete floors with trellised wooden flooring.
Preparation Stage
Before the device of the floor, it is necessary to calculate its area, prepare the necessary tools and material. To create the floor you will need:
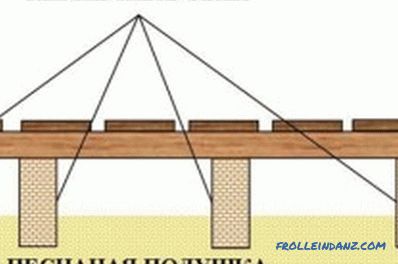
Scheme of the leaking floor in the bath.
- wood saw;
- carpenter's ax;
- level;
- hammer;
- galvanized nails ;
- bar 50x150 mm (for logs) or logs with a diameter of at least 15 cm;
- edged boards 40x150 mm (for floor)
- unedged boards for subfloor;
- floorboards grooved (for solid floor);
- expanded clay;
- waterproofing film;
- sewer pipe with a diameter of about 110 mm;
- crushed stone ;
- clay;
- antiseptic solution.
Having prepared the required material and tool, choosing the type of floor, proceed to its construction.
Floor leaking
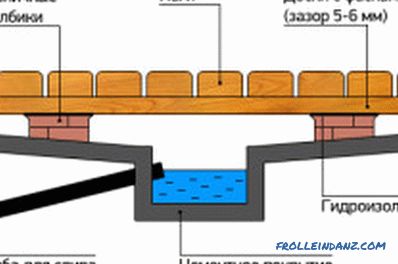
Scheme of the leaking floor with drain.
This is the simplest type of floor, water from its surface between the slits of the boards flows directly into the ground under the bath. The device of a similar floor costs less and is less labor-intensive. Its main disadvantage is that its surface is cold. To build such a floor, it is necessary:
- Align and clean the surface of the soil inside the foundation.
- Select the soil before the sand, if it is not possible to fill in and compact the sand layer with a height of about 15 cm.
- Mark the installation site of the lag.
- With brick or concrete mortar, install supports under the logs, to the height of the foundation.
- Lay and compact the layer of crushed stone about 10 cm thick on the surface.
- Prepare logs on the floor width and lay on supports, put waterproofing of roofing material under the logs. The height of the lag should be at the level of the mortgage crown of the log house. Between the ends of the lag and the wall it is necessary to leave a ventilation gap of at least 3 cm. The horizontal installation of the lag is checked by level.
- According to the width of the room, planed boards are laid for laying on logs (they should not reach the walls about 2 cm from each side for ventilation of the underground).
- Prepared boards, galvanized with nails, are attached to the logs with a gap between their ends about 10 mm (for water drainage and ventilation).
- All wood products are pre-soaked with antiseptic.
Leaky wooden floor
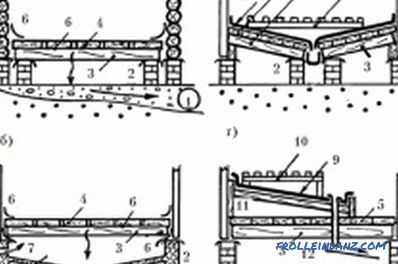
Types of floors in the bath:
a, b - leaking floors, in - leaking, g - inclined pallet.
1 - filter trench, 2 - foundation, 3 - logs covered with ruderoid, 4 - floor leaking, 5 - solid floor, 6 - waterproofing, 7 - concrete water collector,
8 - waterproofing, 9 - stainless steel tray, 10 - wooden grill, 11 - wooden frame for the pallet, 12 - gutter, water conduit.
Water that has fallen on the surface of this type of floor flows into a special hole (ladder) and into a water collector, and then is led out of the bath through the drain pipe. Its design provides for the presence of a black, insulated floor. The device of a continuous wooden floor is more difficult and costs more.
The procedure for creating a floor in a bath is as follows:
- A layer of soil is removed inside the foundation. A layer (about 20 cm) of sand is filled and compacted.
- Mark the installation location of the lag. The support posts are installed under the logs (to the height of the bath foundation).
- A layer of gravel about 10 cm thick is laid on the sand.
- Lags are installed on the supports (must be slightly higher than the inset) with a slope of about 10 ° to the outer wall.
- A drainage chute made of concrete or a plastic pipe cut in half with a diameter of at least 250 mm is created at the foundation of the outer wall. The chute is installed flush with the backfill surface.
- A bar of 50x50 mm is nailed to the bottom of the lag (from 2 sides).
- A rough floor is laid on the bars of uncut boards.
- The surface of the subfloor is covered with a waterproofing film, on which the insulation (expanded clay) is poured, to the height of the lag.
- The claydite surface is covered with a waterproofing material.
- A drainage pipe is attached to one edge of the gutter, through which water will be drained outside the bath. The second end of the gutter is closed plate.
- Boards are laid with a tongue into the room and fastened (with galvanized nails) with a slope towards the receiving channel. For the organization of the ventilation of the subfloor, a gap of about 10 mm is left from the walls to the end of the boards, along which water will flow into the chute-pit and then out.
- A plinth is installed on the 3 sides of the walls, covering the gap between the boards and the wall of the log house. The water drain is left open.
- All wood products are antiseptic before installation.
As an option, the surface under the solid floor can be concreted, and a concrete pit will be arranged in it to collect and remove water from the bath.
A bath in which the construction of the wooden floor is done correctly dries quickly after the bath procedures.
There will be no dampness, mold or unpleasant smell in the space under the floor.
Thus, it is possible to make the floor in the bath in different ways with our own hands.
Didn't find the answer in the article? More information on the topic:
