Many people do not even suspect that all the necessary measures for the installation of electrical wiring in the apartment can be done independently, without resorting to the services of professionals. To do this, you first need to get a basic knowledge of the operation and connection of devices, then draw up a diagram, assemble a shield on it and then mount the wiring. It is in this order that we will consider the entire course of independent performance of work.
Existing wiring diagrams
Consider 3 wiring diagrams.
- Radiation.
- Looping.
- Mixed.
 Beam wiring Beam wiring | The photo shows the radial scheme. The conductor enters the junction box and a separate line goes to each outlet. The disadvantage of such a system is the high consumption of cable, but it is the most reliable. |
 Serial connection Serial connection | Now consider what is called looping. In this case, all the sockets of the room are connected in parallel, with the result that a large saving of materials is achieved. |
 In order to avoid problems later, all connections must be reliable In order to avoid problems later, all connections must be reliable | This is where the advantages end. The reliability of the circuit depends entirely on how firmly the conductor is connected. |
 The scheme is unreliable, so it’s best to abandon it The scheme is unreliable, so it’s best to abandon it | Essentially, nowhere but in the household does this scheme apply. At any object where a serious check of the installation of the wiring will be performed, no one will issue a permission to operate the power network, because it is prohibited to tear the protective conductor. As a result, it may turn out that the grounding will only be on the first outlet, and the rest simply will not be connected. |
 You can find a compromise solution You can find a compromise solution | B As a last resort, it is possible for the organization of grounding to connect the protective conductor on the radial pattern. It is important to note that the total energy consumption of all the sockets included in the chain should not exceed 16 A (these are the parameters for many modern sockets). For example: if the current consumption of the second and third sockets is 16 A, then at the contacts of the first outlet the load will reach 32 A. If it is under the same load, then the current will reach 48 A. In this case, the contacts will not withstand maximum permissible 3 times. |
 The conductor can be bent and inserted into the device The conductor can be bent and inserted into the device | Somewhat increase the reliability of the system can be if the conductor does not tear, and run into the socket loop. |
 Consider installing a mixed system Consider installing a mixed system | Combined The system will be the best in terms of price / quality ratio. In this case, both the beam circuit and the parallel connection will be involved. |
 There are several groups of sockets There are several groups of sockets | Consider on the example of a room in which there are several groups of sockets located on different walls. |
 Each group has a cable Each group has a cable | With this connection to each group of sockets from the junction box is a separate conductor (beam), but each point in the group is connected in parallel. Conductor does not tear, and do a loop. |
Methods for connecting conductors appliances, nor their power. In connection with this, the norms that are currently clearly reflected in the EMP (Rules for electrical installations) are also changing.
 With the aid of such a sleeve, pressure testing is performed With the aid of such a sleeve, pressure testing is performed | In junction boxes, conductors need to be connected in some way. For crimping, you can use the liner. |
 We will use the manual press We will use the manual press | For the work will need to purchase or rent a manual press. |
 Welded wire Welded wire | Also for reliable connections used are welding. The wire is connected with a twist, but at its ends you can see a drop - this is the place of welding. Another copper wire can be soldered, but if the junction box is installed under the ceiling, then it will be extremely inconvenient to work in such conditions. |
 Screw clamp Screw clamp | Screws are allowed clamps, especially in cases where connections are made of conductors from different metals. |
 Tip for multicore wires Tip for multicore wires | Should take into account that this type of connection without the use of a special tip is not suitable for stranded wires.Also once a year it is necessary to tighten the screws. |
 Clamp Vago Clamp Vago | Also, Vago terminal blocks are used. Among electricians there is no consensus about their reliability. |
 Another type of clips Another type of clips | Also used PPE terminals and the like. Such a connection is better not to use when connecting power lines, and use only when installing lighting. |
 Such a connection is not allowed to do Such a connection is not allowed to do | Ordinary twisting is prohibited. |
Welding of conductors
Since the most reliable joint is welding of twists, more attention should be paid to this.
 Got to the terminal box Got to the terminal box | Distributive the box is fixed on the ceiling and several groups of wires are inserted into it. Our goal is to connect them securely. In the one where there are many wires - the power part, and in the other wiring for lighting. |
 We will use the construction knife We will use the construction knife | For Work will require tools:
|
 You also need the side cutters You also need the side cutters |
|
 Passatii will be needed Passatii will be needed |
|
 Stripper Stripper |
|
 With this tool we will hold the wires With this tool we will hold the wires |
|
 On a white electrical tape or masking tape it is convenient to write On a white electrical tape or masking tape it is convenient to write | Leave a cable reserve of about 20 cm. In order not to get confused later, a white electrical tape is wound at each end - it is convenient to sign on it. |
 Cut the insulation Cut the insulation | Now with a knife for stripping the sheath is cut. We do this with each cable, and only then the sheath is cut off. Such actions will protect the insulation of the wire from accidentally damaging it with a knife. |
 Surplus can be bite off with side cutters Surplus can be bite off with side cutters | Insulation bite off side cutters. |
 Now remove the insulation from the wires Now remove the insulation from the wires | Wires will be distributed in groups (or color). Insulation is removed from the wires by a stripper (about 4–5 cm). |
 Twisted wiring Twisted wiring | Now running twist. |
 Spread the wires into groups Spread the wires into groups | All three groups of wires are distributed and twisted. |
 Welding machine Welding machine | Now use this welding machine. |
 Welding is underway Welding is underway | Perform welding need to work in special glasses. In our case, they were included. |
 Insulation perform heat shrinkable Insulation perform heat shrinkable | For insulation took advantage of shrinking. |
 We use the construction dryer We use the construction dryer | This tube must be heated so that it crimps the wire. We did this with the help of a building dryer. It remains to put the wires in the box, and you can start working with other cables. |
If you doubt the correctness of the installation, welding can be performed after inspection.
Let's make the circuit
The very first thing you need to figure out is whether it is possible to connect the ground. The fact is that in the houses of the old buildings, grounding is not provided. It is possible that the power supply system will be reconstructed soon and it will be possible to connect the ground wire. In this case, it is better to wire the three-core wire, and connect the grounding at the first opportunity that arises. Of course, if the house is very old and will soon be demolished (or no one will ever deal with it), then there is no need to spend money on a more expensive cable. Take the right decision will help professional advice.
Video: where to get the grounding in the electrical panel on the floor
Now let's proceed directly to drawing up a circuit. To do this, you need to find out some points:
- What is the power of the dedicated line.
- How many rooms in the apartment.
- How many lamps will be in each room, as well as their location.
- Where the most powerful consumers will be connected.
As a visual example, we will use a ready-made simple wiring diagram in a one-room apartment.
 Wiring plan for one-room apartment
The standard one-room apartment has:
- Hallway.
- Bathroom (combined or separate).
- Kitchen.
- Hall (or a bedroom - for whom it is more convenient to call it).
Now let's take a closer look at the existing scheme, simultaneously discussing what can be changed in it.
- Most often, the electric meter is installed in the common corridor, so be it in our case.
- The apartment included 3 wires - phase , zero and ground.
- The wiring is divided into 2 circuits through automatic switches - the first is the hall and the hall, and the second is the bathroom and the kitchen. Separation is specifically done so as not to get lost in the existing scheme. In fact, there should be more circuits - at least 4 for sockets and as much for lighting. It is clear that this will lead to additional costs, but it is worth it. For example, if a machine gun was knocked out in the hall, then there will still be light in the hallway. We will discuss the switchboard device a little later.
Hall
- Its arrangement is a matter of taste and preference of the owner. If there is only 1 lamp, then it remains only to determine its position. Often installed additional lighting near the closet or directly near the door. In this case, you need to take care to designate it in the figure. You will need one more switch or you can install a paired one instead of a single switch.
- 2 sockets (more convenient to get welded) for such a small room is usually more than enough. Curling irons, hair dryers and similar electrical appliances are constant companions of women. If your wife or daughter prefers to do her own toilet in the hallway, make sure that the socket is not far from the mirror, otherwise you will find out from them whether you have even hands.
Bathroom
- In the toilet and bathroom, 1 light is shown. Often, the bathroom is illuminated mirror, so you can add another branch. Since it is extremely undesirable to install a switch in a wet room (even waterproof), you need to take care of this at the design stage. Sometimes you can find an installed three-button switch that will control one light in the toilet and two in the bathroom, but in fact this is not the best option, since the keys are very narrow and you can accidentally overshoot by turning off the light in the wrong place. The best option is single-key for a toilet, and double-key for a bath.
- If a washing machine or electric towel warmer is installed in the bathroom, then a waterproof socket will be needed.
Kitchen
- As for lighting, there is often a need to install additional sources above the dining, chopping table, and also above the sink, because where do not turn around the center of the chandelier, everywhere you will create a shadow.
- If a fan is installed in the ventilation duct, it will be very convenient to turn it on, being close to the stove.
- Sockets in the kitchen is not enough. Hood, air conditioner, refrigerator, microwave, TV, receiver, electric grinder, blender, dishwasher, vacuum cleaner, phone charger ... This is a short list of what needs to be powered. It is also necessary to consider the location of the sockets (only not near the sink), so that they are convenient to use.
Hall
- With sockets it seems everything is clear - the principle is the same as for the kitchen.
- The hall lighting is usually carried out by one large chandelier, but since in a one-room apartment this room turns into a bedroom at night, it is necessary to take care of the sconce or install additional sockets for floor lamps or table lamps near the bed.
- Although we are discussing the wiring device, it is worth mentioning that during the installation work, you can (not only with the power wire) put a cable into the TV gate, and bring it out to the place where the TV will be installed.
These rules will help you to make a scheme for an apartment with more rooms.
 Wiring in a three-room apartment
How to choose a wire?
Because aluminum conductor can not be used, we will focus on copper. A large assortment can be confusing, so use a specific recommendation - you need to buy certified products. As for the choice between mono-core and stranded conductor, this is already a matter of convenience.
A large role is played by the conductor cross section. You can sum up the power consumption of the devices and calculate the required conductor cross-section or have some margin using the standard scheme:
- To enter and to the most powerful consumers - 4 mm 2 .
- To power outlets - 2.5 mm 2 .
- Chandeliers and lamps (as well as sockets to which low-current consumers will be connected (for example, only a TV or a desk lamp)) - 1.5 mm 2 .
This is the approach used by professional electricians. With electricity, jokes are bad, so it's best to be safe.
But this is not all yet - we will determine the type based on the labeling. For example, the cable VVGNG can be laid directly into the gate, without pulling through the corrugation, while VVGNG-LS is already intended for open wiring on the ceiling or wall, which, for example, will later be covered with plasterboard.
On the example of cable VVGng-LS 3 * 2.5 we can understand the marking.
- If the very first letter A, then this cable does not suit us, since it has aluminum conductors.
- The marking of copper cables starts with the letter B. This means that the outer sheath is made of PVC.
- The second letter B means that the overall insulation of the conductors is also made of polyvinyl chloride.
- The third letter D means that the conductor is not protected by an additional protective cover (in our case it is not needed).
- ng - non-flammable insulation.
- The next indicator is especially desirable - LS. These 2 letters indicate a low level of smoke. That is, even during a fire, such insulation will not emit smoke.
- 3 * 2.5 - the first digit indicates the number of cores, and the second one means that each of them has a cross section of 2.5 mm 2 .
Having made the scheme and having decided on the type and section of the cable, it is necessary to calculate how much it will be needed, taking into account the length of the ends that will remain in the junction boxes.
Laying the cable in the groove
We’ll just make a reservation that walling in a panel house is fraught with unpleasant consequences, starting with heavy fines and costly elimination, right up to bringing the house to an emergency condition. Here and communication will not help avoid the revenge of neighbors. Is there a way out? In some cases, shallow vertical gouging is allowed, but it is better to fix the wire, and then plaster the wall. It is unprofitable, because the area of the room decreases? Yes, it will decrease, but very slightly - by 1 cm on each side, but there are no problems with the law and its neighbors. In brick houses there are no such restrictions, but caution must also be exercised, especially with floor slabs.
Now move the drawing to the walls.
- Mark the single level of the location of the sockets and the places where the switches will be installed.
- From each point, draw a vertical line to where the junction box will be installed.
- Verticality is better to check the level. For the work of the wiring itself, it does not matter, but it will help not to guess where it is laid, when it will be necessary to drill the wall in order to fix something on it.
- For the same reason, it is better not to disturb the horizontal position of strobe.
- For podozetnikov cut holes with a crown installed in the drill (or use a punch in the drilling mode).
- For round junction boxes, you can cut holes with a crown of a larger diameter, and for square products you will have to hammer in a perforator.
- The most convenient way for cutting a strobe is to use a wall chaser, with a vacuum cleaner connected to it - there will be almost no dust. If you just cut the grinder with a disc on the concrete, there will be a lot of dust, which will lead to failure of the appliance, once inside it.
- In the hallway, the tips from all rooms converge at one point - the place where the switchboard will be installed.
- It is better to lay the cable in a corrugation, as a result of which it can be replaced at any time without disturbing the integrity of the wall. Do not forget about the allowance of 15 cm on each side.
- First, the cable is fastened in the wall, stretched into the corrugation, and then the flush-mounted panels and junction box are fixed with the gypsum solution.
In order to save the conductors, professionals often mount a corrugation in the wall, install electrical boxes and junction boxes, and then draw the cable.
- When mounting podrozetnikov need to check their position - the holes for the screws should be in the same horizontal plane. Since we use a quick-setting mortar for their installation, we can draw a horizontal line through the center of the mounting hole, which will serve as a guide.
- If a group of sockets is installed, then plug-in sockets that are connected to each other are purchased for their installation.
- Wire connections are made according to the diagram. Then connect sockets and switches.
From all rooms, the cables converge in one place - where the electrical panel will be installed.
How to dial an electric panel
Before you type an electric panel, you need to purchase a suitable size that will fit all devices. Consider how to complete and connect.
 Picked up all the necessary Picked up all the necessary | This shield we will assemble from budget components. To begin with, we will decompose all components along the panel as they will be subsequently installed. There is a voltage relay, diffrele and baggers. |
 You will also need 2 tires You will also need 2 tires | Also side we install 2 tires - one zero, and the second for grounding. |
 Voltage relays Voltage relays | Purchased time-tested voltage relay Bison. |
 He has powerful terminal blocks He has powerful terminal blocks | One Of its undeniable advantages is the presence of powerful terminal blocks in which you can securely clamp the wires. |
 Automatic and UZO CHINT Automatic and UZO CHINT | Automatic acquired firm CHINT. This purely Chinese product is used for the domestic market of China, so reliability is beyond doubt. |
 Guard in exploded state Guard in exploded state | We analyze our box so that it is convenient to work with him. |
 The devices are installed The devices are installed | Now you can do it installation of instruments. |
 By the handle of the screwdriver, we bend the wire By the handle of the screwdriver, we bend the wire | Install all the components, you need to connect them together. It is expensive to use a bus, therefore we will make an "accordion" from copper wire Ø4 mm 2 . Since the diameter of the screwdriver handle fits perfectly, rounding the wire along it, its ends will clearly fall into the holes of the machines. |
 Made a loop Made a loop | It turned out a loop in which the end of the wire is not cut, but bent. Isolation is removed at the entry points into the machine. |
 There was some kind of accordion There was some kind of accordion | Here This was the "harmonica". |
 Each device was assigned a phase Each device was assigned a phase | It remains to insert it and crimp the terminals. |
 To keep the harmonic from interfering, the loops are bent inward To keep the harmonic from interfering, the loops are bent inward | Since the cover will be installed on top, so that it does not rest on the wires, they need to be bent inwards. |
 Prepared wire for connection of RCD Prepared wire for connection of RCD | In order to connect the voltage relay to the diffrell we will prepare a piece of the same wire. At its ends we make a kind of loop, bending the wire. This will increase by 2 times the area of contact with the device. |
 Black wire connected zero Black wire connected zero | Similar other conductors are connected in this way. |
 Voltage 232 Volts Voltage 232 Volts | It’s time checks. Connecting the voltage relay to the network, check the voltage on each machine. |
 After tripping of the RCD After tripping of the RCD | After pressing on the RCD test button, the voltage should be absent, which will be evidence that everything is assembled correctly. |
After installing the switchboard, cable connections from all the rooms are made. In order not to guess later, automatons need to be signed. They can be numbered, and on the inside of the cover you can write where it is connected.
It remains to seal the grooves (or to fill the screed if the wiring is laid on the floor), and to perform repairs in the room.
Video: protection against high and low voltage
Search
Related Articles
How to make plywood in production with the requirements?
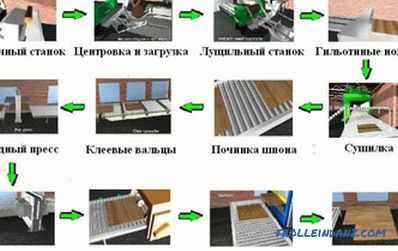
A variety of materials are used for construction today; they differ not only in appearance but also in their properties. One of the current is plywood, manufactured in the form of sheets. Plywood s...
Heated floor under the tile - which one is better to choose
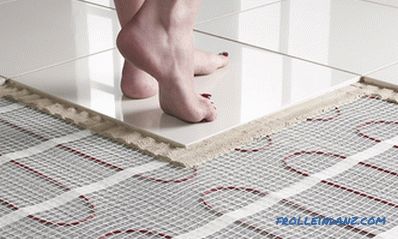
Tile is one of the universal options for flooring, but often a significant drawback hinders your choice of it - if in summer a pleasant coolness comes from the tile, then in winter it is at least u...
Aerated concrete blocks disadvantages and their characteristics + Video
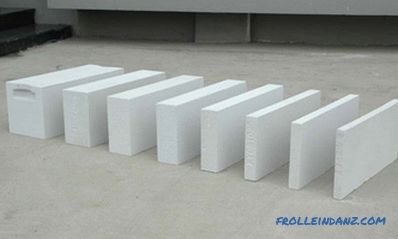
Aerated concrete blocks, the disadvantages and characteristics of which we consider in this article, are becoming more and more popular every year. Many developers choose it as a wall material for t...
Water well drilling - independent water well drilling

Now there are many different technologies that make life easier for a person, and ... his wallet. But, for the reason that the wallet is not heavy anyway, then such a topic as well drilling itself i...
Screed on a wooden floor with their own hands
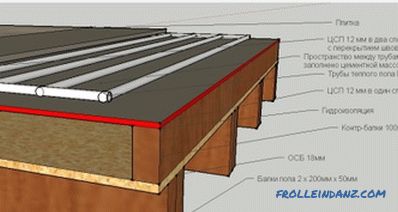
It used to be very prestigious to have a wooden floor at home. Of course, after a certain time they lose their attractiveness, and, accordingly, the owners come to the conclusion to replace them. I...