Laminate flooring today is one of the most popular flooring materials. It is used in both residential and commercial establishments. In order to lay the laminate on the floor, there must be a previously prepared base. This is necessary so that the floor should be well assembled and throughout its life, it will not lose its basic qualities.
")
Layout of the laminate.
The base under the laminate should be smooth, strong and rigid. These conditions need to be observed so that during the operation the castle system is not damaged. For example, if we lay laminate on a wooden floor without prior preparation, this is not recommended, since the plank floor may have significant height differences, some boards may sag, which is considered unacceptable.
Owners of apartments or houses, where the old floor is made of wood, often have a question about how to lay laminate on wooden floor and whether it can be done. Lay laminate on such a basis can be, most importantly - to carry out the correct preparatory work.
Features of a wooden floor
")
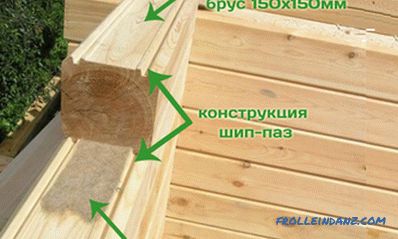
Construction of a wooden floor.
A wooden base is found quite often in premises of various purposes. To prepare it for subsequent use, it is necessary to examine it and, if there are defects, eliminate them.
The first thing to remember is that wood is an unstable material, with such processes as drying and drying. During such movement, gaps can form between the boards, which would entail an increase in the load on the locking system of the laminate.
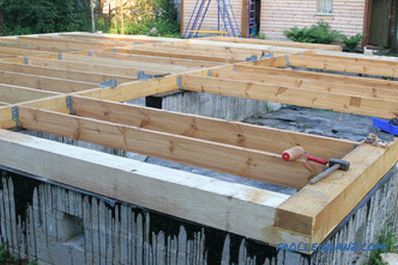
Second: it is necessary to examine not only the surface of the wooden floor, but also its design - beams, logs. If any defects are found, they must be eliminated, since they can further harm the floor covering. Next, we consider the main ways of preparing a wooden base, since the preparatory processes are fundamental in the work. If they are simply thrown away, then all the arrangement will come to naught.
Leveling using surface cycling
Tools:
- sandpaper;
- scraper machine;
- rubber spatula for embedding defects;
- manual plane;
- construction level.
")
Beacon alignment scheme for leveling the floor.
The cycling method is suitable if there are minor irregularities on the surface. The procedure is carried out with special equipment. Before you begin, you need to deepen all the nails to prevent damage to the equipment. The treated surface is checked by the building level for evenness.
After that it’s worth checking for cracks and chips, if any, they need to be fixed. To do this, use a special kind of putty for wood. After complete drying of the material, the surface is polished again.
This leveling process is quite noisy and dusty. All shavings and dust must be carefully removed before starting to lay laminate.
Leveling with sheet materials: features
Tools:
- hammer;
- saw;
- self-tapping screws;
- level;
- tape measure and pencil.
")
Floor leveling scheme with sheet materials.
It is enough just to level the wooden floor using plywood sheets or chipboard. In this case, you must follow some recommendations.
- The thickness of the sheet material must be at least 15 mm.
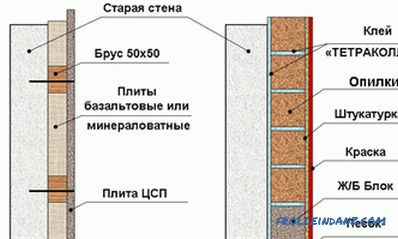
- Like other materials from wood, leaf is exposed to fungi, to prevent such an unpleasant moment, all sheets should be treated with linseed oil or a fungicide.
- Before laying the sheets, check the evenness of the construction log, if necessary, they can be adjusted by placing wedges under them.
- The lag is laid on the finished structure sheet material and secured with self-tapping screws.
Leveling with a wet screed
In order to make a screed on a wooden base, you must first strengthen the construction of the log and beams. It is necessary that the design withstand a sufficiently large weight of the concrete solution.
")
Floor leveling scheme with a wet screed.
The finished surface is ideal for laying laminate. The whole process is quite time-consuming, but the result will give the opportunity to exploit the laminate as long as possible. This is due to the immobility and practicality of the concrete layer.
It is possible to lay laminate on the prepared base without fear that something will happen to the new flooring.
With regard to the necessary tools and materials for the work on laying laminate, it is mainly:
- laminate (the number is calculated based on the floor space);
- substrate
- construction knife;
- adhesive tape;
- hammer;
- wooden block for tamping panels;
- plinth.
Selection of the substrate and its laying
When the wooden base is prepared, you can proceed with the laying of the laminate. First you need to expand the substrate, with which you can solve such moments:
- to eliminate small unevenness of the base,
- to increase floor insulation,
- to increase sound insulation.
")
Laying the laminate on the wooden floor.
As for the material from which the substrate is made, it can be different. The choice will depend largely on personal preferences, since they all meet the basic requirements that apply to them. The most popular materials from which the substrate is made are:
- polyethylene foam;
- natural cork;
- cork bitumen;
- high polyurethane density.
Substrates are produced both in rolls and in sheets.
Depending on the thickness of the substrate, it is butt or overlapped.
In order that in the process of laying laminate there were no problems with violation of its integrity, it is recommended that all joints and overlaps be joined with adhesive tape. The substrate is laid with a gap on the wall within 10 cm.
It is very important: you should not choose the substrate too thick or lay it in several layers, this can adversely affect the locking system of the laminate.
Laying the laminate
You can begin laying the laminate on the prepared substrate. To do the job well, you need to follow the established order.
The first row of laminate must begin to stack on the corner. During installation it is required to level the flooring against the wall.
It is important to know that when laying laminate on a wooden floor, panels should be mounted perpendicular to the location of the baseboard, so that a uniform load distribution can be achieved on the base.
")
Leveling for laying laminate on wooden floors.
There should be a gap around the perimeter of the room 0.8-1 cm between the wall and the laminate. Limiters should be installed to make limiters, for this purpose small remnants of wood or plastic will be suitable. The gap is necessary for the free movement of the laminate. When walking, it may slightly expand. If there is no such gap near the wall, it will rest directly on it, which can lead to the deformation of the entire floor covering.
If the last panel does not fit entirely in a row, it should be cut off. For this, the required size is measured and sawing is performed using the jigsaw.
It is necessary to stack the next row from half, i.e. the laminate panels are stacked in a checkerboard pattern. Inadmissible is the coincidence of the end seams in one place. The offset can be done on half the laminate board or 1/3 - it depends on personal wishes.
Laying of all subsequent rows is carried out by analogue of the first. To connect the locks of the rows together, you need to tamper panels. To do this, use a hammer and safety bar. Such a procedure should be carried out extremely carefully, so as not to damage the locking system.
Very often when laying the last row it is necessary to cut the panel along. To make the line smooth, it is worth making a markup. Unevenness of the cut will continue to be hidden under the plinth.
The final stage of laminate installation is the installation of the plinth. Before this, all wedges must be pulled out of the gaps. Observing simple recommendations, laying the laminate itself is quite simple.
Didn't find the answer in the article? More information on the topic:
Search
Related Articles
How to connect cast iron pipes - technology of connecting cast iron pipes with plastic

Cast iron pipes in sewage systems are rarely used today. But if you decide to use them, then you should know the method of their connection. This is what this article will be about. We will also tal...
How to caulk a log house: varieties of caulking material
To caulk a log house, like a log house, is required without fail. And this should be done regardless of the circumstances of whether or not the interior and exterior are made with insulation. But...
Laying the lag for the floor do it yourself: step by step instructions (video)
Wood is predominantly used for laying floors. Despite the fact that wooden structures are characterized by a short service life, environmental safety, affordable cost and low weight make this mater...
How to choose a chainsaw for the price and quality

For many of us, the word "chainsaw" is strongly associated with muscular lumberjacks, who take a powerful tool in their hands and playfully cut down thick trees. But a chainsaw can become an indispe...
properties, application, installation options (video)
Having got involved in building their own home, every person who wants to create a warm and cozy structure for himself and his family, at some point faces the problem of choosing insulation materia...