Hangers for outerwear are needed in any corridor both at home and apartment. They are an essential attribute of practicality and design. And this is especially true of narrow corridors, where there is very little space in order to install a complete locker.
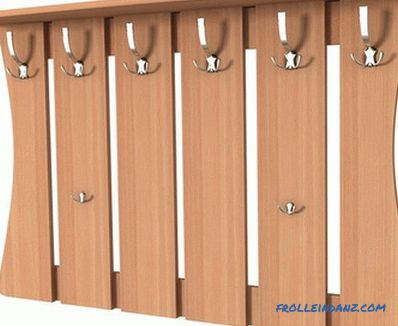
Figure 1. To build a wall hanger, use laminated particleboard 16 mm thick.
Today, designers offer a wealth of options for wall hangers - from the cheapest to the most expensive designs. But it will be much more profitable and more pleasant to build such an uncomplicated hanger with your own hands. Especially since it is not as difficult as you might first seem. How to make a coat hanger yourself? Consider some good options for corridor hangers.
The standard version of the wall hanger
Material and tools
First, we will write out in detail how to build a modern wooden hanger on which you can hang not only a coat, but also put caps and scarves. The wall construction will look like this in the end (Figure 1). Before work, immediately stock up on such tools and materials:

A drawing of a wall hanger.
- Laminated particleboard. You will need two pieces measuring 25 by 80 cm for the side slats. You can make them straight, not curly, as shown in the figure.
- 2 back planks 125 by 12 cm.
- 4 identical planks with dimensions of 18 by 80 cm for the main vertical inner walls.
- Shelf for caps measuring about 135 by 25-30 cm.
- Hammer.
- Building level and plumb.
- PVC edge for finishing chipboard edges.
- Electric jigsaw or sander.
- Ruler and pencil (chalk) for marking.
- Iron.
- Wood glue.
- Scissors for metal or construction knife.
- Soft rag.
- Sandpaper.
- 6 large and 2 small metal hooks (as shown).
- Self-tapping screws.
- Screwdriver or hammer drill.
- Dowel.
When choosing a base material (DSP), it is preferable to choose sheets with a thickness of at least 15 mm. In this case, the texture and color are selected in the hallway independently. Take into account that you can order slats of the required sizes, and you can cut them yourself with a jigsaw, then grind and paste over the tape, which is put on the glue and pressed against a hot iron.
Do-it-yourself decoration will take longer, but you will spend less money on it. Planks will be expensive to order, but at the same time, specialists will be able to make them very quickly and efficiently. But the clothes will never catch on with small errors on the wood.
Assembly and fastening

Wall hanger assembly scheme.
When the preparation of the main parts is completed, you can safely proceed to the assembly and fastening of the hanger. First, the markings are made on the wall. It is advisable to hang a ready-made construction on 4 screws: 2 at the top and 2 at the bottom along the edges. So it will be much safer to hold. When marking, be sure to use a tape measure and a pencil and check everything several times in order not to spoil anything.
After that, start assembling the structure. First connect the front vertical bars with the rear horizontal bars. It is very important to measure everything correctly, so that the distance between the vertical bars is the same. And only then everything can be mounted on the screws from the back.
After that, nails are nailed on top or on the same screws, a shelf for caps is put on. During operation, check all levels so that there are no errors. Otherwise the hanger will turn out to be a curve. Metal hooks are attached depending on what kind they are.
Next, you just have to fix the hanger on the wall. To do this, you can use screws or use hooks. In any case, the dowels are driven into the designated places, and then the fixing is carried out. After you hang the structure, once again make sure that it is reliable and even, then you can safely operate the hanger.
Non-standard versions of hangers
And now let's take a quick look at a few of the most simple, cheap options for hangers. Of course, the hangers will not be so big and beautiful, but in terms of their functionality they are quite good. Yes, and they look very interesting, as they are non-standard.
Hangers from metal devices
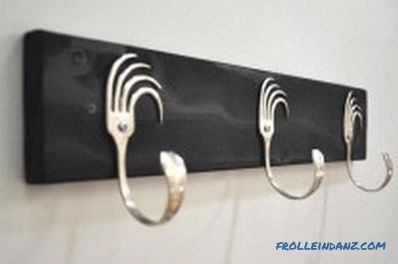
Figure 2. Forks can be used both aluminum and steel.
Clothes hanger from ordinary spoons or table forks. To do this, you will need only the required number of forks, dowels, nails and one wooden plank on which the forks will be attached, since they will not look so beautiful on the wall.
The handles of the forks must be bent so that they become hooks. At the same time, the teeth themselves can be left the same or also bend a little to the side according to the principle of a fan to make them decorative.Under the teeth themselves, holes are made under the nails.
Then markings are made on the wall on which the wooden sheet is mounted. And already on the canvas are marked places for forks, hooks, where they are then attached. Fastening occurs on ordinary nails. As a result, the finished version of the hanger will look something like this (Figure 2).
By the same principle it is possible to use, for example, not forks, but wrenches as hangers. This will be a kind of decoration. But for certain styles it will be quite appropriate. Only now bending such a wrench will be much harder (Figure 3).
Natural structures from knots
Figure 3. In order to bend the wrench easier, it must be preheated.
Another practically cost-free and original variant of coat hangers are ordinary wooden knots (Figure 4). To do this, you first need to choose the most unusual beautiful knots in the right quantity, and then prepare them carefully.
First, they need to be well cleaned of the lagging bark and dried (only in the shade, not in direct sunlight). It usually takes about a week or two. Then you need to soak them with a special primer from rotting wood with a light antiseptic, you can also use a drying oil. And after the liquid is completely absorbed, the knots should be varnished.
If you want this natural hanger to shine, then you need to apply several coats of varnish, it takes more time to dry, but you end up with a glossy finish. One or two layers give a light shine or haze on the tree, but the wood remains the same protected.
Hooks such mount directly to the wall is also not recommended, so as not to spoil the wallpaper. It is best to use a chipboard panel of the desired size, which must be hung on the wall, and already attached to the panel with nails knots. Such a clothes hanger looks good in the corridor if the walls are of cork, or on the wallpaper there are natural elements. Acceptable and combination with plain wallpaper.
Wooden shield with hooks
Figure 4. Twigs and knots can be painted in any color or just varnished.
The simplest solution is to use an ordinary wooden shield and purchased hooks, which can even be arranged randomly. In such a coat hanger you will not see great originality, but you will make it completely without problems - quickly and cheaply.
The size of the shield is selected, which is then cut from the tree. Edges are treated with sandpaper, after which they are finished with a special edge or carefully covered with several layers of paint or varnish. In the same case, if you chose a shield from untreated wood, it must also be thoroughly sanded, then brush off the dust and varnish or paint.
If you are not satisfied with the color of the shield, you can repaint it. The author's decoration with bronze or silver paint looks great, which gives the effect of antiquity and at the same time makes the hanger richer. And you can apply simple drawings in different colors. After drying, the surface is covered with a layer of varnish.
Next, mark with pencil a place of approximate fastenings of hooks and nail them. After that, you just need to attach the canvas to the wall with dowels and nails. As you already understood, even such a simple clothes hanger can be original.
So, how to make a hanger in the corridor for outerwear is now clear.
It can be concluded from all this that for any budget and corridor room there is no particular problem to choose a hanger. After all, materials can be not only expensive, but also practically free.
Now various stores of wall hangers are sold in stores. But they all have their standard sizes. But the self-made canvas, you can adjust yourself. In addition, a self-made hanger of this type can be attached not only to the wall, but also to the surface of the cabinet, which will help save space.
Didn't find the answer in the article? More information on the topic:
-
How to make your own chipboard shelves
Shelves made of chipboard with their own hands. Preparatory work and sawing chipboard. A complete description of the assembly process, as well as all its nuances. Completion of workflow.
