The interest of developers to such a roofing structure as a gable roof is fully justified. This type of roof is the most common in the world. It is especially popular with builders of private houses. Customers are attracted by the ease of construction (even non-professionals can do it quite well), as well as its durability and reliability.
")
The dual-pitch roof is popular because of the relative simplicity of the device, less consumption of materials, beautiful appearance.
But before you take up the design of this important building element, you need to figure out how to install the rasters of a dual-slope roof. To do this, it is necessary to make the appropriate calculations, select materials for cutting rafters and, observing the technological sequence of installing all the necessary components, make the installation of the structure.
Double-pitch roof, rafters and their varieties
")
Figure 1. Types of rafter systems.
All gable roofs are divided into 3 types according to the configuration:
- Symmetric. The most common type. The ridge is located exactly in the center of the facade.
- Asymmetric. The ridge is offset from the axis of the facade. Differs attractive appearance, but complicates the use as an attic of the space under the roof covering.
- The broken line. Good weather protection, convenient for organizing practical attic.
Duplex roofs may have different slope angles. In many ways, this indicator depends on the weather and climatic conditions of the area in which the house is being built. So, in areas where there is heavy rainfall, steep slopes are often chosen, while in regions with strong winds, many homeowners prefer very flat roofs. But on average, houses are most often built with an angle of inclination ranging from 35 ° to 45 °.
Any gable roof consists of the following structural elements made of coniferous wood:
")
Figure 2. Calculation of rafters for loads and angles of inclination.
- Mauerlat. It is a timber that is fastened with anchors along the entire perimeter of the bearing walls. It takes on the load of rafter legs.
- Truss foot. Usually a board with a cross section of 50x150 mm or 100x150 mm. Assembled forms a triangle, which is the main contour of the dual slope roof. To determine the frequency of installation of the legs, it is necessary to calculate the load of roofing components.
- Fad. The upper junction of the rafter legs of both ramps.
- Fillers. Part of the board, which is a continuation of the foot rafter. Forms the overhang of the roof.
- Lent. Timber laid horizontally on the bearing inner wall. It is used to evenly redistribute the load from the roof racks.
- Racks. A set of elements installed vertically. Through them, the inner bearing wall takes pressure from the ridge.
- Tightening. Designed to bond rafter legs to each other.
- Strutting. Board installed at a certain angle to transfer loads from the rafters to the bearing walls. Together with the puffs form trusses - durable, withstand heavy loads design.
- Crate. The system of bars perpendicularly attached to the rafters. It serves as the basis for mounting roofing.
")
Figure 3. Installation diagram of the power plate.
Depending on their design, the system of rafters are divided into hanging and flanged (Fig. 1).
Hanging rafters are a type of construction where rafter legs rest against the side walls of a building. Since in this case there is an effect of tearing the overlaps in different directions, it is leveled due to the rigid connection of the legs with puffs. In this quality can serve as floor beams. To completely eliminate the expansion, the elements of the puffs have to be installed both at the bottom and at the top. In this case, the upper puff is placed at a distance of at least 500 mm from the ridge point.
The rafters of the slant type differ from the hanging version by the presence of additional intermediate supports. They are located in the center of the attic. The supporting wall can also act as such a support beam if it is located in the center of the attic floor. In this case, such supports assume the load of the roof along the ridge line, evenly distributing the weight of the roof to the support points. Unlike hanging, suspended rafters are used at large distances between the outer walls of the building.
Calculation of rafters for loads and angles of inclination
")
Figure 4. Assembling the truss sections.
In order to achieve a durable and reliable home, it is necessary to make an accurate calculation of the rafter system. It is desirable that an experienced professional do it. But if there is no such expert, the calculation can be made independently. To do this, we need several simple formulas and rules (Fig. 2).
Corresponding calculations should be carried out only after choosing the roofing material. The fact is that not all coatings are suitable for one or another slope. So, at angles from 5 ° to 15 °, very few coatings are suitable, while slopes with a tilt angle of more than 45 ° can be mounted using almost any roofing material.
In addition to the constant loads generated by the weight of the beams and roof, temporary snow and wind loads fall on the roof. When calculating the snow cover pressure, it is assumed that for a slope with a slope of up to 25 °, the snow cover ratio is 1, with a slope of 25 ° to 60 ° - 0.7. Thus, if the snow load on the ground is, for example, 130 kg / m 2 , then on a slope with a slope of 25 ° -60 ° frozen water will press with a force of 130 x 0.7 = 91 kg / m 2 .
To determine the magnitude of the wind load, a special coefficient is used that reflects changes in pressure and wind force.
To calculate the total load, it is necessary to sum up the permanent and temporary loads. It should be remembered that the constant load consists of the specific weight per 1 m 2 of the sheathing, insulation, contra grating, roofing material. On average, constant pressure values range from 40 to 50 kg / m 2 .
Tools required for mounting rafters
")
Tools for installing rafters.
The tool kit for roofing should include:
- hacksaw;
- hammer;
- screwdriver;
- roofing knife;
- roofing scissors;
- spatula;
- measuring tape;
- piping cord;
- construction tape ;
- marker (pencil);
- set of self-tapping screws;
- metal corners;
- adhesive mixture based on mastic;
- assembly foam .
Installing rafters: the sequence of operations
The process of installing a truss system under the roof of a building can be divided into several stages.
At the first stage, the mauerlat is installed (Fig. 3). This technological element is mounted on the external walls with the help of fasteners-anchors. At the same time for greater structural strength, you should follow the tactics of the minimum number of connections.
")
The rafters pitch table.
Another requirement for the mauerlat being laid out is absolute flatness in the horizontal plane. From this property of the specified element depends on how accurately and accurately the entire roofing complex will be installed. To achieve such an evenness, you can use additional gaskets or cut off strongly protruding parts of the beams.
In the second stage, runs are selected for the rafters system. These structural elements in the form of bars connecting the trusses, make it possible to install each of the pairs separately from each other. Runs, the ends of which must be protected from moisture, are mounted at the highest points of the front floors. Attach them with metal corners and anchors.
When performing the third stage - assembling the rafter sections (Fig. 4) - the bars (boards) for the rafter legs are cut first, after which they are assembled and fastened to each other according to the construction project of the house and technological patterns.
Experienced specialists recommend collecting roof frames on the ground and only after that lift them to the place of assembly work.
Pre-ground assembly of the section is as follows. First of all, all components of the section are laid out in relation to each other as they stand already in the finished structure. All angles and gaps should be carefully adjusted. In the upper part, lining plates are attached to the rafters with nails or self-tapping screws;
At the last stage of the work, the rafter sections are installed on the upper floor of the house. From the horizontal position they are gradually raised to the vertical. Do this with a winch and safety cables. First, the section rises to the position of 30 ° to the horizon, then at an angle of 60 °. After the vertical fixation, the position of the section is checked using the building level. In conclusion, the entire system is fixed by fastening it to the power plate. Bolts and metal corners are used to fix the truss sections.
All the described calculations and installation operations, as it is easy to see, are not difficult. Nevertheless, if there is such an opportunity, it is still better to rely on the word and practical skills of an experienced specialist in preparing and executing this work.
Didn't find the answer in the article? More information on the topic:
-
")
Making a table in the bath with your own hands
It is easy to build a table in a bath with your own hands. Materials for the table use different, often take those that are on hand. Used wood has a number of requirements.
Search
Related Articles
How to choose a garden mesh for the fence

A fence is not only a construction for the safety of people, but also a stylistic addition that gives beauty and a finished look to a summer cottage. There is a huge variety of fences. However, choo...
How to choose an oil cooler - choice of oil heater

The beginning of cold weather makes you think about the issue of heating a home. In the case when central heating does not warm the rooms enough or the heating season has not come yet, it becomes ne...
Laying the floorboard with their own hands: expert advice, instruction (video)
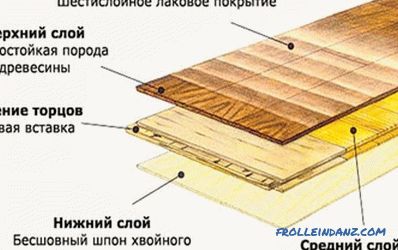
The choice of flooring is an important part of the repair of an apartment or house. It depends on him and what finishing materials will have to use to transform the entire living space. And the tre...
from mounting racks to installing stairs
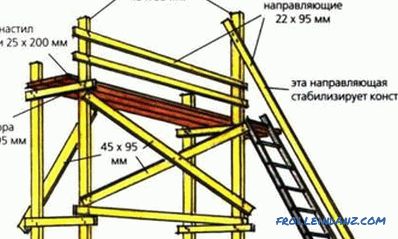
A variety of equipment is used during construction, but scaffolding is indispensable. They allow to carry out high-altitude work, workers are able to be in complete safety at the desired height. Th...
How to make a bathroom floor with their own hands
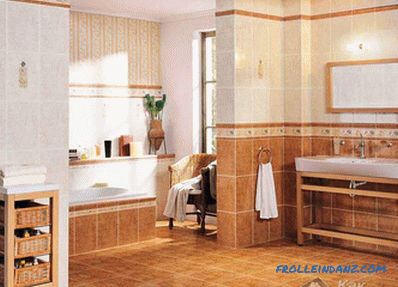
Bathroom floor plays one of the most important roles. This is due to the fact that this room is always high humidity. To prevent dampness and moisture from becoming your main enemy, it is important...