The choice of flooring is an important part of the repair of an apartment or house. It depends on him and what finishing materials will have to use to transform the entire living space. And the tree has always been considered one of the highest priority building materials, and therefore the laying of the floorboard with their own hands most often interests the home craftsmen.
")
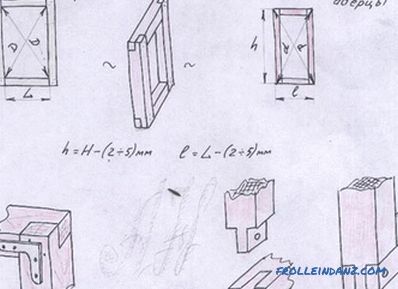
The device of the floorboard.
What basis is suitable for floorboard
This process takes no more than one working day in its duration and requires a minimum set of tools. In order to qualitatively lay the parquet, you will need:
- electric jigsaw or hacksaw with fine teeth;
- hammer;
- tamping plastic;
- restrictive wedges;
- metal clip or clamp;
- level;
- tape measure;
- square.
")
Parquet flooring using the floating method.
There are several options for laying parquet:
- Floating method - locking the connection of panels without the use of glue. This is the most common way. Used in rooms whose area does not exceed 60 square meters.
- The glue method is gluing the board to the base. Used rarely because of the complexity and duration of the process.
- Nailing a thick parquet to a rough floor.
- Laying on logs. Not very profitable due to the fact that the distance between the bars has to be done in 30-40 cm.
In most cases, a floating method of laying is used for the floorboard, so you should consider this technology. Before setting up the topcoat, you need to try and create a solid, dry, even base. It can be made in the form of a concrete screed or adjustable wooden floors. These two types are suitable for mounting floorboard.
Peculiarities of the base
Concrete screed can be given any height. It is of great importance in the repair of premises with low ceilings. In the case when you need to raise the floors above 5 cm, adjustable floors will be indispensable. They gather very quickly and besides, all communications can be laid under their surface.
The concrete screed should not have any drops, otherwise the floorboard will constantly creak. In order to avoid such an obvious defect, it is necessary to expose the beacons with special care and to use the hydro level and a large construction level.
")
Scheme of concrete screed.
If the total thickness of the concrete screed is small, self-leveling cement mixtures are recommended. In another scenario, the usual quality solution will do.
After the surface has been aligned with the beacons, the coupler is left alone until dry and curable. Within three weeks, the concrete mortar will grab and it will be possible to lay the floorboard.
For a regulated floor, it is based on moisture-proof plywood with twisted legs. They allow you to get the perfect horizontal surface. The whole structure is created very quickly without wet manipulations and weighting of the floor slab. After assembly, the adjustable floor is ready for further work. This design has a service life of about 50 years.
Laying floorboard on a plywood base is performed by any method without further preparation. This is undoubtedly the main advantage of plywood.
Technology of laying flooring
First of all, laying the substrate: natural, synthetic or cork. This is necessary to protect the parquet from possible excess moisture. With the same purpose, all joining seams are sealed with construction tape.
The diagonal arrangement of the parquet boards increases the consumption of the necessary material by 2-7%, but it has the ability to visually correct the general appearance of the room if the furniture in it is arranged not too harmoniously.
")
The technology of laying floorboard.
Laying floorboard begins with the arrangement parallel to the window of the first two rows. Placing the spacer wedges under the wall, the four panels are installed in the form of chess cells. The gap between the wall and the floor must be at least 10 mm. If this condition is met, the parquet will retain its integrity in the event of a temperature difference during operation.
After fitting the first two sections of the floorboard, the installation of the next row begins. In the second row, the board closest to the wall should be shortened with a hacksaw by at least 80 cm. It is very good when the transverse joint of one row is opposite the central part of the panel of the next row. In parallel rows, the run between the joints cannot be less than 50 cm. Otherwise, all the joints will be flimsy.
")
Parquet flooring by lag.
In the second row, the boards are inserted into the slots of the previous row, keeping an angle of 20 °. The design snaps, but does not fix. In the same way attach the next board in the second row. It is inserted into the lock on the cut of the first board of the second row and knocked. Then you can firmly fix the floorboards in the second row and knock them down with a bar so that the seam is not noticeable. Similarly, the entire floor is assembled.
The difficulty of installing the last row of the coating. The first thing you need to accurately measure the distance from the bottom edge of the wall to the floorboard of the penultimate row. The board is reduced by 1 cm from the obtained value, it is required for the formation of a compensatory gap. Then hem edge on the key end of the last but one row of floorboards, the groove is filled with adhesive composition and insert the section of the last row. To make it fit closely, you need to use a standard set for laying the board with your own hands, in which there is an assembly foot and a clamp.
The final stage of work and the advice of professionals
")
The plinth fastening scheme.
After laying the parquet, it remains to apply the final touch, which is the installation of the plinth. Before fixing it, you need to remove all expansion wedges from the expansion joint. The plinth should completely cover the gap between the wall and the parquet. Fix the baseboards only on the surface of the wall and make sure that they do not adhere to the flooring too much.
The same covering method is also used for diagonal laying of the parquet. Only in this case, the floorboards lie at an angle of 45 °. To determine the direction of laying parquet panels, you need to look around the room, standing in the doorway of the room.
The diagonal method does not fit a rectangular and narrow living space: here the floorboard will be too variegated.
In addition to getting acquainted with the technology of laying floorboard, the advice of experts will not hurt. Sometimes they can be very useful. So:
- If the room’s permeability is too high (for example, in the hallway), then it is better to abandon the parquet flooring, otherwise the floors will have to be repaired 2-3 times more often than in the bedroom or living room.
- Before installing parquet boards, you need to leave the room for 48 hours.
- Fastening of joints can be facilitated by paraffin or wax impregnation. Sealants are not suitable here.
- By the floating method, laying of the floorboard can be held parallel or obliquely. Properties of operation will not suffer at all from the chosen direction of laying.
- Haste during work leads to cracks and creaks.
- Parquet assembly should be started from the doorway in the direction of the window.
- For apartments with a multitude of niches, corners and an unusual layout, the method of diagonal laying of parquet panels is more suitable.
Considering these tips and observing the technology of laying parquet flooring, we can surely expect an excellent result.
Didn't find the answer in the article? More information on the topic:
-
")
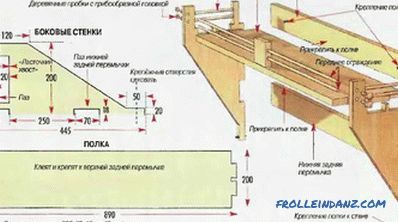
Upholstery clapboard with your own hands
Instructions on how to do upholstery clapboard at home or giving: do-it-yourselfers The list of necessary tools, stages, features of fastening material.
Search
Related Articles
Wardrobe from own lining without much difficulty
For storing things most often used cabinets that are made with your own hands. Many people think that it is very difficult to make a closet with your own hands and this is only possible for people...
Do-it-yourself shelves, make and mount (photo and video)
Wall shelves are an indispensable item in the interior. They help to save space, as they occupy a small area and allow you to place a fairly large number of objects. In addition, on the shelves, yo...
How to revet the facade of the house - the choice of facing material + photo

The facade is the main part of the building, which, first of all, is paid attention to by all who come to the house, as well as bystanders. With the help of high-quality finishes, you can give the b...
construction technology of logs, timber, on the basis of the frame
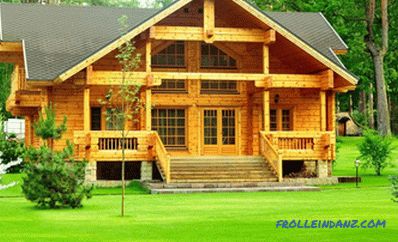
A warm and cozy natural wood house for your family is a dream of many. Such housing has long been sought-after and popular, thanks to the many advantages, the main of which are environmental friend...
general rules, schemes (photo and video)
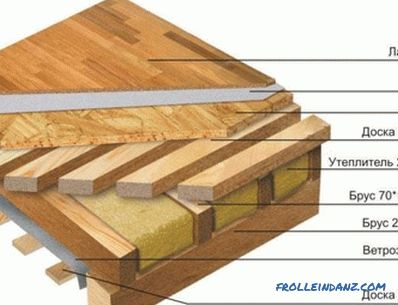
Wood floors are made not only in wooden houses, but also in brick buildings. This floor looks great and helps to create a good microclimate indoors. Laying a wooden floor is easy to do with your ow...