A greenhouse in a country house can be made of various materials. The choice will depend on the personal preferences of the landlord and the amount of free cash. With the help of the tree, you can make a similar design quickly and without large financial costs.
")
Greenhouse arrangement.
Wooden beam is a reliable material that can be purchased at almost any large building supermarket. The durability of the bars is slightly different from the metal, but if they are treated with a special impregnation, it will be possible to extend the possible period of their service. Wooden greenhouses can last about 5-7 years, and in some cases even longer. Everything will depend on the climate of the area where the structure is installed.
It is not necessary to purchase expensive wood for the construction of the greenhouse, as it will not last much longer. It is recommended to choose industrial varieties of wood. In the selection process, you should pay attention to the quality of the material, technical parameters and the number of defects. For the manufacture of greenhouses it is best to use a bar without knots, which is thoroughly dried.
The foundation for a wooden greenhouse
The base under the greenhouse must be reliable and stable. It is best to make a strip or brick foundation. Such structures have all the properties that are needed for the greenhouse. In addition, such foundations will not cost too much.
It is preferable to stop the choice on the tape basis. You will need to perform the following steps:
The foundation formwork scheme for a wooden greenhouse made of window frames.
- First of all, you need to fill the base with a depth of about 50-60 cm and a height of 20-30 cm above ground level.
- The structure will need to be reinforced to make it strong and to prevent subsidence in the future. Such a base can be used for the greenhouse from any material, so if in the future there is a desire to change the frame, then this will not cause any problems.
- After this, the foundation on the tape will have to be waterproofed in order to protect it from moisture for a long time and extend the total service life.
The width and shape of the structure will depend on the size of the greenhouse and the load of the frame, so accurate calculations will not work.
How to install a framework for a greenhouse with your own hands?
It is much easier to work with wood than with other materials. Therefore, with the installation of the frame will not have any problems. First of all, you need to fix on the basis of the beam, which will be slightly wider than the rails used for the construction of the frame.
In order to fix the base of the frame, you can use a corner made of metal, which must be installed in advance in the foundation. In this case, you can apply reinforcement, bolts or anchors. Before the mounting carrier rail, it will need to be treated with protective agents - antiseptics, drying oil and paint. This is done in order to ensure a long service period for the foundation of the greenhouse structure.
")
The scheme of the monolithic foundation with drainage for the greenhouse with his own hands.
When the carrier rail is ready for installation, you should take final measurements and get to work. To fix the basis of the greenhouse construction and make the rest of the work, you need to use the following elements:
- electric drill;
- fasteners;
- hammer;
- Bulgarian .
The basis of the construction is attached around the perimeter of the foundation. It is necessary to check that the base is solid, and its sides are interconnected. The simplicity of the process of installation of the frame of the greenhouse structure and its stability will depend on these values.
Next, a framework is established. It is quite simple to install it, since the base has already been mounted on the foundation and firmly fixed. It will be necessary only to make measurements and to execute installation, using schemes. The scheme itself can be seen in fig. 1.
All other elements of the wooden greenhouse, frame and vents, the ceiling logs are fixed with screws, clamps, corners and profiles made of metal.
Production of greenhouses of various designs
Before you start building a greenhouse, you should purchase all the necessary elements.
Standard greenhouse from small tree sizes
")
Figure 1. Scheme for a wooden frame.
The dimensions of the construction to be made are 6x4 m. The product is coated with polycarbonate. To manufacture such a greenhouse, you will need to perform the following steps:
- First of all, it will be necessary to build a foundation. To do this, you should drill the soil at 50-60 cm, pour the pillars through the pre-installed studs.
- On the pillars, you need to assemble a harness from larch timber with dimensions of 1x1 m. The harness is attracted by nuts and washers to the posts.
- The frame is erected according to the diagram and is covered with studs.A diagram of a similar construction with all the necessary steps can be seen in fig. 2.
Greenhouse of wood according to Mittlayder
The structure to be erected has the following dimensions: width - 4 m, length - 8.4 m, height in the ridge - 3, 1 m. The structure will have several slopes of different heights and vents, which are located under the ridge.
Figure 2. Scheme of the greenhouse frame on the wooden base frame.
For the construction of the structure, you will need to use boards of 0.5 x 1 m. The construction process is as follows:
- The foundation is built first. For a greenhouse of this type, a monolithic tape of 35x20 cm is suitable, which is fixed with 8x4 mm reinforcement. Outside, it must be soaked with a special tool so that the base does not crumble in the future. The design can be revetted with natural stone.
- The frame is being installed. Racks should be installed every 70 cm.
- Vents are made in the upper part of the greenhouse. You can provide automatic to open them.
- Fixed polycarbonate. In this case, it is important not to leave gaps.
- At the end, get a water supply into the greenhouse, install a large container and dilute the pipes into several beds for drip irrigation.
To manufacture such a greenhouse structure, you need to purchase approximately 2000 boards of 0.5 x 1 m. To build doors and windows, you will need to purchase even smaller bars - 30x50 cm and 50x70 cm.
How make a greenhouse for polycarbonate?
In this case, the frame will be made of wooden bars 45x45 cm. The length of the greenhouse is 8 m, width - about 2.8 m. It can be provided for the installation of two doors and a few windows.
Between racks there should be a distance of no more than 1 m.
")
Mittlider's greenhouse construction technology.
Each truss must be supported on several racks. The exception is the central rack.
The sequence of actions will be as follows:
- The binding in this case will be made using the angles of metal 45x45 mm or 50x50 mm. With the help of the grinder should make a notch shelf in 12 cm at a right angle. Thus, you can get the base on which the harness will be mounted.
- After this, you need to paint the corners several times with anti-corrosion paint.
- Next, it is necessary to hammer the bars into the ground, check their location with a building level, then fix the slats with self-tapping screws, joining them with each other.
- All joints will need to be strengthened with a metal plate.
- The bottom trim around the perimeter is sewn up with galvanizing and recessed into the ground.
- Next, on the roof, it will be necessary to fasten polycarbonate with self-tapping screws with rubber washers, all other elements are fixed by using a press washer.
- The end parts of polycarbonate should be covered with a plastic corner. Sheets are overlapped and then treated with silicone sealant around the edges.
- The bottom trim is treated in several layers with an antiseptic, after which it is painted.
How to make greenhouses with your own hands under the film?
")
The layout of the metal frame for the polycarbonate greenhouse.
In this case, the greenhouse will be covered with a light film. The procedure will be as follows:
- A solid base is made. The design will have a small weight, because you can weld ordinary homemade piles of small sizes. They can be made of metal corners 50x50 mm. The length of the elements should be 90 cm.
- The piles are coated with a primer in several layers and driven into the ground.
- The piles will need to be leveled using laser level. After that, you can proceed to the assembly of the frame.
- Truss structures are installed. In this case, you can use plywood with a thickness of 8 mm, which is sealed with PVA glue and screws.
- In the next step, you need to install bumpers for the beds. It is best to use slate thickness of 10 mm. From the side of the street near the slate, you can additionally lay foam.
- After that, painting of the batten is performed. It should be remembered that the boards before painting will need to be treated with antiseptic. Paint should be applied in several layers.
- The frames for the vents and doors are being assembled.
- The whole structure is covered with a light film.
- In the greenhouse itself, it will be necessary to tighten the cables in order to be able to tie up the plants.
- Additionally, you can install irrigation and automatic ventilation systems.
- If the greenhouse structure is built in a cold region, inside it you can stretch another film layer, securing it to the crate with a construction stapler. Even if budget films are used, the effect can be immediately noticed.
How to build a portable greenhouse on foundation blocks?
")
The scheme of fixing the film to PVC greenhouse.
The design can be disassembled and transferred due to its low weight. If the greenhouse will need to be transferred from one place to another, you can build a similar structure. The basis of it will consist of several 15x15 cm bars. It can be made as follows:
- The first step is to dig a hole to a layer of sand, pour sand and gravel into it, carefully tamp it and lay blocks of concrete.
- Next, you need to treat the bars with an antiseptic. After the product dries, the wood should be bitumen coated on both sides.
- The frame is installed, after which it is treated with the same antiseptic.
- In the corners of the structure, braces should be fixed with a height of 1 m.
- A template rafter is made, with which it will be possible to easily make all the rest later.
- Racks are prepared and installed.
- After the roof has been built, it will be necessary to paint the end parts of the structure.
- The wooden greenhouse is covered with polycarbonate 5-8 mm thick.
- To insulate the structure, extruded polystyrene foam can be laid inside it. Cement blocks are installed from the outside.
What is the best way to cover the greenhouse?
")
Fastening scheme of a film wooden greenhouse: a is a rack mounting scheme, b is a lifting device diagram film.
When the greenhouse structure is ready, you will need to decide on the material to cover it. Durable frame can withstand any weight, because you can choose both glass and film or other materials. The choice should be made on the basis of practicality and quality of the material. The following materials can be used:
- Film. Covering should be done consistently, gradually passing through the slope from one side to the other. Gradually, the film is fixed to the frame. The corner of the slope of the greenhouse construction is recommended to cover with a visor, since the film is often damaged and moisture and cold air get through the defects.
- Glass. If it was decided to cover the greenhouse with glass, special stops and beadings should be purchased. Glass is best ordered after the complete installation of the batten, when they know the exact dimensions of the cells. Secure material should be firmly. Seams can be treated with silicone or sealant to ensure the tightness of the structure and eliminate drafts.
- Polycarbonate. Covering a greenhouse made of wood with polycarbonate is quick and easy. To do this, use special rails and profiles, as well as fasteners that can be bundled with polycarbonate plates. This material is the most practical and modern, because it is recommended to cover the structure with it.
After the greenhouse housing has been covered with the selected material, the structure will need to be made airtight, the heating and lighting devices installed in it, the water for irrigation, and the ventilation system must be installed.
Today, there are quite a lot of different schemes of greenhouse wood. You need to choose based on personal preferences. Making a greenhouse with your own hands is easy if you take into account all the existing nuances, follow the sequence of actions and have the necessary tools and materials for work.
Didn't find the answer in the article? More information on the topic:
-
")
How to make a wooden floor on the ground?
Wooden floor on the ground: the device of the coating, the required materials and tools. Technical features of the work stages. The process of mounting your own hands.
Search
Related Articles
drawings and diagrams (photo and video)

The house cannot do without cabinets that can accommodate many things in their space. A chest of drawers acts as the most convenient variant of the piece of furniture for everything (from laundry t...
DIY drilling (+ diagrams)
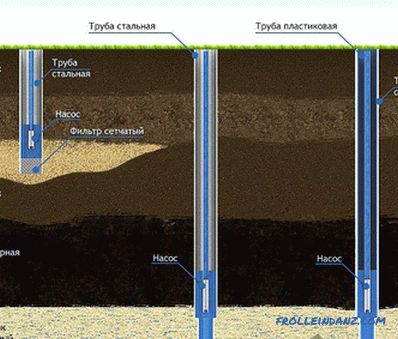
Each country site needs a water source. To get a water resource, it is necessary to equip a well or a well. In this article, we will describe the technology of drilling a well with our own hands, co...
Lining your own hands: how to make and fix
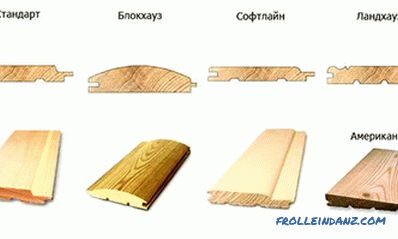
Lining is one of the most popular types of home decoration during construction or repair. These are long and wide slats, which are tightly mounted to each other using side slots. Lining is plastic...
The connection of rafters with power plate in the manufacture of the roof
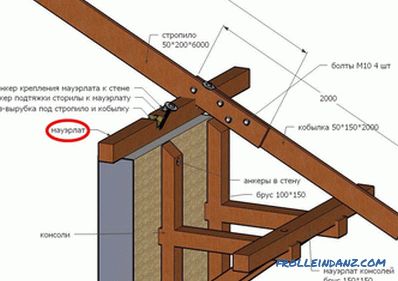
How is the connection of rafters with a power plate made? The strength and reliability of the roof under construction provides the roof system, which is the basis of the roof structure. The quality...
features of the arrangement of the floor, ceiling and walls (photos and video)
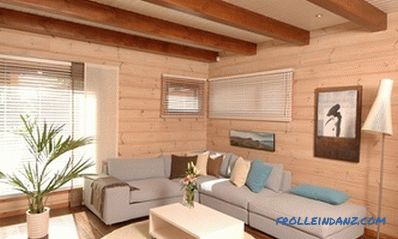
Immediately after completing the construction of a wooden house, it is worth while to forget about the implementation of interior decoration, since the building will sit down for a while, this may...