For carpentry work, a convenient workbench is needed, in which cells for storing various tools (files, chisels, etc.), a vice and everything needed for work will be provided. The carpentry table has some design features.

The joiner's workbench is used to process woodwork.
Production of the base of the workbench
The production of the table is carried out in stages. First of all, blanks for legs are prepared. To do this, cut strips of plywood with a circular saw. The width of the strips should correspond to the width of the legs. The strips need to be connected to each other in order to make a parallelepiped.
After drying of the wood glue, a recess is made on one side of the leg. For this, a milling cutter with a straight mill is used. The depth of the groove should be 2 cm. A shelf will be inserted into it.
Next, the table frame is constructed. For it is necessary to cut the workpiece of plywood of a certain size. In one of the lanes you need to cut a notch, which will later serve for mounting the vice. As fasteners for assembling the structure it is best to use slats and cutters for them. You can also use dowels.
Of the 4 plywood strips for the frame, you need to glue the box. For this, wood glue or PVA is used. The glued box needs to be checked for squareness and equality of the diagonals. If the product is even, then you can fix it with clamps. The box must remain in a fixed position until the glue is completely dry. The legs are attached to the received frame with screws. Next glued the bottom shelf.

The device of the joinery workbench.
Next, you need to prepare a shelf with special grooves for hand tools. It also fastens in a groove way to legs. Shelf under the tool is attached confirmats. For mounting you need to drill and chamfer. For this, it is more convenient to use a special drill on confirmating wood. With it, you can simultaneously drill and chamfer. However, you can do this job with a regular drill. It is necessary to embed the confirmat in the surface, since in the future the side with fasteners will be used to move the box, and protruding confirmatics will prevent this.
Making the countertop
First, prepare the drawer for the countertop. It will require to prepare 5 parts of plywood: the bottom and 4 side walls. On the two side parts on the inside you need to prepare the grooves for mounting the bottom. From the outer side of the same walls of the box, the router makes grooves, thanks to which the box will move along the side shelves.
The side walls are fixed with dowels. In their ends drilled holes for fasteners. The centers of the holes for fasteners must be transferred to the side surfaces of the adjacent walls. After all the preparation, the walls and the bottom can be glued together with wood glue.
The bottom is additionally fixed with hidden screws to the front wall and on the opposite side. For this purpose, holes are preliminarily made at the ends of the side elements through the depth of the bottom. For machining these holes, a phasmodifier or roller cone is used. Concealed screws will be recessed into the surface, so they can not be caught.

Removable workbench cover: a - cover design (1 - base; 2 - side rail; 3 - liner; 4 - emphasis for planing; 5 - guide; 6 - clamp for fastening the workbench to the table lid; 7 - stop for sawing); b - removable stops for planing.
After the drawer is prepared, the worktop itself is made. For this, 2 sheets of plywood are cut out and glued together. The thicker the tabletop, the stronger the workbench. Under the basis of the worktop cut strips of plywood. You will need 2 elements in the form of small parallelepipeds. Each of them must be glued from 2 parts. With the help of special dowels strips are attached to the tabletop. You can use ordinary round dowels, but in this case you will need to use 2 times more fasteners. After that, holes are drilled in the future place of attachment of the vice.
All elements of the basis of the tabletop are connected with glue, dowels and clamps. It is necessary to check the evenness of the connection of these elements. On the finished box set tabletop. For this, reinforced dowels are used.
After the glue has completely dried, it is marked with stops. It is best to drill holes for them with a drill with a stand and a Fosner drill. This will allow you to get even holes exactly in the place intended for them.
Next, a vice clamp is glued from plywood strips. It must be prepared in advance holes for the metal elements of the fixture.
You can use the mechanism from the old workbench if it is working, or purchase a new one in specialized stores.
The vice needs to be assembled and screwed to the table top. After that, locking brackets snap into place, thanks to which the guides will not fall out of the table.
Manufacturing of a handle for a vice and stops

Workbench and clamping devices: a, in - wedge clamps for processing the edge of the board; b - clip for processing the ends of the board; g - joiner's vice.
The blank for the handle can be made of a wooden cylindrical part of sufficient length. It should be a little narrower than the hole in the vise, designed to install the handle. You will also need a crown on the tree wider by 15-20 mm than the cylindrical part. Using a plywood crown, you need to cut 2 washers. At the ends of the stick it is necessary to drill holes into which the screws securing the washers will be screwed. First, 1 washer is attached, and when the handle is installed in the hole in the grip - the second one.
Next, the stops are made of wooden scraps of a round shape and square blanks of thick plywood. In the center of the square, you need to drill a hole that corresponds to the size of the holes previously made in the worktop. In depth, they should reach the middle of the square. In the recess in the box is placed a round piece and screwed with a screw. It is necessary to make 4 such stops. This work on the production workbench completed.
Thus, the carpentry table can be made with your own hands. In this case, it is necessary to take into account the peculiarities of such a design and to carry out all operations with accuracy and accuracy. As a result, you can create a perfect table for the master, taking into account individual wishes. Such a workbench will be functional, comfortable and practical.
Didn't find the answer in the article? More information on the topic:
Search
Related Articles
Are stretch ceilings harmful to health?

The tension fabric today is recognized as an aesthetic, fashionable and practical element for ceiling decoration. At the same time, many are interested in whether stretch ceilings are not harmful to...
Roofing Pie Device - What Does a Roofing Pie Consist of?
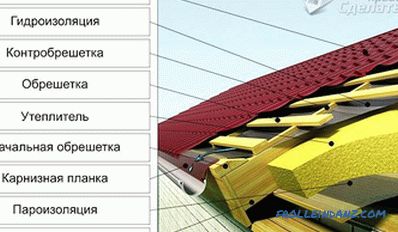
To protect the roofing and living space from the adverse effects of atmospheric phenomena, the roofing pie is an important part of the roof. Each layer performs a specific task and is inextricably l...
Compare which mattress is better spring or springless + Video
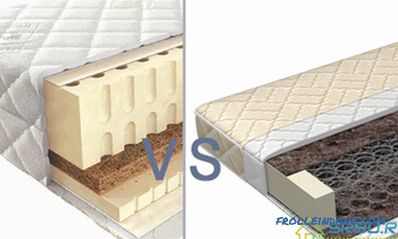
The natural desire of everyone is to wake up fresh and rested in the morning. And a good dream directly depends on what we sleep on. Especially mattress matters - if it sags, like a hammock, or sta...
algorithm, auxiliary table, example (video)

Wooden houses are the basis of Russian national architecture. Today, beautiful Russian traditions in architecture are becoming increasingly popular, technology is being improved, high-tech equipmen...
How to make a corner ceiling plinth
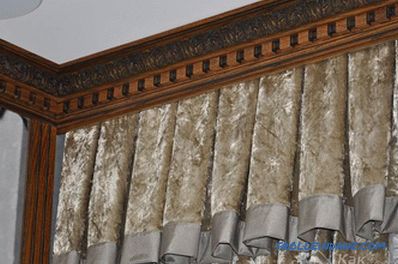
The finished appearance of the ceiling and walls can be given by focusing on the baseboard for the ceiling, securing it around the perimeter of the room. Before choosing it and finishing it is bette...