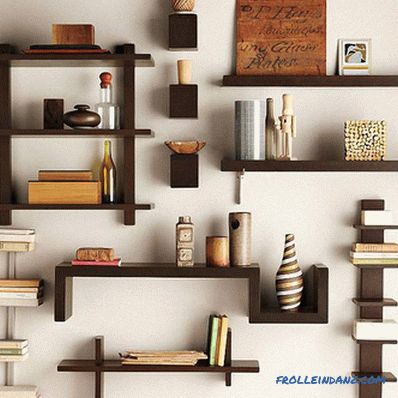
Wall shelves are an indispensable item in the interior. They help to save space, as they occupy a small area and allow you to place a fairly large number of objects. In addition, on the shelves, you can place lovely trinkets or decorations for the heart, and a shelf with an unusual design will be an excellent complement to the interior.
")
Shelf Design.
When you want something unique, a great option would be to make shelves with your own hands. After all, any thing made by hand is more valuable, individual and original.
Preparation for the manufacture of shelves
First of all, before proceeding with the work process, you need to think about how to concept. The first question that needs to be answered is - for what purpose is the shelf planned to be made? How heavy or bulky items will be placed on it? The selected dimensions and material for furniture will depend on this. It is necessary to decide in advance exactly where the shelf will hang.
")
Installation scheme of fasteners for mounting the shelf.
When the design and dimensions of the shelf are thought out, you can proceed to the next step - drawing production. All parameters of the future shelf must match the proportions of the room and harmoniously fit into the interior. It should be noted that in the course of work, most often even professionals inevitably have at least small errors. Therefore, creating a drawing, you need to add about 3-5% of the desired size on the deviation. Calculation is a very important stage, since the material consumption will depend on how correctly the dimensions of the shelf are calculated.
In addition, at the preparation stage, it is necessary to decide which material will be used. The most versatile for the manufacture of shelves is wood. It is easiest to work with this material; it looks aesthetically pleasing and durable. You can use a combination of wood and plastic. A more complex option - the shelves of glass. These shelves look more elegant and original, but to make a shelf of such material is much more difficult. Working with glass will have a long and very carefully, especially if the shelf has a complex shape. Therefore, for the first experiments on making shelves with your own hands, it is better to give preference to a simpler material. Size is also preferable to choose a standard, to work was easier.
One of the simplest ways to make a shelf is to make a classic rectangular shelf made of wood, with two sections and an open top.
In order to make such a shelf yourself, the following materials will be required:
- wooden part from any kind of wood, except for plywood, dimensions are determined based on the design and desired dimensions of the shelf ;
- a small bundle of 3 cm screws;
- 4 or 6 screws for fastening the shelf to the wall (size - 6 cm);
- 3 holders (2, 5 cm) with right angle;
- paint for shelf decoration.
The tools you need to make a shelf: a tape measure, level, drill, screwdriver, electric screwdriver.
The tools you need to make a shelf:
- tape measure;
- level;
- circular saw;
- drill or electric screwdriver;
- brush;
- screwdriver;
- grinding machine;
- sandpaper (coarse-grained).
If any of these items are not at hand, you can purchase them at any hardware store.
Production of the shelf
")
Size chart of the hinged shelf.
When the necessary tools and materials are prepared, you can proceed directly to the work process. How to make a shelf with your own hands?
First you need to use a measuring instrument to mark a piece of wood and divide it into parts of the future shelf. Two long rectangular parts are sawn off for the back and the base, two small parts are prepared for the side walls, and one, slightly smaller side ones - for blocking sections. Then measure and pre-drill the holes for the screws.
Next, you can start joining the shelf parts. First of all, with the help of wood glue, the back and the base are glued to each other. When these parts of the shelf are glued together, you need to connect them together with screws. This is done to increase the strength and to ensure that during the drying process of the glue the parts are reliably pressed together and better fastened. To connect you need to use a small three-centimeter screws. Then mounted partition. The partition at the shelf can be placed both in the center so that the sections are equal, and asymmetrically so that there is one main compartment and one additional one.
To make the shelf more reliable and durable, you need to connect two main parts with rectangular holders - the bottom and the back. Three pieces in the manufacture of the shelf do it yourself will be enough.
After that, you can begin to attach the side walls of the shelf. They should be fixed in the same way - to glue, followed by fixation with screws. Then the shelf is left for 5-6 hours until completely dry. After the specified time, polish the surface, prime it and start painting. To do this, you can use the paint of any color you like or polyurethane, which will give the effect of naturalness. The choice of material depends only on the taste preferences and the interior of the apartment, for which you need to make a shelf. When the shelf is dry, you can give it a uniqueness and add any decorative elements.
Fastening the wooden shelf to the wall
")
Schematic of a wooden corner wall shelf.
After the manufacture of the shelf is completed with your own hands, it remains only to fix it in the interior. To approach this question must be responsible. The finished shelf is quite heavy, and when it is filled with various items, its weight, of course, will become even greater. Therefore, in order for the regiment to serve for a long time and please the owners of the house, it is necessary to choose reliable fixings. Wall anchor is not suitable here, but the screws will perfectly cope with the task.
In order to secure the shelf, you need to:
- determine the place where the fasteners will be put;
- fix one of the sides with 6-centimeter screws;
- determine the level of fastening by the level;
- provided that the product hangs exactly, you need to fix the second side in the same way, the location of the screws is not important and is determined at will, the main thing is that the weight is distributed evenly; >
- if you plan to store rather heavy items on the shelf, for additional fixation you can secure the regiment with two more screws below the main anchorages or in the center.
Production of the original shelf from the pallets
")
The scheme of fastening the shelf using dowels.
If you want something completely unusual and stylish, you can follow the modern trend and make a shelf out of pallets. Recently, the conversion of pallets (pallets) into pieces of furniture came into fashion. Of these, you can make tables, hangers, swings, fences and even beds. Making a shelf out of pallets with your own hands is easier than easy.
A great variant of the original shelf of pallets is to make a shelf with bars for the kitchen.
For the manufacture of such a shelf you will need:
- pallet;
- wood varnish;
- sandpaper;
- fasteners for fixing the shelf to the wall;
- 3 steel bars, the length of which should be equal to the length of the pallet, as well as fastening on them;
- hooks for fixing objects on the bars of the finished shelf.
First of all, you need to treat the surface of the pallet - carefully clean it and then paint it with varnish. The movements should be clear and be made in one direction. When the pan dries, you can proceed to the next stage - painting. Any kind of paint and any color that fits into the kitchen interior is suitable for this. Then it remains only to fix the special mounts for rods and hang them. After that, you can hang a shelf on the wall and proceed to the placement of kitchen utensils. On such an original shelf, a great number of objects will fit perfectly on hooks - cups, pots, oven gloves, ladles and spatulas. And on wooden crossbars shelves will look wonderful small jars with spices.
If you plug in your imagination and think about how to make a shelf out of scrap materials, you can find many more non-standard solutions. All such options are different cost, originality and, of course, enjoyment in the process!
Didn't find the answer in the article? More information on the topic:
-
")
Properly making your own shelves
Making your own shelves: planning, work features. How the appearance of the front edge made affects the shelf rating. Wood shelf processing, assembly work.
-
")
Frame house: we build with our own hands
How to build a frame house with your own hands: the device foundation, frame, floor, walls, roof. Carrying out wall insulation, installation of windows and doors in the house.
Search
Related Articles
Mansard roof rafters: step by step instructions

When installing rafters for an attic, it is necessary to withstand all the technological requirements so that the supporting structure can fully perform the tasks assigned to it. Farms and other re...
How to glue a ceiling plinth - we glue fillets + photo
The ceiling plinth has several functions. Firstly, it gives the design of the walls and ceiling a special charm and beauty. Secondly, the plinth can hide some defects (for example, minor irregularit...
How to choose a garden mesh for the fence

A fence is not only a construction for the safety of people, but also a stylistic addition that gives beauty and a finished look to a summer cottage. There is a huge variety of fences. However, choo...
How to make shelves on the wall
Self-made shelves allow efficient use of space and create an individual interior. Home craftsmen are not limited in their imagination in the choice of form and material, but we must not forget about...
Calculation of rafters and trusses for hip and gable roofs

The rafters are calculated after selecting the layout scheme, mutually attaching the legs in the skate, and the method of joining to the power plate. This will allow the first stage to determine th...