Ceiling priming is required for any replacement of the ceiling covering, with the possible exception of suspended type mounting. In other cases (before painting, whitewashing, glueing wallpaper or other materials) requires priming. Independently this procedure is quite possible, because there is no need for any special skills. We will understand how to do it correctly.
Why this is necessary

It would seem that if there is paint or glue for wallpaper, why also apply a layer of primer on the surface? In fact, both paint and glue do not have the best adhesion to the ceiling surface, even if it is well cleaned, and in this case there is a primer. Its composition increases the grip several times, which means that the repair becomes more durable and of higher quality.
In addition, applied before painting it can significantly reduce the amount of coloring material. The thing is that the plaster or putty of the ceiling is quite porous and absorbs a lot of liquid. Yes, the adhesion to the paint will be quite good, but if the coloring was preceded by the priming procedure, the required amount of paint will significantly decrease.
Which primer to choose

When choosing a primer, you should pay attention to what constitutes the ceiling material, in most cases it is concrete, but it can be drywall, and covered with paint that is not removed by the usual methods.
Also, the primer must be selected depending on what exactly the ceiling is planned to cover in the future. If it is painted with water-based paint, the preliminary layer must be appropriate for water-based paints, which is a mixture of synthetic dispersions and latexes with special additives. A different composition of primers under the enamel: they contain specific fillers and resins.
Universal types of such coatings can be found on the market, which prepare any base equally well for various types of finishing coatings. They can also be the basis, for example, for decorative plaster.
Surface Preparation

To begin with, you need to clean the ceiling of all materials as well as possible. It is usually easiest to remove the wallpaper, and for this it is best to use a spray gun and a spatula. The most difficult case is paint coating, and here the preparation stages are slightly different. If water-based paint was previously used, then the next layer of paint can be applied directly onto it, without trying to clean off the old layer, you just need to clean it in any way. The only exception is the difference in color, especially when the previous layer is slightly darker, in this case it is recommended to clean it with available methods, including solvents.
If the old coating of oil paint, you need to maximally clean the surface with sandpaper. The surface must be completely matte, because the primer and the subsequent topcoat do not adhere well to gloss.
Now you need to vacuum the ceiling to remove as much dust as possible. We can say that everything is ready to apply the primer.
Priming the ceiling
 Tool
Tool
How to apply the primer so that it lies uniform layer? It is best to use a roller and paint bath, which is always useful in the economy. The composition is poured into this bath, the roller is dipped, and then lightly rolled over the grooved bottom section. It is necessary to remove excess volume from the roller, because the appearance of drops is very likely with a primer. Now you need to roll the roller on the surface of the ceiling.
 Priming process
If the ceiling in the house is too high, or the stepladder is rather low, you can use and a special extension handle, having attached a roller to it. In this case, you do not even have to go down the ladder every time you need the next primer.
 Brush for angles
It is necessary to soak every centimeter, and the corners must be greased with a brush very carefully, because they usually contain dust particles that significantly reduce adhesion. Do not forget about the beams, and about all the protruding elements.
After covering the entire surface, wait about two hours. During this time, the primer dries, and now you can apply a second layer. Of course, many people stop at the ldn layer, but applying two layers more technologically correctly, because the first layer often only slightly soaks the ceiling surface, and only the second layer will penetrate more deeply, which will ensure the reliability of further coverage.
Video
The wizard will tell you about the procedure for priming the ceiling and give practical advice:
Search
Related Articles
The best manufacturers of faucets for the bathroom or kitchen
A selection of the best manufacturers of bathroom and kitchen faucets are based on the technical features of the products, user reviews and ratings, as well as technological solutions. Such an eleme...
Do-it-yourself parquet repair: step-by-step instructions and recommendations
The wooden floor is valued primarily for its naturalness and safety for health. But over time, even the highest quality wood wears, it dabbles, gaps appear between the boards, floorboards begin to...
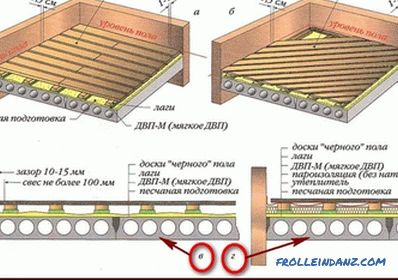
How to lay the floorboard yourself: materials, tools, stages

Repair in the room is not only a very laborious and necessary process, but also at times quite fascinating. Most of the time, one has to perform repetitive manipulations, but when working with fin...
Laying plywood on wood flooring and other surfaces.
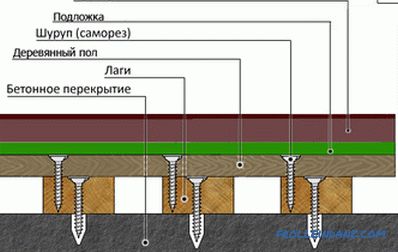
Any building material over time begins to deteriorate, collapse and crack. Such characteristics can be attributed to wood. Old and worn floors, making unpleasant creaking sounds, are not able to de...
Brick chimney with their own hands
One of the most important elements of a heating system is a chimney. If everything is done in accordance with the technology, then the smoke will go up - out, and the heat - will spread around the r...