Lining is widely used in construction, and everyone knows about its advantages and quality. Many people spend extra money on the purchase of this material, since they do not know how to make a wall paneling from simple, ungraded boards. Below will be described the technology with which you can do this using the minimum amount of time and tools.

Self-made lining.
What material can you make lining?
A variety of different types of wood will be suitable for this. It all depends on the scope of the material obtained. For example, a linden or an alder is suitable for covering the walls of a bath, since the wall paneling of these wood species tolerates the high temperature of the air and does not deteriorate from moisture. If pine or spruce is used for the manufacture of clapboard, then this material can be used to cover the inside of the room where the humidity is low and the temperature varies from -3 ° C to + 27 ° C.
Ungraded boards are bought on the construction market or in a specialty store. It is advisable to choose a dried material - the quality of the obtained wall panel largely depends on this.

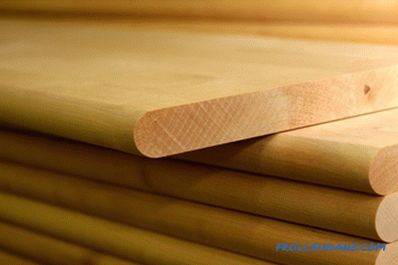
Types of wooden wall paneling.
The length of the board to be bought should not exceed 2 m, otherwise it will be difficult to process. But if you are confident in your abilities and quality of the available tools, you can purchase longer boards.
The width of the lining you received depends on the corresponding parameter of the non-hemmed material. If the initial board is narrow, then only one unit of finished goods will leave it. With a large width of one non-hewn board, you can make 2 narrow battens. For practical purposes, ready-made material with a width of 6-10 cm is best suited. If the entire lining is used for covering one room, the width of the individual boards should be the same. The service life of self-made lining reaches 12 years.
It should be noted that if a person makes this material himself, then he has waste that can be turned into slats and also used as needed.
Independent production of lining

Lining board scheme.
The technology of this process is as follows:
- They draw a straight line along which the side of the board will be processed. To do this, it is best to use a pencil of green or blue color, since the line will be poorly visible on the raw or blue material.
- If a manual milling cutter is used for work, then start sawing, having fixed the product well on a flat, horizontal surface, observing safety rules. When using a desktop woodworking machine work is greatly simplified. The board is placed on the table fixtures, abut the body at one end and push the body (but not hands) in the direction of the saw. At the same time, you should try to keep the material as even as possible - according to the drawn cutting line. For convenience, you need to purchase a large diameter saw and make sure that the product does not pinch when moving.
- To cut the other side, you need to rebuild the machine. His line is set to the desired width and sawing the second side of the board. If you do this work by eye, then the lining will have a different width.
- For the manufacture of material with the same dimensions, as a ruler, we use a board that has already been sawn from 2 sides.
- Sequentially we cut the required amount of lining.
- Now we turn to their planing to get a flat and smooth surface: rebuild the machine and plan the boards on one side. To obtain a material with the same thickness, you need to count how many times you have spent the board on the machine and stick to this figure for the entire production batch.
- For making grooves at the ends of finished grooves, you can use a milling cutter with the desired thickness. It is installed on the machine instead of a saw and raise the table fixtures, setting the desired depth of the grooves, which are made from 2 sides on all received boards. Material lead to the mill on the line, then the grooves will be at an equal distance from the planed part. If there is no disk cutter, but there is a face of the desired thickness, then you can clamp it in the chuck of an electric drill and make grooves in the boards, although it will be somewhat more difficult.
- From the remnants of the material can be cut slats, which are used when connecting individual boards in the assembly. Their length may not coincide with the length of the wall panel, since they will practically not be visible when covering the walls. It is not necessary to strip them, it is enough to cut approximately one length. If a high-quality saw used for work, then the slats will be quite smooth.
What materials and tools are needed for work?

Lining characteristics.
- ungraded boards 1.5–2 m long, 10–2 cm wide;
- desktop woodworking machine or manual milling cutter;
- circular saw of large diameter;
- disk cutter of the desired thickness;
- colored pencil of green or blue color.
If the paneling is treated with special compounds to protect against mold, insects and putrefactive bacteria, then it can last for 30-40 years.
Its manufacture on its own will bring significant financial savings and help any room to get an attractive look.
Didn't find the answer in the article? More information on the topic:
-

Guide to do yourself a hand
How to make a log house with your own hands? Detailed instructions for the construction of a bath room based on wood material. Selection and sorting of logs, laying the foundation and building walls.
Search
Related Articles
Felling processing: fire retardant and antiseptic
Log wooden houses are not comparable with anything in their attractiveness and originality. But wood is prone to collapse. Only a well-performed felling treatment can eliminate this destruction....
How to make doorways without doors
Each of us seeks to decorate an apartment or a country house in an original way, thereby demonstrating our designer taste and making the interior of the house unique. There are a lot of opportunitie...
How to choose an oil cooler - choice of oil heater

The beginning of cold weather makes you think about the issue of heating a home. In the case when central heating does not warm the rooms enough or the heating season has not come yet, it becomes ne...
Wooden table with your own hands from the board and beam: drawings (photo and video)
There is not a single home craftsman who would not want to assemble a wooden table with his own hands, and this desire does not depend on gender and age. It is important to observe many aspects in...
Laying solid board on the screed, plywood
Why is laying solid wood on a screed or other foundation considered not only the most aesthetic, but also the most reliable way? Boards of solid wood are eco-friendly, durable and durable mat...