This article is a step-by-step instruction on how to build a kennel. This is quite an interesting project, as it provides an excellent opportunity to practice using various woodworking methods, and besides, its result is not only a useful, but also a very nice thing. We will show you how to make a dog house with your own hands, tell you what materials and tools you need to do this work. It is not necessary to strictly follow this instruction. Armed with the knowledge gained, you can build a booth of the shape and size that best suits your needs and tastes. Of course, you can simply buy a ready-made kennel disassembled, but by making it yourself, you, first, save a significant amount of money and, second, get great pleasure from the process itself.

Preparatory work
It is quite difficult to determine the size of the booth, we recommend that you thoroughly examine this issue from the very beginning. You must make sure that your dog has enough space to freely turn around in it and sit down. If you make a mistake with the size, the box may be too small or too big for your pet.
It should be remembered that pressed lumber (in particular, chipboard - approx. Srbu. Ru) is often treated with toxic substances that can harm the animal. This aspect is of great importance, so when choosing materials for the manufacture of the frame and walls, you must carefully familiarize yourself with the technical characteristics of the materials in order to avoid possible problems.
To make a doghouse, you will need:
Materials:
- bars 5 * 5 and 5 * 10 cm section;
- nails / self-tapping screws 5 cm and 10 cm long;
- plywood 12 mm and 18 mm thick;
- ruberoid roofing tiles.
Tools:
- protective gloves, goggles;
- circular saw;
- hammer;
- handsaw;
- spirit level;
- pencil.
Tips:
- remember the adage "Measure seven times ...";
- to get hard design, fasten the side walls with the floor, hammering nails at an angle;
- in the figures accompanying our instructions all dimensions are in inches; to convert to your usual units of measurement, you need to use the formula: 1 inch = 2. 5 cm.
Assembling the frame of the doghouse
So how do you make a doghouse? Begin work with the creation of the base. You need to saw off 3 bars (5 * 10 cm) with a length of 110 cm and 2 bars (5 * 10 cm) with a length of 90 cm. Connect them as shown in the figure, making sure with the help of a joinery square that all the angles are right and fasten 10 cm self-tapping screws (two at each joint).
Tip: Before screwing in the screws, drill the guide holes to prevent the wood from splitting.

Building a frame for a booth floor.
Next you have to cut a rectangular piece of 18 mm plywood measuring 90x120 cm - the floor of the future booth. Attach it to the frame 5 cm with nails or screws every 25 cm.
Tip: Back off from the edge at least 1 cm, otherwise the tree may split.

Floor fastening booth.
Using 5 * 5 cm bars, build the frame of the side walls. If you want to get a rigid structure, install a central rack on each side. After you assemble the side wall frames, you must attach them to the base with several 10 cm self-tapping screws. Before mounting, make sure that the walls are vertical; for this you will need a spirit level.

Mounting the frame of the side walls.
It was the turn of the frames of the front and rear walls. For their manufacture you will need 5x5 cm. Bars. Fix the made frameworks of 10 cm self-tapping screws. As you can see in the picture, the front and back walls are different. In the frame of the front wall you must place two additional racks. The distance between them is the width of the entrance to the booth. Make sure your dog can easily pass between them.

Installation of the frame of the rear and front walls.
Now you have to build the roof of the booth. For reasons of efficiency, ease of construction and aesthetic appeal, we recommend that you create a roof with a 45º angle.
Saw the bars of the required size for the rafters and ridge. Fix the rafters on the booth frame with 10 cm screws, having previously checked their parallelism between each other on each ramp. The ends of the rafter cut at an angle of 45º.

Creating a frame for the roof of the booth.
It is fairly easy to make elements of a roof frame. To do this, simply follow our instructions and cut the rafters of the right size. Remember that in the pictures all dimensions are in inches (1 inch = 2. 5 cm).In the rafters it is necessary to make grooves, so that they will be better adjacent to the walls.
Having cut the first pair of rafters, make sure that they fit well. If this is not the case, make the necessary adjustments, and after that, using the first pair as a template, fabricate the remaining rafters.

Required roof elements.
Cladding of the frame
For the manufacture of the walls of the booth, use 12 mm plywood. This process is fairly simple and straightforward: you must measure the skeleton of the walls and with a hacksaw cut out pieces of plywood of appropriate sizes.
On the front wall do not forget to make the entrance. Just draw the contour of the entrance and, after drilling a hole, make a cut along this line using a jigsaw.

Production and fastening of plywood walls.
Along the rafters with finishing nails, nail the decorative encircling rim. As you can see in the figure, the roof of the structure should protrude at least 5 cm beyond the borders of the front and rear walls.
Tip: The protrusion of the roof may differ from the recommended one. It all depends on your needs and aesthetic preferences.

Roof trim.
In the next step, you should cut out two sheets of 12 mm plywood and attach them to the roof frame with 5 cm screws or nails every 25 cm along the ridge and rafters. Before fixing the roofing sheets, carefully combine them.

Roofing with plywood.
Tile the roof of the booth. Begin to mount it from the bottom row. Using chalk, draw a few horizontal lines on the plywood slopes of the roof, which will serve as a guide when laying your shingles. For attaching shingles, use nails of a suitable size.
Do not forget that the roofing tile should protrude at least 2. 5 cm in all directions in order to properly protect the wooden structure from rainwater. Do not forget to protect from the water and the ridge of the roof

A ready-made doghouse with your own hands.
Source of translation: www. howtospecialist. com
Search
Related Articles
types, style selection and installation (photos and videos)
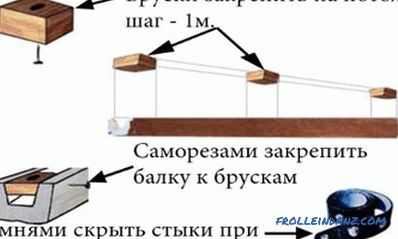
Ceiling beams as an element of decor are installed in the premises to give the interior originality and uniqueness. It can be both outward-carrying beams, and imitations depicting ceiling beams. In...
Do-it-yourself wooden flooring (video and photo)
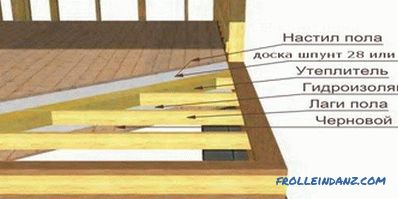
Wood flooring is currently very popular because it uses environmentally friendly materials. Such coverage is established not only in country houses, but also in city apartments. Therefore, many own...
How to make concrete - concrete with their own hands
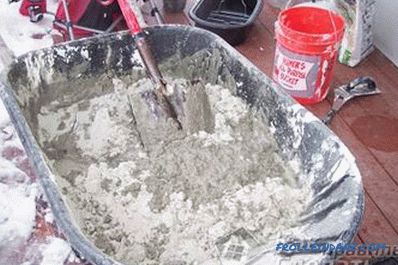
The preparation of high-quality concrete is impossible today without the use of technologies that have been used up over the years, which will allow you to get a mixture with specified technical cha...
Wood and glass do-it-yourself shelves: drawings (photos and videos)
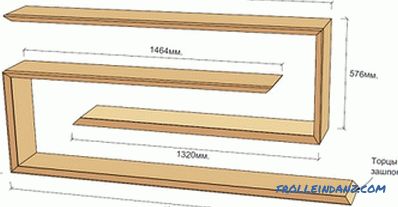
It is not necessary to purchase ready-made shelves or a closet for storing objects of small weight, photographs, books, decorative items, etc. Having made the shelves with your own hands, you will...