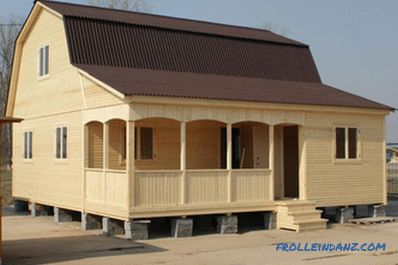
At the dacha, a gazebo is a decoration of the garden and the best place to relax. Conveniently located in it, you can enjoy nature and fresh air in any weather. The construction of an arbor with your own hands can be made of any materials, giving it a different shape.

The arbor on the site can be made of any shape from any materials.
Preparatory work
The construction of the gazebo begins with the selection of its location. You should not install it on the sun itself, since it will heat up, and therefore it will be impossible to be in it. The best place for a gazebo is its close proximity to a tree, the crowns of which will cast its shadow on its roof. For lovers of natural freshness and coolness, it should be installed near the reservoir, the view of the landscape of which will bring a feeling of deep peace. If the terrain is characterized by strong winds, then a continuous wall should be made on the leeward side. Pergolas can be protected from rain, glazing them, and from snow, either by raising the floors above the ground, or by making them from a moisture-resistant material.

When choosing a place, it is necessary to take into account the landscape of the site.
Next, you should decide on the type of future construction. It can be temporary, that is, it is installed at the end of spring, and in early autumn it is removed for safekeeping in a protected room. The advantage of such an arbor is that it can be transferred to any place. Its disadvantages include frequent dismantling, i.e., assembling and disassembling a gazebo with their own hands. Permanent structures made of wood, polycarbonate, brick, etc. are most often mounted. Since such a construction is thoroughly performed, it should be a continuation of the main landscape interior of the site. When mounting it, special attention is paid to the stability of the base. To do this, use either a concrete pavement, or a support on piles, or pipes, buried in the ground.
Having decided on the location of the future gazebo, you need to prepare a design drawing and a platform for its construction. Before you start building the foundation, you should familiarize yourself with the soil on the site. The most reliable are sandy and rocky soil types. The laying of a stable base in them is carried out at a depth of only 50 cm, in the event that the groundwater is located below this level. If the site is dominated by a dusty type of soil saturated with water, then the construction of any structure will be difficult. In this case, it is necessary to take additional measures to protect the foundation from wear.
Construction of the foundation
Required:

Since the arbor is not a heavy structure, the foundation can be made not deep from blocks.
- tape measure;
- shovel;
- pins and cord;
- profiled beam;
- PVC film ;
- tar;
- roofing felt;
- concrete.
The most common are arbors made of wood. Since they are not heavy in weight, then they do not need to establish a solid foundation. The best solution in this case is the arrangement of the columnar foundation. Installation of pillars is great for areas with clay soil. In order to avoid further distortion of the structure due to the rise of the foundation, due to the swelling of the clay soil, at least 6 posts should be installed. However, they should be located only around the perimeter of the building, since if there are internal pillars, the foundation can be skewed. In order that the soil does not freeze to the racks, and when swelling does not damage them, you should insulate by wrapping them with PVC film.
The optimal size parameters for a gazebo do it yourself is a width of 2 m and a length of 3 m. Before you begin work, you need to completely clear the area of debris and stones. Then the top layer of soil with vegetation to a depth of 10-15 cm is removed. After that, pegs are driven in along the perimeter of the future base and the cord is pulled between them. In this case, the diagonal sides are checked. Further, in the corners and in the center of the gazebo, pits measuring 30 x 30 cm and a depth of about 50 cm are dug, into which concrete poles are installed. The material used for them is profiled oak or larch. Before plunging into a hole, each pillar is lowered into tar or bitumen by 55 cm.

Arbor design.
To ensure a reliable base and drainage, a small amount of rubble is piled and carefully tamped to the bottom of each pit. After that, the PVC film is laid on it and the prepared timber is installed. In addition, each pillar is fixed horizontally with the help of rails. Then gravel is added to the pits and carefully tamped down. In the end, everything is poured with concrete and a small hill is formed around the perimeter of the above-ground part of the timber.The posts should be placed so that there is enough space under the floor for ventilation (about 10 cm). Between the pillars mounted basement (strapping), which relies on the jumper between them. After the concrete is fully grasped, that is, after two days, you can proceed to the installation of the gazebo with your own hands.
If a small building is installed on the site, then a flat horizontal concrete platform will serve as the foundation for the gazebos. To do this, first remove the top layer of soil with vegetation. Then a cushion of sand and crushed stone about 50 cm thick is made. At the same time, the poured sand is poured abundantly with water, and the rubble is carefully compacted. Further the platform is filled in with monolithic concrete. After the surface is completely dry, you can finish it with either paving slabs or wild stone. This foundation is not threatened by the swelling of the ground, or its subsidence.
Installation of the wooden arbor floor
It will be required:

The first stage in the construction of the arbor is the floor installation.
- timber 50x150 mm;
- floor boards;
- roofing material;
- construction level;
- screwdriver .
The construction of the building begins with the arrangement of the lag. For these purposes, planed bars of 50x150 mm are used, which are necessarily treated with a solution against rotting. To ensure the waterproofing of wood from groundwater, logs are stacked on columns along with roofing material in two layers. To facilitate the assembly process, the boards are sawn at one angle at 45 ° , and on the other, along the required length. Their connection is carried out using self-tapping screws. Lags around the perimeter are mounted horizontally horizontally using a level, further reinforcing the base with steel corners. After this, the cross from the boards is fixed inside and several parallel bars are installed in parallel. At the same time, they should be joined at an acute angle with self-tapping screws.
Next is the flooring of the gazebo. For this purpose planed boards are used, the cross section of which is 100-200х25-50 mm. Before work, they must be treated with antifungal solution. When installing the floor between the boards left a gap of 5 mm with inserts. This is necessary to ensure ventilation and because the wood can shrink and expand from changes in temperature and humidity. To hammer in nails or to screw in screws it is necessary so that their heads would be drowned in a tree. Then the skirting boards made of the same material close the edges of the floorboards. If the building is raised above the ground, then at the entrance steps are mounted.
The walls and the roof of the gazebo do it yourself
You will need:

The installation scheme of the corner posts of the gazebo.
- boards for the framework;
- timber for rafters;
- hacksaw;
- screwdriver.
Depending on the location of the gazebo, its walls can be lattice or solid. For example, when it is located in an open area, it is better to make them solid. First set up the rack for the frame of the future construction. For this purpose, boards treated with antifungal mortar 5-10 cm thick are used. They are mounted vertically using self-tapping screws at a distance of 150-200 cm from each other, as well as along the edges of the door passage. In this case, their upper part is preliminarily prepared for attaching rafters, i.e., grooves 50 mm wide and 70 mm deep are sawn into which they will be inserted diagonally.
For greater strength and reliability, the gazebos are connected in pairs, and the corners are reinforced with metal corners.

Variant of the wooden frame construction of an arbor
Then, diagonal and outer trimming is performed to form the frame. For this purpose, processed boards of 50x100 mm are used, which for a diagonal binding are fixed by self-tapping screws to the front side of the pillars, while strengthening the central connection with metal corners. And for the outer strapping, they are simply nailed from the outside in the upper part of the arbor frame. As a result, the same horizontal plane should come out.
The construction of the roof depends on what form it will be. In the event that it is gable, then 4 rafters are used, which are mounted on each side of the gazebo. At the chateau roof, 8 rafters are used, 4 of which are located at the corners, and 4 at the center of each side. To install them, a timber of 50x100 mm is taken, and the length of the rafters should be such that their ends hang 40-50 cm from the edge of the frame. On one side of the bars, a groove 50 mm wide and 100 mm deep is made. On the other side of the two rafters, a sampling area of 100x100 mm and a depth of 25 mm is performed.

Arrangement of the octagonal roof of the arbor.
The rafter bars overlap one another at the ends with a sample and then are inserted into the prepared groove of the column.And the other side are attached to the corner posts with self-tapping screws, which are 200 mm long. Then the ends of the remaining rafters are cut at the required angle and superimposed on the side of the column above, while securing them. At the double-sloped roof, the rafters are first connected with a horizontal cross member. Then attached to the harness beam and fixed between the slats.
Finishing work
It will be required:

The finished gazebo is painted or covered with stain.
- clapboard;
- railing boards;
- plywood;
- screwdrivers;
- foam;
- stain;
- plaster.
When building the arbor walls, the presence of a door and windows should be taken into account. If you plan to insert windows, then openings are prepared for this, mounts are installed for crossbars above the window and window sills. Then the frames are mounted and the gaps are filled up with the help of foam. Further, the frames overlap with wooden or plastic platbands. In buildings with solid walls, internal work is performed. First, the plaster is applied, and after it dries, the walls are clapboard or gypsum plasterboard. After that, the surface can be covered with water-based paint or pasted over with wallpaper.

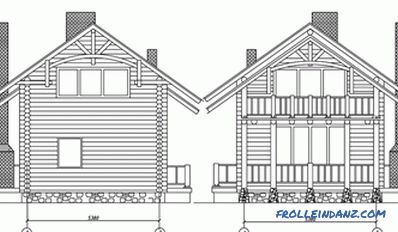
Drawing of an arbor from a log.
If construction of open-type arbors is being performed, then one of the walls on the windy side can be made solid. Then, in order to give an additional rigidity to the arbor frame, a railing of 40x60 mm board is installed. They are fixed at a distance of 1 m from the floor with screws between the racks. In this case, one wall is covered with boards completely, and the rest - only from the bottom to the railing. When installing boards between them left a gap of 2 mm. Then on the prepared walls lining is mounted. To do this, under the railing and on the bar of the bottom strapping, bars are fixed, the edges of which should not reach the outer edge. Further, the outer and inner parts of the arbor are lined with clapboard.
The roof crate can be made either with thick plywood sheets or boards. Plywood to bars fastened with galvanized screws. Boards before work are treated with linseed oil or wood stain to protect against moisture. The frequency of their location directly depends on the roofing material, in which the quality of shingles is excellent. The ceiling itself can be trimmed with foam polystyrene panels, clapboard or batten, or simply plaster. If it is planned to build electricity, the cabling is done before finishing work. To protect the wooden structure from fire, the cable is laid in a special hose from the corrugations. At the same time, mortgages for switches and sockets are installed and sockets for lamps are prepared.
For practicality, the floors are covered with linoleum. First, logs are mounted chipboard sheets, which are pre-treated with linseed oil. Then the flooring is spread. In this case, the gap formed between the railing and the top trim can be covered with a decorative grille or simply left open. At the end of construction, all wooden elements of the arbor are treated with wood stain and coated with varnish or paint. After that, you can proceed to the design: arrange the furniture, start climbing plants on the decorative lattice, hang out flower pots, decorate the interior with original lamps, etc.
an article? More information on the topic:
-

How to level the floor in a new building with your own hands?
Instructions on how to level the floor in a new building in case of serious drops in the horizontal surface of the base. Preparation and leveling of floors using log or cement-sand screed.
Search
Related Articles
Frame house do-it-yourself 6x8: step by step instructions
The frame houses are very reliable and durable. At the same time during their construction requires a minimum of materials and effort. Therefore, to build a frame house with your own hands is quite...
Felling of a sauna on the basis of wood: instruction (video and photo)
Different materials are used for self-construction of the sauna room. Their choice is most often caused by their own desire, which does not go against the available material means. The most popular...
Doghouse DIY - step by step instructions + Photos
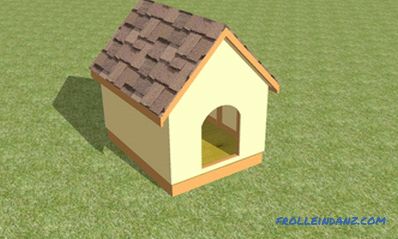
This article is a step-by-step instruction on how to build a kennel. This is quite an interesting project, as it provides an excellent opportunity to practice using various woodworking methods, and...
Lumber grades: grade differences, calibration
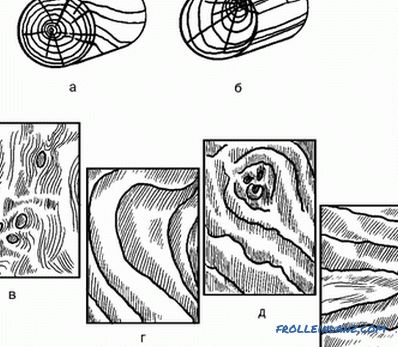
A tree, like any of the materials, has significant differences. They relate to the appearance of the rock and the quality of surface treatment. What is lumber? This is a fairly extensive term, whic...
Which air purifier to choose for an apartment or house

Ecology in today's cities leaves much to be desired. In addition to dust, cigarette smoke rushes in the air, bacteria, and heavy smog accumulates. And all this falls into our apartments and offices....