If you make a wooden pool with your own hands at a dacha or near a house, then you can take water treatments on a hot summer day just by going beyond the threshold.
The advantages of this solution
 Wooden ground
Perhaps thinking about the pool, Immediately it seems the pit, which then will be filled with concrete and will be laid out with tiles. And really, they do this in many cases. This requires a large investment of time, effort and money. But if you replace the concrete pool with a wooden structure, excavation may not be necessary at all. You can independently develop a unique project that will differ in an intricate form. In addition, at any time the structure can be moved to another place. With proper selection of components there is no need to dismantle it for the winter. The water inside may simply freeze and expand, but this will not do any harm to the coating. Fluid change does not take long either. In some cases, even the pump will not be required, it will be enough to connect the switch to the crane at the bottom and, while doing your own business, wait until the tank is empty. Moreover, the flow of water can be used for watering garden plants. You will be surprised how quickly and simply you can implement such a project.
Wood is an environmentally friendly material that can be added to any area.
What needs to be analyzed
The normal desire for a person is to use his products as long as possible. Usually this becomes possible with good preparation and careful planning. This approach is also valid in relation to the construction of the pool. Pay attention to some points.
 Pool near the house
- Neighborhood with buildings and vegetation . It is quite possible to place a container near the house, but if it is done near the pantry, where food is stored, then rodents, who may go there, can ruin the structure, which will lead to its partial or complete destruction. In hot days, the shadow of the trees is the salvation from the scorching sun. But for the pool such "partners" can become disastrous. For example, the root system of trees, growing, can damage the bottom. With a strong wind, a broken branch will drop the frame when it falls. In addition, the falling foliage when released into the water contributes to the development of bacteria and algae, because of which it is necessary to make frequent changes of water and cleaning the pool. It is better to avoid areas that are under high-voltage transmission lines. This, in addition to electromagnetic radiation, is threatened by electric shock.
- It is better to plan a plot for the construction of the pool that has a slight slope . This will make it possible to simplify the task itself with the discharge of used water, since it will be able to leave by gravity. It is great if the soil is clay, because it has a good density, and also does not pass water. In addition, such a coating can withstand sufficient weight without deformations, which could lead to a change in the configuration of the structure.
- Wind . The question of determining the preferred direction and strength of the wind is very important. Airflow can lift clouds of dust and dirt that will settle in the water. It is best to place the pool on a specific side of the building so that it covers the pool from gusts of wind. It is useful to consider this parameter when choosing the shape of the pool. If it is a rectangular container, then it should be placed long side downwind. In addition, openings for overflows must be made in the distant part, where the wind is mostly blowing, then the garbage will independently flow into the drainage.
-
 The optimal depth is Depth . The deeper the better. This rule is not suitable for home pool. Of course, I would like to make dizzying spectacular jumps from a springboard, but this can be unsafe. If this desire is still there, then in a place designed for diving, you can make a recess to 2.5 meters or more. But the optimum is the distance from the surface of the water to the bottom of 1.5 m. It is in such conditions that you can feel safe, swim safely, and if necessary, just stand up. When there are children in the family, then the depth needs to be made even less. For younger children, it may not exceed 50 cm. Nothing prevents to form the bottom in several levels. This will require considerable effort; afterwards it will be necessary to carefully monitor that the children are in a safe area. Additionally, you can build a partition of the grid or other material that will impede the free movement of children outside the territory allotted to them.
 - Communication supply . In advance, you need to think about how the pool will be filled.Whether a long hose will be used for this or a stationary system is implemented by supplying the pipeline directly to the location. In addition, with the continued operation of the pool, it will require cleaning, which can be done automatically with the help of special pumps. Their work will require the availability of electrical energy. This means that you need to do a cable routing. In this case, it is necessary to take into account the importance of ensuring good insulation and grounding, so that no one in the water will suffer.
- Lighting . Will bathing occur only during the day or have a desire to spend time in the pool and in the evening. In this case, you should think about a good backlight. It can be placed both on top of the pool, and directly in the pool itself. For this there are many solutions, which will be discussed below.
Choice of construction
All pools can be divided into several main groups.
 Surface Pool
Surface . In this embodiment, the entire structure is installed without excavation. When work needs to be done quickly or you are going to make a collapsible frame that will be removed at a time when the pool will not be used. Typically, such solutions provide a small depth, for example, up to 1.5 m. Otherwise, the load that will be on the walls of the vessel can destroy them. It will also be difficult to enter the water, you will need to make a fairly high stairs.
 Partially recessed
Partially recessed . Something in between the previous and the next option. In this case, you can increase the depth of the pool to the required.
 In-depth wooden basin
In-depth . Depending on the chosen configuration, large-scale work involving heavy equipment may be required. In this case, it will be significantly difficult to replace the fluid, it will be impossible to do without a pump. But the main advantage is that the territory remains uncluttered. In such a capacity is much easier to dive.
 Wooden pool with a podium
The form of realization is the desire and needs of the owner. It can be a triangle, square, rectangle, circle or something else. In some cases, for example, in the construction of a round pool, one cannot do without the help of an experienced carpenter who knows his job well, because the upper rim must have the correct shape, which will ensure high stability.
 Panel frame
The frame can be panel or knocked out of individual boards. Both options can be quite durable with the right approach. The choice will depend on what budget will be invested in construction, as well as on the availability of certain types of building materials.
Preparatory work
 Pool marking
- Selected land thoroughly cleaned of garbage. The grass is mown, which will only interfere with the entire construction.
- The territory is marked according to the selected project. If a rectangular and square shape is chosen, there are hardly any difficulties, but if a polygonal basin is conceived, some advice should be taken. So, if the construction is octagonal, then you can proceed as follows. The center point of the selected area is determined. A wooden peg or a piece of metal fittings is driven into it. A rope is taken that does not stretch. At one end is a loop that will move freely around the landmark. Its length should correspond to half the width of the future structure. Another element is attached to the second end with a pointed end, which can be used to draw. A circle is drawn. Through the circle are two perpendicular lines to divide it into 4 parts. Pegs are hammered at the points of junction to the circle. Between them, the distance is measured, it must be the same. Then to each of the drawn lines 2 more perpendiculars are lowered. Dots are also marked with pegs. The distance between the pegs is measured again. Then all the pegs are connected to each other with a rope or fishing line. Another way is to first mark the square on the plot. Its side should be equal to the width of the whole structure. To make it even, you need to clearly check the equivalence of the diagonals. A string is drawn between the four pegs. With the help of roulette, each side is divided into 3 equal parts. Two more pegs are hammered. On one side there are 4 marked points. Next, the marks are connected to each other so as to form a square with beveled corners. The result is an octahedron with equal sides.Six and other polygons can be drawn in a similar way.
- Inside the marked-up figure it is necessary to dig a small trench. If the construction is planned without deepening, then the recess should be made by 40 cm. The bottom of the pit should be formed in such a way that there is a bias towards the middle. A pit is dug there to a depth of 20–30 cm with dimensions of 50 * 50 cm or more. It is filled with gravel and will serve as a drainage (in order to speed up the removal of liquid that can overflow, you can put a sewer pipe inside the drainage pit and take it to the drainage receiver). The entire plane is covered with gravel in a layer of 20 cm and is well rammed. The remaining space is filled with sand and compacted using manual or mechanical tamping.
- If the design is planned with a large depth, then everything is done according to the instructions above, but the depth of the pit will be as calculated by the design decision.
- At this stage, it is also necessary to bring planned communications. If the water supply system comes close to the structure, then you need to lay it in a trench. The depth of the trench should be below the freezing of the ground level, so that in winter the frozen water does not break the pipes. You can use metal, polypropylene or polyethylene materials. In the latter case, the installation will be carried out quickly and without the need for soldering or welding. In the case when the whole structure is collapsible, then the eyeliner can be made on top, and for cold periods, simply drain all the liquid from the pipes.
In other variants, the pool can be placed not on the ground itself, but on wooden boards. To do this, you must knock them out of the trimmed board in the form of a future design. Such a solution will allow to make a ventilated bottom. This will prevent the development of various fungi due to moisture.
A simple option
 Assembling the sides of the pool
Realization Such a decision will take about one day and will not hit the family budget. The following tools and materials will be needed for implementation:
- hammer;
- hacksaw or hand-held circular saw;
- bayonet spade;
- screwdriver;
- wood screws;
- tape measure;
- water level;
- marking tools;
- bar 10 * 10 cm;
- edged board 10 * 5 cm;
- thick polyethylene film or PVC flooring.
 Make the deepening garden drill
The shape of the basin will be rectangular, because easiest to implement. The sequence of works will be as follows:
- According to the size of the future structure, pegs are hammered in the four corners. It is very important to observe the correct geometry. To do this, you need to check the diagonal and the correctness of the sizes of all sides.
- Racks are made of timber. Their length should be equal to the height of the entire pool plus the depth to which they need to be dug - at least 50 cm.
- The columns are cleaned and treated with an antiseptic composition to prevent them from rotting from constant moisture exposure.
- With the aid of a garden drill, holes are made to the required depth. Part of the beam, which will be in the ground, smeared with bitumen mastic and wrapped in roofing material.
- The racks are lowered into the prepared sockets. They need to be reconciled by construction level.
- In order for them to be well fixed, it is important to tamp the space around them in the pit with sand or rubble.
- After they are mounted, the diagonals are checked again for consistency.
- If everything is in order, then two lines are stretched between the installed elements. One is located at the bottom, the second - at the top. They will serve as a guide for the rest of the legs.
- With a step of 1 m in the same way as described above, the remaining racks are mounted.
- The water pressure will be large enough, so you need to strengthen them with oblique struts. At a distance of 50‒60 cm from the stand, a peg clogs up. A piece of board 10 * 5 cm rests against it, it is nailed to the rack from the top, and another jumper is made from below to form a triangle.
- A frame is formed between all the columns. For this, the edged board is cut into the required pieces and screwed with screws. The docking can be carried out closely or with a gap of 1‒2 cm.
- Inside the plastic film is laid with an overlap on the edges so that it does not wrap inside.
 The variety of wooden pools
In the case when it was decided to make a full tent, then you need PVC base. Its easy to buy. The one from which sew tents on trailers for trucks. Density is better to take 650 or more g / m 2 .
- The size is chosen so that there is a margin of 15‒20 cm on each side. This is necessary so that the inversion can be made later.
- The material fits into the middle of the frame and marks are made in those places where it will be necessary to lapel or to ensure a tight fit to the corners.
- If you need to combine 2 or more sheets to make a general construction, then you will need a powerful building dryer and a nozzle with a thin nozzle.
- The individual parts are laid on a flat surface. The edges are clearly aligned and fit together.
- If possible, practice with PVC tent residues. Two separate segments are placed next to a small overlap. After that, the edge is heated by a directed air flow. After it reaches the molten state, but has not yet become a liquid, it is important to make the rolling with a rubber roller. You need to train until you get a smooth, high-quality seam. After that, you can go to the main product.
- The edge of the rim is made by 5 cm. The eyelets are fixed every 10 cm - these are special metal rings into which you can later pass a rope for fixation. They are mounted using a special zaklepochnik.
- The prepared boot fits in the middle of the frame. It is spread over the entire area.
- Edges are wrapped around the top of the structure.
- A sturdy rope is pulled through the grommets and is well tightened to prevent the awning from moving.
-
 A small wooden swimming pool is ready The final step will be to make a staircase so that it is comfortable to enter.
 - It is necessary to take two pieces of the board. The length should be such that when they are inclined at an angle of 45 ° from the top to the ground. The ends are cut at the specified angle.
- The slats are screwed to the frame. Between them are made cross bars, which will serve as steps.
- For added safety, railings are additionally attached.
- It is necessary to fill the finished container gradually. On the first day, you can pour a third of the volume and leave overnight. If the level does not fall, then the seams are whole, and a full test can be performed.
Provide an additional material that can cover the filled pool. This is necessary so that when it is not used, the liquid in it remains clear.
 Wooden pool
Photo instructions:
 PVC preparation
 Site preparation
 Installation of racks
 Strengthening of the boards
 Installation of PVC
Semi-recessed
Such an option will require a more thorough approach, but it is easier to connect all the required systems.
 Semi-submerged basin
- The territory is marked as described above. But the size of the walls of the pit should be 10 cm larger than the walls of the pool frame. This gap must be met so that later there will be no problems with the installation.
- The pit breaks to a depth that will cover 2/3 of the tank wall height.
- The bottom is processed in the same way as described for the previous version. All walls are well aligned and tamped so as not to crumble during installation. After all the work is completed, this will no longer be a problem.
- For such a pool, you can make a complete water drainage system. At this stage it is necessary to carry out preparatory work. A trench is being dug, its level should start from the rammed bottom. In order for the water to go by gravity, a small slope is observed. Here it can be arbitrary, because heavy particles, as in the case of sewage, will not be discharged. The bottom of the trench is also covered with sand and rammed. The sewer pipe keeps within. A sand bed is made around it and it is also rammed. After that, it is completely covered with soil.
- A pit is dug in a short distance from the pool, into which a filter can then be placed. It must be connected to the pit under the pool with two holes through which the hoses will pass. You can make them with the help of an ordinary garden drill. That they were not filled up, metal sleeves are inserted into the middle.
- The main frame is easier to assemble on the surface. A bar of 10 * 10 cm is used for the racks. A rectangular or square construction is made, as provided by the project. The accuracy of all sizes is checked, measured diagonally, so that there are no errors. The columns are set to the level, they are located every meter. For ligation between them, 2 boards of 10 * 5 cm are used.
- The main frame is lowered into the excavated pit. It must be set to level.
- The remaining components are screwed in place already. Instead of a cut board, you can use moisture-resistant OSB or plywood.
- The entire structure must be treated with an antiseptic so that it lasts as long as possible.
- In the walls of the finished frame, in places where the sewer pipe and filter pipes pass, holes are cut.
- The head of the pipe for draining is displayed in the middle, hoses are laid that will lead to the filter.
- Spacing wedges are made of 10 * 5 cm board. In height, they should be equal to the depth of the pit. In order for them to perform their function, it is necessary to provide supporting elements. Sheet metal with a thickness of 3 mm and a size of 25 * 25 cm is suitable for them. Two plates opposite each other are screwed at the bottom of the rack and two at the top.
- Spacers are placed between the frame and the walls of the pit.
- The rest of the space is filled with rubble and well rammed. Top should be left 10 cm. This will be a layer of sand, which will give a more pleasant aesthetic look.
- The next step is to lay the tent. It is made on its own, as described earlier or to order.
- One of the most difficult moments will be the withdrawal of pipes through an awning canvas. To do this, before cutting the hole, the patch is glued in size larger than the planned slot. Special fittings that have bumpers are purchased. The hole is made clearly under the threaded connection, and the sides keep the product in place, which is reinforced with an additional patch.
- It makes no sense to put the sewer pipe directly into the tent. For this purpose, a special adapter with a rubber seal is installed on it. Closer to the bottom of the fitting is installed, it is closed with a plug, and on the other hand the flexible hose is lowered into the sewer pipe. Subsequently, it will be enough to open the valve for draining.
- The pool can be filled with water through a filter.
Making a sand filter
 Making a filter
This is very important an element of the entire system that allows organic residues and other debris to be removed from the water. If you do not do this, then you will have to change the water very often, which will result in a pretty penny. For manufacturing you will need:
- plastic barrel per 100 l;
- fittings for HDPE pipes;
- cartridge from the filter bulb;
- low-power centrifugal pump (well, if it is self-priming);
- clean sand.
In order for everything to function, it is necessary that the barrel be with a lid that will be hermetically closed. Departing 10 cm from the top of the tank, a hole is made under the thread of the fitting. A rubber gasket is put on and the thread is inserted into the prepared place. On the other hand, another rubber gasket is put on and the metal nut is tightened. In exactly the same way it is necessary to organize the exit at the bottom. From the inside, the filter cartridge is connected to the thread of the lower fitting. It is important to close its second end with a suitable lid in diameter. Inside the sand is filled up, it needs a little more than half the capacity. Hoses are connected to adapters through which circulation will be carried out. At the gap in the lower hose is set pump.
The system will function as follows: due to the fact that the tank will be below the water level in the pool, the liquid will enter the barrel by gravity. Passing through a layer of sand, it will be cleaned. Purified water through the filter cartridge screen will flow into the hose that goes to the pump. The engine, in turn, will push it back into the pool.
 The principle of operation of the sand filter
You can make an interesting design, in the form of a hill. To do this, you need a natural stone or bare skin from a river. From them the elevation is laid out. Inside the hose is laid through which water is supplied from the filter. Entering the slide, it will drain into the pool in the form of a waterfall.
There is another option that will be slightly more difficult to manufacture, but the performance will be at its best. In addition, it will be possible to implement an automatic filter cleaning system. Of the components will be needed:
- tank from the accumulator;
- fittings and pipes made of polypropylene;
- soldering iron for pipes;
- pipe shears;
- drill and drill bit for metal;
- bulb cartridge;
- adjustable wrench;
- pump;
- 4 ball valves.
You need to do the following:
- The rubber membrane that is inside is removed from the metal tank. To do this, unscrew all the bolts that hold the flange.
- A slightly higher hole is drilled above this hole. Its diameter must be made so that the thread crawls from the MRN.
- A single brass nut is screwed on the MPH up to the stop, a rubber gasket is put on and a thread is inserted into the prepared hole. On the other hand, another gasket is put on and the second nut is fixed.
- A fitting of approximately 15 cm is soldered to a fitting with an American type adapter.
- A cartridge from the filter is put on a section of pipe.
- The finished design is screwed to the threaded connection that was installed.
- The accumulator is installed vertically and sand is filled in the middle. This is done a little more than half.
- A small metal mesh is placed inside, which will serve as a limiter for a natural filter.
- The flange is set in place.
- The tee is screwed to the thread that comes out of the flange.
- Two cranes are installed on the tee. One of them will be for filing, the second will be applied if necessary to automatically clean the filter.
- A tee is soldered into the MPN to which two more cranes are connected.
- A bypass jumper must be made between the inlet and the outlet.
- A pump is connected to the metal tee, which is located on the flange thread, which will supply the pump. A hose is connected to the second tap on the metal tee, through which the waste will be removed during cleaning.
- A pipe for draining clean water is connected to one of the taps on a plastic tee. Bypass is connected to the second valve.
The essence of the system is as follows: water is sucked by the pump from the pool and is fed under pressure into the tank, passing through the sand and filter cartridge, it returns to the bathing container again. If it is necessary to perform automatic cleaning, then the flow must be redirected. To do this, open the valve through which the garbage goes through the hose (it is located on the tee, which is bolted to the flange). The valve on the outgoing branch pipe is blocked, the valve on the supply is also blocked, but the one on the bypass opens. Thus, the water begins to move first through the filter cartridge, then through the sand. Metal mesh, which serves as a fence, will prevent its washing out. But the dirt that has accumulated over the net will be free to go.
In the following video you will find instructions for making a homemade filter for the pool:
Setting the backlight
 Wooden pool lighting
The backlight can be implemented both external and underwater. In any of these cases, you will need protected lamps. Electricity can be supplied from home. To do this, the pool will need to install a mast. It can be made from wood or metal. Its height should be 2.5 m. This will allow not to cling to the cable, passing under it. On one of the walls of the main building a hole is drilled and an anchor with a metal hook is fixed in it. Or a separate hook that is inserted into the dowel. Between him and the prepared post tensioned cable or steel wire. It will hold the conductor, in which quality it is better to use a two-core monolithic copper cable in double braid, for example, GDP. An automaton is installed on the entire individual circuit. The strength of the current it can withstand should be less than that of the central one, which is mounted in the main shield. For example, if the primary has 25 A, then it will have 16 A. Now it will be possible to safely power the filter pump, as well as all the lighting elements.
 A swimming pool with a platform and lighting
To save electrical energy it is most advantageous to use LED emitters. There are special ones that are designed for immersion. Usually they are built in when pouring a concrete base, but in this case, in order not to tear the awning, for them holders can be made of plastic containers. You can mount them at the four corners at the bottom. To give a special atmosphere, you can take a sealed tape and attach it around the perimeter of the bottom or top of the pool. The most basic in this question will be a scrupulous approach to ensuring the isolation of compounds. To do this, you will need to use special plastic shells. Initially, the wiring is carried out using pads. After that, the resulting twist is placed in a special capsule. In the middle is poured epoxy resin, which is included. After pouring it is necessary to wait for some time until it solidifies. After that, the resulting connector can be lowered to a sufficiently large depth without fear that someone might suffer.
 LED lamp
If you still have concerns about the safety of those who will be in the water, then all lights can be positioned on the surface. To do this, you can build a stand at the four corners. Management of all elements can be taken out in a convenient place. It will be best to use sealed switches that are protected from the ingress of both moisture and dust.
As you can see, making a pool of wood is not that difficult.More time will have to be spent on the arrangement, which will make your stay in the pool as comfortable as possible.
Video
Step-by-step instructions on the construction of a wooden frame pool, see below:
See also:
- Construction of a concrete pool .
- How to build a swimming pool in the bath.
- How to make a water heater for the pool.
Search
Related Articles
How to get rid of mold in the apartment with their own hands

Mold - this is a fairly common phenomenon. Constantly growing spots not only look unaesthetic. Mold brings many more problems: unpleasant smell and harm to health. In this article we will describe t...
Shelves for a bath with their own hands: how to make, stages

The best way to rest, relax and rejuvenate after a hard day's work is to visit the bath. And in order for the rest to be complete, the room should be equipped with maximum comfort. Not the last rol...
Thermal insulation of the walls with foam plastic
The most popular material for thermal insulation today is foam. It is easy to work with him, he warms the room well and does not allow heat to volatilize through the walls. Most often it is used for...
design features (photo and video)
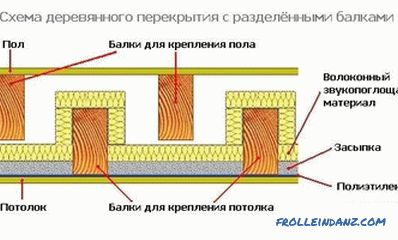
The ceiling in a wooden house can be made with your own hands. House made of wood refers to a warm and comfortable buildings with high thermal insulation properties. Arrangement of the ceiling stru...
Mounting rafters to Mauerla do it yourself
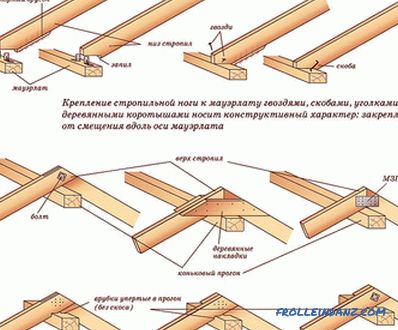
In order for the erected roof to be reliable, a very strong roof system is required, which is the supporting structure of the roof. Fastening the connections of individual elements affects both the...