High-quality and original furniture not only emphasizes the uniqueness of the dwelling, but also allows to diversify life.

A bunk bed can be made of several types of material: a fairly popular chipboard, timber and edged board, furniture board, and an array.
A wooden bunk bed is made quickly enough with its own hands, but it will have to invest a lot of forces due to a number of features.
Selection of materials before the workflow
There are a number of materials from which a bunk bed can be made with your own hands, but in reality only a few are used:

Bunk bed layout with wardrobe and drawer made of chipboard.
- Particleboard among others is particularly popular due to its low price and the possibility of extremely fast production. Skillful work with the jigsaw will not cause problems, but it’s impossible to make an internal design, since for its closure it requires complicated equipment that is installed only in factories. The downside is the color scheme (it is impossible to create high-quality imitation), as well as small emissions of chemicals into the air in unclosed edging places.
- Edged board and timber are also very popular, but more and more often as bearing elements, whereas they are rarely used as the main elements. It is quite difficult to work with them, besides, it is rather difficult to evaluate the material without prior experience, and only an experienced person can distinguish 17% of humidity from 30%. In the presence of a lathe bar becomes particularly popular, because you can create a very interesting supporting structure.
- The furniture shield is the most expensive among all, and you cannot find it in every city in the world. To make a bunk bed with your own hands, this material fits perfectly, and the strength and environmental friendliness are almost equivalent to an array. Quite well amenable to processing, and you can form a pattern even without through holes, which is very much appreciated by those who like to cut wood.
- An array is used extremely rarely, since prices are almost always astronomical, although it can be got everywhere. The convenience of this approach is the minimum number of parts, as well as their complete homogeneity. Working with the material is quite complicated (you need to properly dry, select and process), so without a good prior experience it is better not to get to work.
Accessories are used standard, but preferably instead of aluminum to resort to galvanized steel, which often does not look so impressive, but much more reliable, and this is especially important for the upper tier.
Preparation and main activity
Tools and materials:

Tools for installing a bunk bed.
- tape measure;
- edged board;
- plank;
- bar;
- jigsaw;
- protective composition;
- flat brush;
- screwdriver;
- steel furniture angles;
- furniture screws.
At the very beginning, you need to prepare a blueprint for your future workflow. In the drawing, it is desirable to use the minimum number of parts, moreover, it is often simplified during operation, since far from all elements can be machined. Bed dimensions may vary depending on the physical characteristics of the person having a rest, i.e. with a height of 190 cm there is no point in making the bed shorter than 210, whereas at 160 cm the best will be 180.
In this case, the most inconvenient option will be considered Work with a cut board and a bar, since, having learned on the difficult, it will be much easier to go to the simple. First you need to make a complete sawing of the elements that will be used later:
- timber 60 * 60 mm - 4 pcs. 1800 mm each;
- edged board 25 * 150 mm - 6 pcs. on 1900 mm, 12 pieces. 750 mm and 2 pcs. 1550 mm each;
- 25 * 80 mm bar - 2 pcs. 1800 mm and 6 pcs. on 300 mm.
After which they should be sanded as carefully as possible with an emery cloth. Particular attention is paid to the places of cuts, so that they do not have a burr, and after finishing the grinding, you need to collect all the dust from the wood with a damp sponge (not wet), but not especially wet it.
Then, without fail, all elements are covered with a protective layer against moisture and insects. Drying usually takes up to 12 hours, after which you can start working activities again.
Now we have to assemble a lot of sawn elements into one common bunk bed structure with our own hands:

Scheme of a bunk bed of planks and beams.
- At a height of 30 cm from the bottom of the bars, the perimeter of the edging board is formed.
- A further perimeter is formed mirrored from above.
- The feet and headboards are closed with 2 short boards.
- The upper tier around the perimeter is covered with boards, and you need to leave only a platform for the stairs.
- A staircase is being formed.
In order to organize the joint of the board and the beam, you will need a furniture steel corner, 2 screws for each joint. This design will ensure maximum reliability of the entire system during operation, regardless of the mass of the rest.
If you wish, you can use furniture screws of a great length, but for them you first need to drill holes of small diameter, after which you can finally finish. Installation on self-tapping screws is more reliable, but the joints will be visible (it is better to use 2 options in a pair, so that the quality was extremely high).
Important aspects in work
Tools and materials for further work:

Varieties of furniture screws.
- PVA and sawdust;
- furniture plugs;
- stain and varnish;
- brush flat;
- rubber heels;
- hammer and staple nails.
After the bunk bed is made with your own hands, you need to make some lying places in it. To do this, you will need 8 pieces of a bar of 25 * 40 mm along the entire inner length of 2 levels - these will be tsargs.
For their fixation, ordinary screws are used, but you still need to drill holes in order not to split the wood. The mounting pitch is only 25 cm with the required joints in the corners.
On them are formed of mattress pads. To do this, the board is cut to the entire inner width of the bed and fixed in increments of 10-13 cm. If the step is reduced, then the bed will be too hard, and with increasing the mattress will fall into the cracks. All fixation is made on the screws with a flat cap, and the cap must be inserted into the board (a groove is cut with a chisel). Otherwise, the mattress can be damaged, which should not be allowed.

Bunk bed assembly scheme.
All screws that are visible to the eye must be closed with special furniture plugs, which allow the metal to merge with the wood. If you want to achieve a better result, then you can mix the PVA with sawdust (you will get an improvised putty) and carefully tighten the metal with this gruel. In any of the 2 options, the result will be quite good, but upon closer inspection you can still see the screws.
And so the bed is completely ready, but you cannot rest on it. Now you need to cover it with stain and varnish, and then give 36 hours for complete drying in a ventilated room. You should not be guided by the fact that after 4-5 hours after varnishing with your fingers nothing is felt, since harmful chemical compounds will be emitted into the surrounding atmosphere for a very long time.
Before the start of operation, rubber heels are nailed onto the staple nails, which will level the unevenness of the floor. Instead of rubber, you can use plastic counterparts, but they will not provide such softness.
Summing up
Regardless of which drawing was chosen for the work, and then the materials, the whole process should be carried out with the utmost care. T. Because the bed is subjected to stable high loads, you need to choose extremely reliable materials that will last a long time.
If suddenly something went wrong while doing work, you can always interrupt for a short time, after which, by adjusting the part to another place, cut off the excess.
Even if there are a lot of unclaimed cuts in the end, you shouldn't get rid of everyone, because long ones can still be useful in the future for new ideas.
Didn't find the answer in the article? More information on the topic:
Search
Related Articles
How to choose a motor cultivator - inexpensive and reliable

The motor-cultivator is an indispensable tool for gardeners and gardeners. The main tasks of the soil cultivator include plowing and loosening the land, as well as hilling, cutting furrows and harro...
installation on the floor and on the ground
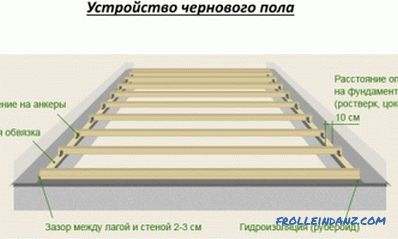
The design of the subfloor of wooden houses may be different, but in all cases it is a combination of several elements, including the underlying, leveling, intermediate and insulating layers. The f...
American style in the interior - the rules of design and 42 photo ideas

Modern American style in the interior in the form in which we know it today, was formed over several centuries, absorbed the features of the passing times, historical events. It was influenced by th...
What should be the slope of the sewer

For those who have not encountered the laying of sewer pipes, it may seem that everything is elementary and simple, but it is worth noting - it only seems that way. The question of what should be th...
Well do it yourself - how to dig (+ photos, diagrams)

Quality water is a guarantee of health, and it is unlikely that this can be said about the overall water supply system. That is why many people have a desire to have a well at their summer cottage....