Quality water is a guarantee of health, and it is unlikely that this can be said about the overall water supply system. That is why many people have a desire to have a well at their summer cottage. At first glance it may seem that this work can be trusted only to professional craftsmen, however, everyone can dig a well. This requires ingenuity, some knowledge and a desire to work hard.
") Tubular well
Tubular well
Before you need to decide exactly what your well will be - tubular or mine? If we talk about a tubular well, then it will be difficult to dig it out with an ordinary shovel, because it has a small diameter. Water supply is carried out thanks to the pump installed in it.
This type is established in places where the aquifer is very close to the surface of the earth. In order to drill a tubular view of the well, you need a special unit and tool. If this is not the case, then the best solution would be to dig a well of the mine type. However, before you begin to perform basic work, you should carefully study the safety precautions that contribute to the success of all work.
We are familiar with safety
") Safety
Safety
When digging, remember not so many rules, but knowing them will help you protect your health, and sometimes life.
Before you start work, you should check the ropes and ropes that you plan to use to lift buckets filled with underground soil and rings. Ropes and ropes used should be firmly tied to the bucket because its fall can mutilate the excavator inside the well. If you are going to dig a mine, the depth of which exceeds 6 m, be sure to tie a spare rope to the bucket.
It is important to know that a gas harmful to the human body accumulates at a depth. To determine the possible danger you need to light a candle in the mine, if it immediately goes out, then the presence of gas in large quantities is undeniable.
The problem is solved by airing. How? You can tie a tight blanket to the rope, lower it several times into the well shaft and pull it up. If the problem persists, then you can use fans. Such simple precautions will help you dig a mine and install well rings without injury or injury.
We are starting to go deep
") Digging a well
Digging a well
It’s important to start digging a well time during the period when the aquifer has the lowest level during the year, namely from June to September. However, if spring came late, then the construction of the well should begin no sooner than one month after the spring flood. This, among other things, will help the excavator not to confuse the water pipe with groundwater, which often leads to a rapid depletion of the well. In order to carry out the lowering and lifting of the rings, it is necessary to prepare a winch or a crane in advance. If you have no experience with such facilities, then it is better to invite yourself to help an experienced neighbor or colleague. After all, an error in this matter will require additional efforts, costs and time.
Now everything is ready for drilling the well. Initially, you will need to prepare a recess of about 30 cm, which will help to ensure that the parameters of the future excavation, in which concrete rings will fall, will be correct.
If the work is done qualitatively, it is necessary to install the first ring and continue to dig out layers of soil in it. To speed up the process, it is necessary for three people to take part in the work, the first of whom loads buckets inside the well, the other pulls them out, and the third rests. Periodic change of workers will help them to restore physical strength.
Gradually, the ring under the weight of the weight will sink into the pit, and the following will be installed on top and so on.
Rings should be lowered until an aquifer is found.
At the completion of digging a well, its bottom must be covered with stones and covered with gravel 30 cm, which serves to clean the water from the soil. Clay is poured in the cavity between the ground and the rings to create a kind of lock that protects the well from infiltrating the water pipe.
Video: digging a well of concrete rings
Difficulties encountered in the process of digging
") Difficulties of the process
Difficulties of the process
It happens that the rings stop falling under their own weight. Why it happens? The most common cause is the deviation of the rings from the vertical. The problem is solved by alignment. On top of the rings you need to lay a metal or wooden shield, and on it lay the bags that are stuffed with sand. In this order, the well should stand for some time. Under its own and additional weight the rings will align, after which work can be continued.
") Cleaning of drinking wells
Cleaning of drinking wells
Sometimes it happens that before the aquifer is found, water begins to seep into the well. How to be? It is necessary to pump out the liquid from the well, temporarily installing a pump in it. Upon completion of work on the site, it is imperative to make a cleaning in order to ensure the supply of clean water for a long time.
") Clean and tasty water
Clean and tasty water
Photos
") Digging a hole
Digging a hole
") Drilling
Drilling
") Installation of rings
Installation of rings
") So that the well does not freeze, you can build a well house
So that the well does not freeze, you can build a well house
") Creating a hut for the well
Creating a hut for the well
") Installation of communications from the well to the house
Installation of communications from the well to the house
") Offset of non-fixed rings due to ground movements
Offset of non-fixed rings due to ground movements
") A beautifully decorated well
A beautifully decorated well
")
")
")
Scheme
")
")
")
") Ogolovki mine wells
Ogolovki mine wells
") Device layout and main element you of the Abyssinian well
Device layout and main element you of the Abyssinian well
") Gate scheme and filter
Gate scheme and filter
") Drawing of the water lift from the well
Drawing of the water lift from the well
") Bottom filter for the well
Bottom filter for the well
Search
Related Articles
How to sheathe an iron staircase with a tree: features
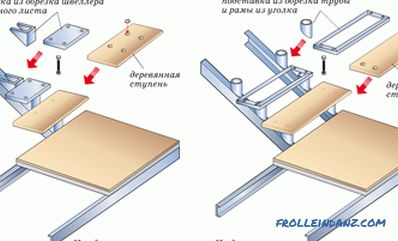
Wood and metal: agree, a good combination. Many designers use it for their projects. And it's not just about the stairs. But today we will talk about them and how to sheathe the iron staircase with...
definition of the concept, indicators for different breeds

The construction of almost any wooden object is associated with a large number of problems. After all, wood is a natural and very plastic material, demanding to external conditions. It is devoured...
main types and features (video)
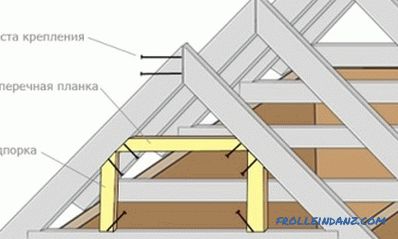
The type of roof will depend on the type of roof chosen. The device of the rafter system can be seen in fig. 1. Figure 1. Device of the rafter system. The process of erecting a roof of any...
Do-it-yourself installation of wooden entrance doors: stages (video)
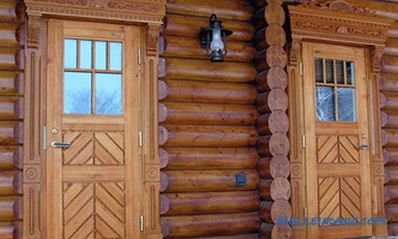
Wooden doors remain extremely popular due to their environmental friendliness, aesthetics and decorative effect. They are installed where no increased protective requirements are imposed. B...
DIY installation of HDPE pipes
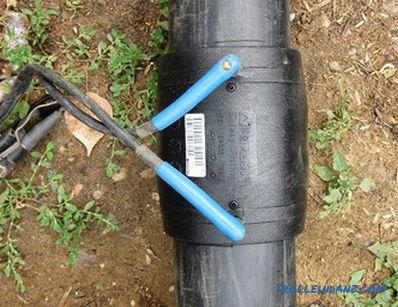
If you are building a house or doing repairs in an old dwelling, then you must be faced with the need to replace rusted steel pipelines with new ones. Best of all, plastic or polyethylene products o...