Often, a ready-made wardrobe purchased in a store does not fit into the size and interior of the apartment. In this case, you need to solve the question: how to make a cabinet with your own hands? It may seem difficult to make such a product. However, it is not. The main thing is to correctly determine its dimensions and make product drawings, and the assembly can be done by hand. Thus, you can solve the problem of how to make a wardrobe on your own.
")
Diagram of dimensions of the assembled structure.
Preparatory work
The process of manufacturing the cabinet consists of the following steps:
- Based on its installation site, its dimensions are determined. A sketch of the general view is drawn.
- Calculates the dimensions of the base, cover and base.
- The interior of the cabinet is divided into vertical and horizontal sections.
- There are sections for installing drawers.
- The door dimensions are calculated.
- The number of ends to be closed with end tape is determined.
- The necessary fittings are selected.
- All received dimensions are put on the drawing.
")
Wardrobe frame assembly scheme.
The process of measuring and creating sketches can be significantly accelerated by using a free program for designing furniture (Basis Furniture Maker or Autocad).
The most common and cheap material for making furniture is laminated chipboard. The back wall can be sewn laminated fiberboard. On the market there are many color shades of this material.
Preparation of elements and accessories
The details from which the cabinet is assembled are cut from chipboard sheets. When marking the sheet, it is necessary to take into account the cutting width of the saw (approximately 3 mm) so that the parts do not turn out to be less than is required. It is rather difficult to cut a sheet with a hacksaw or a jigsaw, therefore it is better to order the work on cutting a sheet in a workshop or shop when purchasing chipboard.
For the prepared components it is necessary to cover the open edges with a film in the color of chipboard. To do this, the tape is laid on the open edge and pressed against it with a hot iron. The exposed parts of the tape are cut off with a sharp knife. Cutting points are cleaned with fine sandpaper.
")
Holes for canopies are drilled at a distance of 7-12 cm from the edges of the door.
The shape of the hardware and its quantity depend on the number of drawers, compartments and doors. You will need the following fittings:
- handles for doors and drawers;
- guides for drawers;
- special screws (confirmatics) and plugs for them;
- tube for hangers.
After purchasing the component materials, proceed to the assembly of the cabinet.
Cabinet assembly procedure
To assemble the cabinet, you need the following tool:
- electric drill with a screwdriver drill;
- screwdriver;
- level;
- square;
- hacksaw;
- tape measure;
- sharp knife;
- iron;
- awl;
- hex key.
")
The hem is gently applied to the seam, covered with a towel on top and ironed with a heated iron.
The assembly of the cabinet begins with the development of a scheme for mounting and marking the mounting locations of fasteners. Then the elements are assembled in the following sequence:
- Places for fixing screws are marked. The screws are screwed into the end of the part, so the hole must be placed exactly in the middle of the end.
- The base of the cabinet is installed on the floor; holes for the installation of the base are drilled in it.
- The caps are fastened to the bottom with screws: one is in the middle, the others are on the sides.
- The side walls and the internal partition are installed on the base and are attached to it with screws.
- Installs the cabinet cover. If the cabinet is high (the gap between the ceiling and its top must be at least 10 cm, otherwise it is impossible to wrap the screws), we wrap the cover fixing screws with the hex key.
- Install the upper shelves.
- Fasten the back wall of the cabinet, it will give it rigidity and facilitate the assembly process.
- Set the assembled frame into place and set it to the level (horizontal).
- We fasten hinges on the door leafs. On the middle door, on the seal, fasten the mirror.
- We mark and drill holes in the details of the drawers.
- With the help of screws, we assemble drawers, with a square we check the corners (should be straight). We fasten the bottom to the side walls.
- In the places where drawers are installed, on the side walls, the support strips are fastened, and on the walls of the drawers - runners with rollers.
- The drawers are installed in place, the ease of movement is checked.
- The doors are hung on the cabinet frame, the smoothness of their opening is checked.
- The doors are adjusted, the gaps between the blades should be the same.
- It is installed on the marked places fittings.
- Final inspection and refinement of the ease of movement of drawers and doors is carried out.
The question of how to make a wardrobe on your own is easily solved. To do this, it is necessary to follow the above instructions step by step.
A closet made with your own hands will perfectly fit into the interior of an apartment and allow you to save a decent amount of money.
Didn't find the answer in the article? More information on the topic:
Search
Related Articles
Installation of metal tiles - video selection of instructions for installation of the roof

It is quite possible to learn to roof the roof with a metal tile even for a non-professional - there would be a desire. Yes, and modern roofing materials are so comfortable and light that it is plea...
instrument setup and security measures (video)
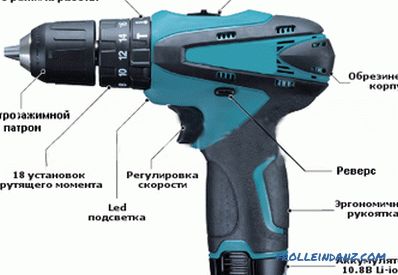
Often there are situations in the household or during repairs when a screwdriver is simply necessary. This hand-held power tool is designed for tightening and loosening various fasteners (screws, s...
How to glue the cork on the wall
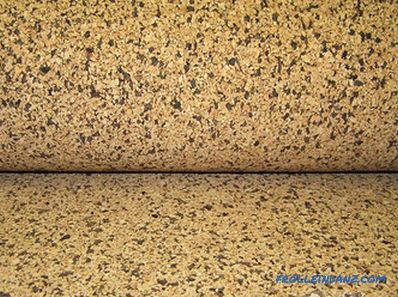
If you are an adherent of environmentally friendly materials that do not affect your health and are safe enough, then choosing a cork as a finishing material would be an ideal option for you. Partic...
What brand of chainsaw to choose - the best manufacturers

Even if the loggers at one time tried to automate production, the prototype chainsaw was originally designed for medical purposes. In the middle of the XIX century, the prosthetist Bernard Hein crea...
The interior design of a small bedroom - recommendations and 70 ideas for inspiration

Finding an apartment with a decent size bedroom is often very difficult. In a world where tiny studio apartments are becoming an increasingly common phenomenon, it seems you cannot do without the he...