The wall paneling gives the room coziness and brings country motifs into the interior.
")
Winging installation scheme.
The walls and ceilings of ancillary rooms and even living rooms in a country house can be sheathed with clapboard. Its main advantage should be considered simple installation.
Equipment and materials
Tools required for work: puncher, jigsaw, tape measure, level, pencil, screwdriver, hammer, sponge.
It is necessary to begin to sheathe clapboard from the blank of everything necessary for this work. You will need:
- punch;
- electric jigsaw or circular saw;
- chisel;
- tape measure;
- plumb;
- level;
- cord;
- square;
- pencil;
- screwdriver;
- hammer;
- glue gun;
- wooden or metal slats;
- direct suspensions;
- self-tapping screws;
- dowels;
- nails ;
- wall paneling;
- additional elements;
- assembly glue;
- clamps;
- base primer for wood;
- varnish or oil on wood;
- roller;
- brush;
- sponge.
Preparing panels
")
Clapboard mounting plan.
Lining should not go into the work directly from the store. She needs to rest for several days at a humidity and temperature that will be indoors in the near future. This will help avoid warping.
Processing the walls already claped with clapboard is not entirely correct. When drying, the wall panel will taper, and unpainted strips along its edges will protrude. Therefore, for durability and protection from pests, wood must be processed in advance.
It is also better to cut panels into size before work begins. This will allow the ends to be saturated with primer. Best of all, the wall paneling is cut with a circular saw, but the jigsaw is also fine. In the extreme case, you can use a hacksaw, but for the effective development of large volumes of work it is not very suitable.
In the first pass, panels on both sides are treated with a primer on wood. Walk roller on flat surfaces and brush on the ends. After drying, you can proceed to the finish coating. Coloring is performed in a horizontal position to avoid drips.
The most beautiful effect is rubbing the color with a semi-dry sponge. But such processing takes a lot of time and effort. If you are not ready for increased difficulties, then you can limit yourself to applying a top coat with a roller and a sponge. Do not forget to paint the ends of the front surface of the grooves. They do not overlap.
Frame device
")
Laying pattern for wall lining.
The paneling is fastened along a batten frame. You can use flat wooden bars 60 * 30 mm or lightweight galvanized profiles CD 60 * 27 mm, also called ceiling ones.
The first thing you need to decide is the frame with or without removal. The option with the removal provides a reserve space for insulation, and the second saves space in the room. Takeaway can be used on exterior walls, and the rest can be sheathed without unnecessary clearance.
The wall paneling can be positioned both vertically and horizontally. Accordingly, the frame, the rails of which are mounted perpendicular to the panels, can be horizontal or vertical. Consider that against the background of the horizontal plating all the flaws that were in the device floors clearly show through. Therefore, in the general case, it is better to prefer the vertical placement of the skin.
The distance between the slats for wall paneling should be about 50-60 cm.
")
Wall paneling for the ceiling.
Carrying out is performed using direct suspensions. Depending on the material of their walls, they are fixed with dowels or screws. The bent paws of the suspensions make it possible to fix the rail with screws through the perforation in the paws.
It is necessary to lay the slats in one plane according to the plumb, level and stretched cords along each line of suspensions. First, expose and fix the extreme slats on the level and plumb. Stretch the cords between them and expose the intermediate elements of the frame. Special care requires the use of wooden elements. Their geometry is often far from the reference. They can be not only curved, but also twisted. All this requires careful correction.
It is easier to use wooden slats for the framework without removal. They are attached directly to the wall. Sometimes you have to knock down the protruding plaster or put wedges in the hollows. When the wall is filled up or leaves, it is necessary to apply the combined designs. That is, wall fasteners with protruding and remote sides on the outgoing edge.
The ceiling frame has its own characteristics. It is convenient to carry out the ceiling lining when the walls are already aligned with clapboard or other finishing cladding. On a water or laser level, a horizontal line is drawn at the desired height.On line screwed galvanized start profile 28 * 27 mm. It gets the ceiling profile 60 * 27 mm. It is kept from sagging by direct hangers bolted to the ceiling every 40 cm. The step of the rails on the ceiling is 30 cm. plastic lining.
The lining is made using special fastening elements, which are called cleats. The spike of the panel is inserted into the groove of the previous one, and its groove is attracted to the frame by a kleimer.
Klymer is a small piece stamped from a thin galvanized sheet. It has a bearing pad with holes and a brace fixing plating. The bracket comes into the groove of the panel, and the klyaymer is nailed or screwed with screws. The hole for the nail on the supporting platform is small and single. For screws there are two holes bigger.
With this method of fixation, the wall panel still has the ability to change its size when the humidity and temperature fluctuate in the room. To preserve the possibility of expanding the panel is not inserted into the groove until it stops. It is necessary to leave a small gap of 2-3 mm.
Cladding starts from the corner or bottom-up with a spike to the corner. The sides of the extreme panels facing the corner have to be fixed by hammering or twisting the hardware right through the panel. Hats fasteners are hidden behind the overhead universal corners of MDF or other similar materials. Facing fittings sit on mounting glue. The joint with the ceiling or the floor is blocked by a plinth and a baguette. Ceiling lining is performed by the same method as the walls.
Didn't find the answer in the article? More information on the topic:
-
")
What to glue the flooring with your own hands
What to glue parquet? You can use different glue, its features depend on what kind of parquet is planned to glue. The first step is plywood, which should be well polished.
-
")
How to fix Euro-rail correctly?
Step-by-step instructions on how to fix the lining with your own hands. Materials and tools needed for work. Installation of this coating using klyaymerov.
Search
Related Articles
How to weld a ceiling joint by electric welding
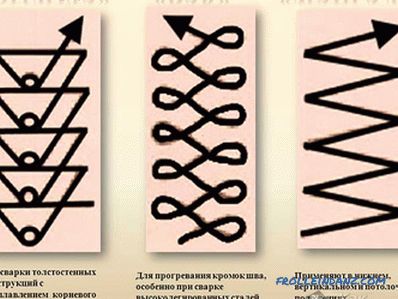
The use of welding joints in the assembly of metal structures is considered to be the simplest and most reliable method of their installation not only in industry, but also in everyday life. It is c...
How to glue wallpaper on drywall and properly prepare the surface + Video
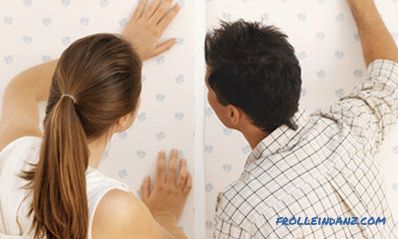
Wallpapering is the most popular type of wall decoration. It is easy and quick to glue wallpapers, this process is relatively simple and does not require any special skills or high qualifications o...
How to fill the foundation for the house with their own hands + photos, schemes
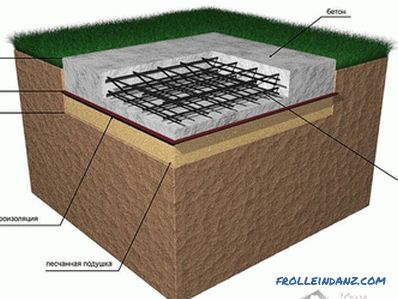
The construction of a private house always begins with the preparation and pouring of the foundation. Arrangement of the foundation of the house - one of the most important and crucial stages of con...
How to Roof Ondulin DIY
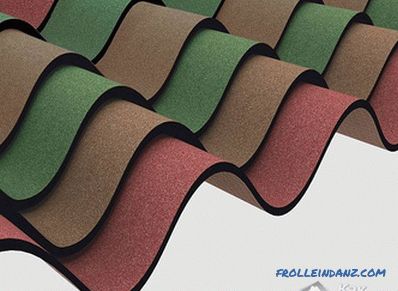
In the list of modern roofing materials, widely used both in the private sector and in industrial construction, ondulin (or Euro-asbestos) occupies a special place, characterized by such remarkable...
Wooden interior doors do it yourself: the subtleties of assembly and mounting

Interior doors add completeness to the interior of any room. Skillful selection of doors is not so easy to do, given that the market for these products is saturated to the limit. There is a peculia...