In the list of modern roofing materials, widely used both in the private sector and in industrial construction, ondulin (or Euro-asbestos) occupies a special place, characterized by such remarkable properties as:
- external attractiveness;
- lightness and high wear resistance;
- quite acceptable price;
- easy installation.
Ondulin, which includes bitumen, cellulose fibers, rubber and minerals (as a filler), can be classified as unique materials, made in the form of standard sheets of wave-like shapes, reliably protecting roof structures from bad weather
Strengths and weaknesses
 Ondulin
Before you roof the roof with your Oudulin hands, it is not superfluous to be familiar with some of its distinctive features. Like any roofing material ondulin has its advantages and disadvantages. The indisputable advantages of such coatings include:
- high resistance to sharp temperature fluctuations;
- long service life;
- possibility of laying material blanks on the old coating;
- resistance to biologically active media (mold and mildew);
- high environmental friendliness.

The disadvantages of ondulin coatings are considered to include:
- material flammability;
- its surface roughness, which contributes to the retention of snow on the plane of the roof;
- a small selection of possible colors;
- "burnout" of the surface of the sheet under the influence of direct sunlight.
Features of working with material
As already noted earlier, one of the advantages of ondulin is the possibility of its quick installation in combination with the relative simplicity of all the operations performed at the same time. Given the fact that the ondulin is allowed to lay on the old roofing, the economic effect of its use can be quite large.
 Installation of ondulin on the old roofing
In addition, during the installation work with this material is not there is a need to use any complex tool, as well as special training of the contractor. The owner of the structure being built is able to cope independently with the task set for him (even without outside help).
Since ondulin is soft, it is necessary to fasten the sheets of RSD that will not allow this roofing material to sag over the sheathing. Ondulin is relatively light and even with OSB sheets a new roof is much lighter than old tile and even slate.
Lathing

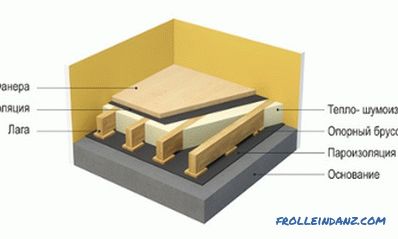
In the case when the roof is built from scratch, you will have to prepare a reliable crate from the bars, which will serve as the basis for laying sheets of ondulin. In addition to its direct purpose (as a supporting base), this part of the roof structure can be used to place on it such important elements as heat and waterproofing.
The lathing for the ondulin sheets is done with a small step, sufficient so that the coating material does not sag under the weight of accumulated snow or the OSB sheets are packed over the old lathing. In addition, the parameters of the batten should be selected taking into account the angle of inclination of the slope, as well as the direction of the wind characteristic of your area.
 Fastening of sheets of RSD
For a classical stingray, covered with Odulin, the basic parameters of the frame base look as follows :
- the optimum angle of inclination of the roof is at least 20 degrees;
- the typical step with which the rails of the sheath are packed is from 60 to 80 cm;
- with a larger step It will be necessary to use intermediate slats.
Installation conditions

To build a reliable ondulin roof that can last for many years, it is recommended that you familiarize yourself with a number of provisions regarding the installation of the specified material.
Such an installation manual contains the following recommendations:
- When moving along already laid sections of the roof covering, it is necessary to step on the crest of the blank wave, since the depression between them is not designed for heavy loads.
- All laying operations for an ondulin coating are carried out at air temperatures from -5 to + 30 ° C, which guarantee the preservation of the declared characteristics.
- A minimum of 20 fasteners from the purchased material kit should be used to fix a single sheet. The specified number of nails increases the reliability of fastening of the material, taking into account possible loads (with strong gusts of wind, for example).
- For the arrangement of the batten, bars with a cross section of 60 * 40 mm are usually used.
The slope of the roof
 The slope of the batten
In each specific situation the sheathing step is set depending on the slope of the slope being closed:
- when the slope is less than 10 degrees, a continuous sheath is usually made of OSB or moisture-resistant plywood;
- when angles of inclination from 10 to 20 degrees, the size of the working step should be about 450 mm;
- at large angles of inclination of the roof, this figure can reach 600‒800 mm.
 Diagram of the sheathing for ondulin depending on the slope
In the first of these cases, the value overlap height (end overlap) must be at least 300 mm; while the side overlap is done in two waves of the sheet. At high angles of inclination of the roof, these figures decrease to 200 mm and one wave, respectively. It should also be noted that a standard wood saw with lubricated technical oil can be used to adjust the sheet blanks.
Technique of fixing the sheet
This subsection describes how the ondulin sheet is properly attached to the crate.
 Installation sequence
The first row is mounted in one piece, starting from the edge of the roof. To fix them, special nails are used (they look like screws), which should be installed in each crest of the wave. When laying the subsequent rows, half sheets will be required (i.e., cut longitudinally into two parts), which are fastened through a single comb. It goes without saying that each of these sheets (as well as the rows) should be installed with a small overlap, the value of which is indicated above.
 Sheet fasteners
Sheets, fastened in a vertical position, are fixed on a crate prepared for them with a longitudinal overlap (overlap) in one wavelength; while the transverse overlap should be about 150 mm. At the final stage of roofing work, the installation of the ridge elements of the roof is made, which are fixed with an overlap along the wave of the sheet used.
 Installation of the ridge element
Material cost
Cost of a standard sheet ondulin in the size of 2000 * 950 mm in different regions ranges from 380 to 400 rubles.

The total need for roofing material, as well as the total cost of its purchase is determined by taking into account the number of sheets required to close all roof slopes, the area of which is calculated by known methods. When determining the total area, we should not forget about the amendment, which takes into account the part of the surface that is hidden under the overlaps (between adjacent sheets and rows).
In conclusion, we recommend that you familiarize yourself with the video, which tells about the installation of ondulin on the old roof, covered with roofing material (slate).
Video
Search
Related Articles
How to make a liquid wallpaper do it yourself
When creating a unique interior, special attention is paid to the finishing of the walls, because it is them who look first of all. In pursuit of beauty and comfort, many resort to original methods...
How to build a frame garage: the construction of buildings
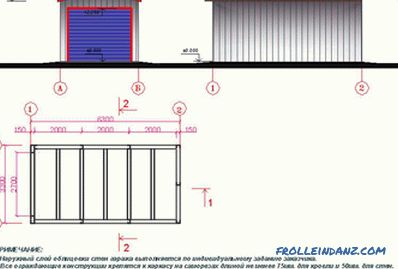
How to build a frame garage? Many motorists ask this question after purchasing a car. To implement such a plan, first you need to take the following steps: Drawing of the frame garage. to...
Septic from Eurocube do it yourself
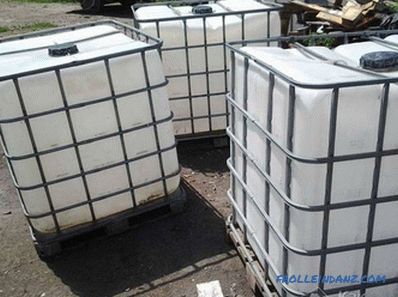
The arrangement of sewage systems in a private house has become a noticeable trend. For the device septic tank often used eurocubes. In this article we will consider the installation methods of such...
Decorative plaster walls do it yourself + photo, video
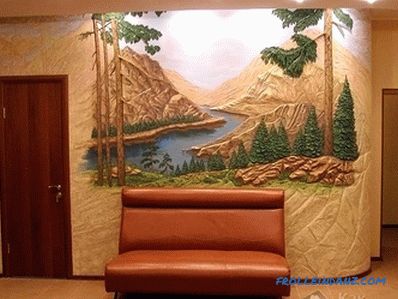
The times of total deficit generated by the Soviet era have long passed. After all, then the decoration of the walls in the room was clear and simple. Today, a variety of various finishing materials...
How to put crates and sheets?
There is no person who has not had to face the renovation of the house. Particularly acute problem of reconstruction of the premises is in the old buildings, where a simple tint and glue can not do...