Protection for wind and rain is needed for all dogs that live not in the house, but in the yard. This article is a step-by-step instruction on how to build a dog house with your own hands from plywood and standard lumber.
Remember that the box should be proportional to the size of your dog. In a very small kennel animal will be closely. But a big one does mean that it is good, because dogs tend to feel more protected in a dwelling that is limited in size. In addition, a properly-sized booth will help your pet use the warmth of its body to warm the air inside, and in cold weather it will make it comfortable to stay there.

Drawings and necessary materials
Drawing of the kennel:

Attention! All dimensions on the plan are in inches (1 inch = 2. 5 cm).
This project is designed for small and medium-sized dogs, whose weight does not exceed 20-25 kilograms. For the manufacture of basic structural elements you need only one sheet of 18 mm plywood.
Wood is a natural heat insulator, thanks to which in a booth it will be cool in hot summer and warm in winter. Safety of your dog is a priority, so try to choose high quality lumber. Use wood treated with preservatives under pressure, only to create a base that your pet can not nibble, because pressed wood (DSP) contains harmful chemicals that can harm the animal.
Timber preparation:
- Saw four bars with a section of 5x10 cm to create the base: two with a length of 55 cm and two with a length of 56. 2 cm.
- Saw eight fir or pine bars with a section of 5x5 cm to create a frame: four 37. 5 cm long for vertical posts in the corners of the booth and four 32. 5 cm long for the roof frame.
Step 1 - markup
At the beginning of our article there is an image containing a drawing of a booth, which we will build with you in this project. Once again we draw your attention to the fact that all dimensions on this plan are in inches. It is strongly recommended that you do not just download the file and print the already prepared scheme, but do your own drawings of the dog box with the sizes that your pet needs, check and double-check everything several times.
To begin, you must transfer dimensions from the drawing to a sheet of plywood. Use a ruler and a square to reproduce the scheme accurately. Bear in mind that on plywood, the individual pieces should not come into close contact with each other: you should take into account the width of the cut of the saw blade.
Make the entrance opening about 25 cm wide and 33 cm high. The lower edge (threshold) should be 7. 5 cm to cover the bottom and partially the bottom panel of the base. The height of the entrance opening should be about 3/4 the height of the dog. A large opening is not needed, as dogs prefer to enter the booth, bending their heads, this helps them to feel that their home is a cozy and protected place. In addition, a small opening allows you to keep warm in winter. Use any object of a round shape and a suitable size to draw the arched top of the entrance opening - a plate, frisbee or lid from the pan are perfect.


Step 2 - cutting out plywood fragments of the structure
Cut out all the marked fragments from plywood. Before you do this, firmly fix the sheet, it will provide a direct saw without splitting. In addition, to reduce chipping and splitting, be sure to use a sharp blade. It does not matter whether you will cut directly along the drawn line, to the right or to the left of it, but only under the condition that during the whole process you will adhere to the chosen strategy, i.e. you will make all cuts uniformly.
When cutting the roof panels, cut one long edge of each panel at a 45 degree angle. This will ensure their snug fit at the point where the two ramps close. Before changing the cutting angle of your circular saw, do not forget to turn it off, however, this should be done with any adjustments to the tool mode. When cutting, make sure you see both the blade and the line of cut.
Use a jigsaw with a blade for cutting plywood to cut the entrance opening. Pre-drill 1 cm hole - the starting point - in each lower corner of the opening. Carefully follow the drawn line. When the sawing process comes to an end, support the cut piece to prevent the plywood from breaking off.
If there is poor ventilation in the booth, the air in it in the summer will be too warm and stuffy, which means your pet will experience discomfort. A few holes in the rear panel near the ridge of the roof will ensure good air circulation. Drill three evenly distributed 35 mm holes.Directly under the drilling site, place a piece of board or bar under the plywood to reduce the likelihood of material splitting.
When you are finished cutting out all the plywood blanks, grind their edges with a manual sander or sanding pad, and then sandpaper of medium grain to eliminate any unevenness and notching.


Step 3 - Building the Foundation
Assemble the base frame from 5x10 cm bars. The base raises the floor of the booth a few centimeters above the ground. An air cushion under the floor will help keep it dry and will keep it warm. Using a circular saw, cut two bars with a length of 55 cm and two with a length of 56. 2 cm. When cutting pressure-treated wood, always wear a mask to protect your eyes and face from dust.
Longer bars should overlap the ends of shorter ones. Rezenkuyte pre-drilled guide holes and fasten the elements of the base of the booth together 75 mm galvanized screws (two at each end).
Place the bottom plywood panel on the assembled base and make sure that its edges are flush with the edges of the bars. Secure the booth floor on the base with 30 mm galvanized screws, drowning their heads just below the surface plane.


Step 4 - Assembling the Side Walls
Cut the framework elements from the bars with a section of 5x5 cm. Assemble the side walls, securing along the edges of the plywood fragments, bars 37. 5 cm long, which will serve as racks. The upper end of each bar should be flush with the upper edge of the plywood, the lower edge of the plywood wall will be longer than the bar-rack, by 2. 5 cm. Each bar must be fixed with three 30 mm galvanized screws. Place the side walls on the base of the booth and fasten with screws using the entire length of the bottom edge every 10-12 cm.
Now attach the back wall so that its bottom edge is flush with the bottom edges of the side walls. Secure it with 30 mm galvanized screws, screwed every 10 cm at the location of the vertical posts. At the bottom edge of the back wall attach to the floor panel, making sure that the ends of the screws do not stick through the plywood floor.
Fasten the front wall in the same way.


Step 5 - Mount the roof panels
Fix the bars with a section of 5x5 cm and a length of 32. 5 cm along the short sides of the roof panels. Each bar should be located at an equal distance from the upper and lower edges of the plywood fragment. To fasten them, use 30 mm galvanized screws (three for each bar).
Arrange the roof panels on the box, making sure that they are, firstly, evenly placed relative to the front and rear walls of the booth and, secondly, fit snugly to each other at the junction (on the ridge of the roof). Fasten the roof panels with 30 mm galvanized screws, screwed through the front and back walls of the booth into the roof frame bars.


Step 6 - roof lining
First cover the entire roof with one piece of roofing paper. This is an additional layer of protection that will ensure dryness inside the booth. Fix the roofing material can be 10 mm galvanized brackets, using a construction stapler. Using a knife, cut the edges of the ruberoid flush with the edges of the plywood roofing panels.
Now you can proceed to the roof lining of the roofing tiles (soft shingles). At the same time, it is necessary to ensure that the tips of the nails with which you will fasten the tiles do not stick inside the kennel, passing through the plywood roofing panels, since they can injure an animal. Therefore, at this stage, use galvanized roofing nails no longer than 18 mm.
The first row of roofing tiles must be laid along the lower edge of the roof. At the same time, the tile should protrude ~ 2 cm beyond the plywood panels, this will help protect the wood from moisture. Continue to fix the roofing material, moving upwards. Each next layer should overlap the previous, downstream. The caps of the nails with which you fix the tiles must be closed with an overlying layer of material, because this is a place of potential penetration of rainwater. Repeat the process on the other ramp. Do not forget to cover the ridge of the roof, bending the tile at a 90 degree angle.
If there is a need for this, after completing the work, you can cut off the excess material using a knife with a blade for cutting tiles. Do not forget, however, that the roofing material should protrude ~ 2 cm in all directions beyond the limits of the plywood slopes.

Step 7 - final touches
Paint the booth using low toxic paint with low content of volatile organic compounds for outdoor use.Previously, you can hide the holes for the screws with wood putty.
So we built a simple dog house with our own hands. Before allowing your pet to go inside the kennel, wait until the paint has completely dried (at least one or two days).

Source of translation: www. diynetwork. com
Search
Related Articles
pitch dependence on flooring
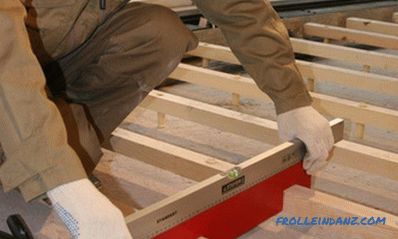
In order for the floor to be properly laid, even and strong, in 9 out of 10 it is laid on logs. Without a log, it is very difficult to level and reinforce the floor surface so that it does not bend...
How to make a color combination in the interior of the kitchen + 21 photo sample
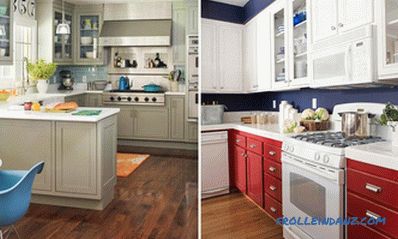
This collection of colorful kitchens will inspire you and tell you how to mix and match different colors and shades in the interior of your kitchen. Icy-blue + white + bluish-gray The right c...
Brickwork window laying
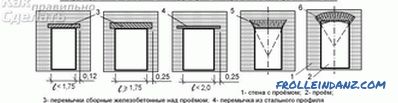
The design of window openings in buildings being erected is, as is well known, an indispensable component of the construction work carried out during the construction of residential buildings. When...
Mounted cabinets do-it-yourself: recommendations
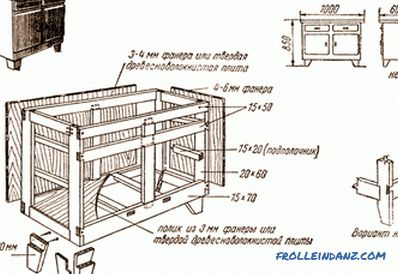
Wall-mounted cabinets are integral parts of any modern kitchen. They are used to store dishes, cutlery, food and other utensils. Today there are wall cabinets are quite expensive. Not every person...
How to sharpen a chainsaw chain - sharpen a chainsaw
The level of performance of such a responsible and efficient device as a chainsaw is greatly influenced by the care and timely maintenance of all equipment nodes. A well-prepared chain of quality al...