Self-made furniture will create an atmosphere of individuality, originality and convenience in your apartment. By completing your own wooden shelves, you will be able to embody your preferences, select the desired shape, size and color of the product.
")
If you don’t want to clutter the space with large bookshelves, you can make an original shelf for books that does not take up much space and will serve as a wonderful element of decor.
Wall shelves will save room space, free it from a large number of cabinets, give the interior an extravagant style. Shelves can be used for placing books, magazines, photographs, boxes, souvenirs. In the hallway, they may be intended for hats, bags or small items.
Classic wooden shelves may have a regular rectangular or asymmetrical shape. Shelves can be open or closed, suspended, floor or wall.
Wall shelves can be securely attached to the wall with anchors or dowels, in which case they can support more weight. Products may have a removable mount in the form of hooks and brackets. With a movable fixation, the lower tier of the model is a support for the upper tier.
Next, let's look at how to make a shelf with your own hands?
Making your own wooden shelves
")
Bars for a single-size shelf drilled from both sides at the same distance from the edges.
Before starting work, it is necessary to determine what the future model will have, what its dimensions and shape will be, and what weight the product is designed for. Then choose the location of the shelves in the room. After that, you need to make a drawing of the whole structure and its individual elements.
The wooden wall shelf will have a simple construction. It will be designed for relatively high loads, so it is recommended to make it from durable boards and to provide reliable fastening of its parts.
DIY materials and tools for making a shelf:
- wood planks;
- lacquer;
- circular saw;
- construction level;
- sandpaper;
- drill;
- screwdriver;
- grinding machine;
- screws;
- self-tapping screws;
- nails;
- pencil;
- square;
- ruler;
- brackets;
- anchors;
- hooks;
- brackets;
- dowels.
The boards from which the shelves will be made must be dry.
")
A rope is passed through the holes in the bars and fixed at the ends with knots.
They must be pre-sanded using sandpaper and a grinding machine.
The wooden shelves will look like a honeycomb.
First you need to set the cutting angle of the circular saw to 30 degrees.
Then cut out the details of the shelves of the required sizes. In total it is necessary to cut 15 elements of the product.
Each plank should be turned over and measured 300 mm from its edge. At the marked place perform cutting saw.
After the elements are manufactured, it is checked whether the joints of the parts are sufficiently even. For this product must be attached to each other on a flat surface.
Then the elements are glued together. Glue is applied to the edge of each part, after waiting a few seconds, pressed blanks to each other.
After the glue dries, drill holes for installing self-tapping screws. All blanks are interconnected. Assemble the frame of the product, connecting the sections with each other.
Two holes are drilled in each section to connect the structure. Using a screwdriver, screws are screwed into the holes.
")
The corners for fastening the shelf to the wall are inserted into the outer bars and securely fixed.
Then install the internal shelves. To do this, with the help of the square, they make the necessary measurements, specify them with the help of the construction level, install fixtures on which shelves are placed.
At the end of the work, the edges of the product are ground with emery paper.
Then you need to varnish the structure. It preserves the appearance of wood and gives the product a beautiful shine.
After the varnish has dried, mount the shelves on the wall. For this, a hole is drilled in the wall with a drill, a dowel is driven into it, a bracket is installed for hanging the product.
Then the bracket should be checked for strength. For this you need to make a certain effort to it. If the bracket is held firmly, then you need to attach the finished product to this bracket, and then with the assistant center the structure.
Then mark the installation location of the second bracket. It is installed and also tested for strength.
After that, the finished structure is mounted on the wall.
Original wall shelves for books do-it-yourself
")
The finished shelf is attached to the wall with self-tapping screws and an electric drill.
Materials and tools:
- wood planks;
- sandpaper;
- sanding machines;
- lacquer;
- brackets;
- dowels;
- screws;
- angle;
- pencil;
- construction level ;
- drill.
How to make a shelf for books? It is necessary to prepare in advance the necessary number of boards of the required sizes. Boards must be sanded and varnished.
First of all, the markings are made on the wall for the location of the future structure.
After that install the brackets.
At the bottom of each board, 2 large brackets are fixed, positioning them at a distance of the book's length. In the middle install a small bracket, separated from the two extreme brackets on the thickness of the book.
A shelf is mounted between these brackets. She must come close to her place.
Thus set the required number of shelves for books.
You can think of many different ways of making wooden shelves. If you follow this instruction, check all measurements with the help of a building level, firmly fasten all the elements, perform a reliable fixing of the product on the wall, then your model will be strong, reliable and durable. Attach all your skills, creativity and imagination, and you will create a product that is unique in its beauty, originality and convenience.
Didn't find the answer in the article? More information on the topic:
-
")
How to make furniture with your own quality
How to make furniture yourself. What are the materials, and what is their difference? Variants of the drawings, as well as a description of the manufacture of an example. What else you need to know when deciding to do this kind of work?
Search
Related Articles
Installation of plastic windows according to GOST instructions with photos

Metal-plastic windows are designed for long-term operation for 10–15 years. In order to avoid any problems with them, it is necessary to very carefully approach the choice of the structure itself an...
Dovetail Spike Connection: Workflow (video)
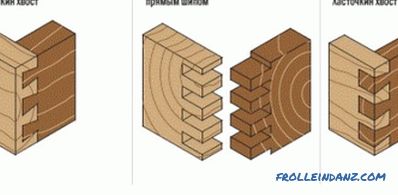
When constructing buildings and structures made of wood, you should always be able to make the right joint of wood among themselves. Various methods are used for this, but among all of them there i...
How to make a dog house with your own hands
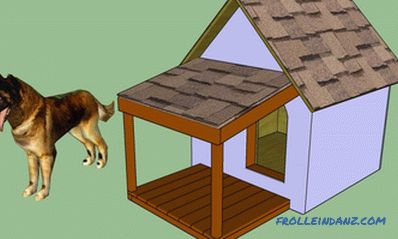
From this article, which is, in fact, a detailed step-by-step instruction, you will learn how to make a dog house with your own hands. And not just a booth, and insulated. Insulating material placed...
Bimetallic heating radiators specifications + Video
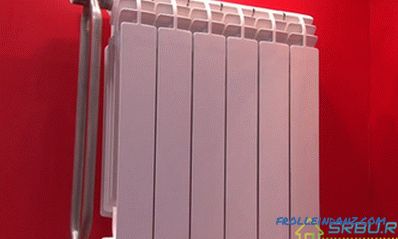
We have recently learned about bimetallic radiators - at the beginning of the current era. And they have already fallen in love with our compatriots much more traditional cast iron batteries. Not on...
What is the foundation for a one-story house?

Everyone knows that the reliability and durability of a country house under construction is largely determined by the correctness of the choice of the foundation for it. At the same time, you can de...