At first glance, the bath shelves can present themselves as completely unpretentious furniture. However, this is not entirely true - they are built in accordance with certain rules, the implementation of which helps to ensure not only a long service life, but also ease of use. With all the seemingly hard work, all the necessary actions are carried out easily and quickly enough.
")
Shelves are the most important component of the interior of the bath and it is not difficult or expensive to make them yourself.
Standard shelves for a bath
Sauna shelves can also be called benches. They are comfortable wide seats, which are placed in the bath in accordance with a special scheme. The design includes the following elements:
")
The first step in the construction of the bathing shelf is to make a frame with your own hands, to which the boards will later be attached.
- Frame - it serves as the basis for floorboards or as a support for their whole system. The frame is often made from supporting racks, which perform the same function as the legs of any shops, and attach transverse boards to them. In some cases, the frame is carried out as if for a staircase - the steps of the regiments will then be fixed to it. Sometimes the framework is installed without supports - in this embodiment the shelves are fastened to the walls. This technology is borrowed from the Finns, lovers of dry steam.
- Flooring - made of polished boards made of aspen or linden. It is necessary to fill the planks with a step of 1-2 cm. It is necessary to nail the floorboards directly to the frame or to make separate components, like traps, laid on the floor. If the flooring is not fixed, it can be removed from time to time and taken out of the bath to fresh air for ventilation.
With the use of removable decking, both the seats and the loungers are made in the bathhouse, and lovers of steam baths make podiums for the bathmaker. By the same principle as the flooring, they build backs for sun beds and seats, side elements for the regiments, devices that help to take a recumbent posture for relaxation, in which the legs are placed on the same level with the head or higher.
Preparation of preliminary work plans, calculations
")
The L-shaped design with an arbitrary number of steps can be placed in the corners of the room where possible.
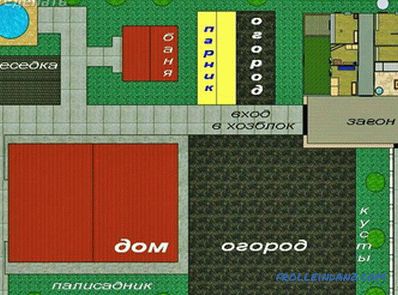
To achieve a successful result, it is imperative that you perform calculations and draw up a project - at least in general terms. To make the shelves in the bathhouse with your own hands, first draw a floor plan on a piece of paper, where all dimensions should be indicated, the intended arrangement of furniture and equipment should be marked, and door and window openings should be sketched. The scheme will help to more accurately calculate the intended location of the regiments in terms of security. For example, you can not install shelves in the steam room along the walls, if they have glazed windows. With a very hot pair of glass sometimes crack, and people can get hurt by shrapnel.
In drawing up the scheme for installing regiments, the choice of the owners is limited. Structures in several steps can be installed only along the walls, in which there are no windows and glazed vents of ventilation. The layouts are almost the same. The arrangement of the shelves can be as follows:
- L-shaped structures with an arbitrary number of steps. They can be placed in the corners of a room, where this is possible, while the upper and lower shelves of the three-story structure can be placed along the longer wall, and the middle one can be placed along the adjacent wall.
- Unified design along a wall in several rows.
- Parallel structures, symmetrical or asymmetrical, set off opposite walls like shelves in train cars.
Try to make several different options - then from them you can choose the one that best of all. In order to properly plan the work and calculate the cost of the necessary materials, it is necessary to determine the size of the regiments and the number of stages as accurately as possible.
Approximate dimensions of the regiments
")
Sizes of the shelf for the bath.
Traditionally, shelves for receiving bath procedures in different positions are arranged with the following dimensions:
- The length of the 1.8 m regiments is set for sun beds on which you plan to lie with legs extended. Of course, in the case of private construction, all dimensions are adjusted in accordance with the requests of the owners - we are talking only about the generally accepted averaged parameters.
- The width of the regiments is set to basically 0.6 m. However, it will not be particularly convenient to bathe in the prone position.
- With a width of 0.9 m, you can sit across the regiment, with your legs tucked in, and lie down along it comfortably with any figure.
- The smallest width for a regiment is 0.4 m. With such dimensions, it can be used except for a stand under your feet - it is quite convenient for a bath attendant to stand on such a step, and you can also sit if it is too hot at the top and you want to cool .
Of course, the options when choosing sizes may be different, but you shouldn’t do less than the listed values of the bath shelves with your own hands - it will be simply inconvenient.
The height of the furniture in the bath
")
The length, which is comfortable to sit on, is 90 centimeters to lie with bent legs, not less than 150 centimeters to lie, stretching their legs - more than 180 centimeters.
When arranging the shelves in the bath, calculations should begin with determining the height of the uppermost step. It must be made suitable so that you can sit on it without being constrained, and also be comfortable so that the person next to you can handle the back of the reclining person, that is, the distance should be sufficient for the span. The plane of the upper shelf, thus, preferably located at a distance of 1.1-1.2 m from the ceiling.
The height of the benches in the bath is set from 0.4 m to 0.6 m. The tolerance allows you to slightly raise and lower the lines of the regiments in the drawing so that the number of steps will turn out the way you want. The main thing is to make sure that the lowest of the tiers is at least 30 mm above the floor.
The bottom step is often not even attached to the floor. It is made as a portable shop, which is convenient to move or completely carry out to wash and clean the floor under it. If the stage is heavy, it can be equipped with special runners, which will move along the guides of rubber.
How to make the shelves for the steam room
With the right approach to making the shelves in the steam room, the craftsmen provide not only comfort in the future steam room, but also safety during bathing procedures and durability of bath furniture.
A special ventilation gap should be provided between the installed shelves and the walls of the room - at least 10 cm.
")
Phased manufacturing of the shelf do it yourself
At the place designated for the construction of shelves, frame elements are installed. Horizontal sections of bars are attached to the wall at the level where the front part of the shelf is located, then the frame parts are fixed to them using self-tapping screws.
It is recommended to use bars of 50Х70 mm for construction of the frame of bath regiments with your own hands. For boards, the thickness must be four times smaller than the width in order for the wood to have the opportunity to dry fully.
How many supports will be required for normal functioning is determined depending on the thickness of the slats. With a board thickness of 22 cm between the supports, it is necessary to maintain a distance of at least 0.6 m. To make the support more stable, it is connected using boards in the upper part, and in the lower part, and so along the entire length.
On all benches that are planned to be moved from place to place, rubber pads should be nailed to the bottom.
It is often advised to choose pins or nails made of wood as fasteners for floorboards. For them you need to drill special holes in the boards. When using self-tapping screws, it is better to mount from the back side of the shelf, otherwise the metal caps, while red-hot from the heat, will cause trouble to people lying on the shelf. If such an option is extremely disadvantageous, and it is necessary to fix it in the front, nevertheless, the caps must be buried in the wood.
Leave a gap between the floorboards - at least 1 cm. When calculating the material for the purchase, one should not forget about the need to make technological indents.
The side parts of the regiments, which comply with the rules adopted in Finnish saunas, do with ventilation gaps. Basically, sauna lovers do it this way, but not all of them know that the fixture of this element for the Finnish and Russian sauna with their own hands has some differences. They did not do that in the Russian baths - the sidewalls were tightly sutured with a board, which made it possible to reduce the cubic meters of wasted space. At the same time, the steam room naturally heated up faster, but the wood also dried out more slowly. The owners of the premises independently decide which approach will be more practical.
Didn't find the answer in the article? More information on the topic:
-
")
How to make a wooden floor on the ground?
Wooden floor on the ground: the device of the coating, the required materials and tools. Technical features of the work stages. The process of mounting your own hands.
Search
Related Articles
Protection of wooden structures from rotting and fungus: recommendations
Wooden structures are increasingly used in modern construction. Houses, farm buildings of various purposes, arbors, built of wood, look harmonious, beautiful and safe from the point of view of ecol...
How to process a tree in the bath: features
The originally Russian bath is traditionally made of wood. And this applies not only to interior decoration, interior and bath accessories - the right bath involves the very construction of the log...
How to choose an installation for a pendant toilet
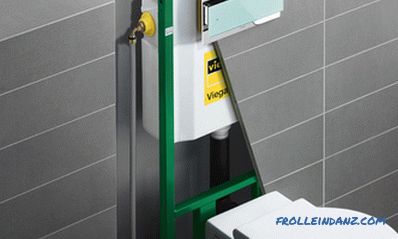
To avoid all sorts of problems when installing plumbing fixtures, you need to know how to choose an installation for a toilet bowl. The range of installations is large and an ignorant person can qui...
How high to install sockets

Modern home appliances have densely entered our life. It allows you to speed up and simplify many processes. But as you know, their work is connected with electricity, so in order not to run around...
How to build a barn with his own hands (+ photos)
A shed is an integral commercial building on a summer cottage. A well-designed barn can last more than ten years. In addition, you can save well if you build a barn yourself. First of all, to start...