Properly selected floors in a wooden house provide a more presentable look and a comfortable atmosphere in the rooms.
")
Floor installation scheme in a wooden house.
In wooden houses, the flooring is mainly made of the same material. It is safe for health, reliable and time tested.
Choice of material for flooring
")
Laying solid wood on supporting wooden structures.
When we make wooden floors in the house, the first thing to do is to choose the right material. Wooden floors can be arranged using different types of wood. When choosing a specific floor, you need to take into account the climate in the region, the available budget, the type of premises and the expected floor loads. For example, in a small residential building it is best to make a wooden floor from conifers. Such material is relatively inexpensive and is of good quality. The average price category is oak. Such a wooden floor is appropriate in almost any room. Alder and aspen are very suitable for children's rooms and bedrooms. For laying the floor in a wooden house can be used parquet flooring or solid wood flooring. It is recommended to use boards 1.8–2.5 cm thick and 50–200 cm long.
You can use glued parquet. The appearance and dimensions of such a product do not differ from the solid counterpart. Performance properties at the same level. The product consists of at least 3 layers, which are glued to each other under high pressure. The top layer is made of fine wood and has an average thickness of 0.5 cm. The remaining layers are made of more budget wood, which reduces the cost of the product as a whole. In addition, for flooring in a wooden house, you can use parquet.
Technology of flooring in a wooden house
")
Laying options for floors in a wooden house.
There are 2 main options for laying the floor: without and with offset. Choose a suitable scheme in accordance with the characteristics of the room layout, your personal preferences and the available budget.
Before you start, prepare the following tools:
- hacksaw with small teeth;
- hammer and ax;
- plane, preferably electric;
- construction level and square;
- nail catcher;
- grinder;
- circular saw;
- pencil and measuring tape.
The flooring in a wooden house is done in 2 layers. The first is preparatory, that is, the basis. Wood spreads on top of it. Flooring can be laid in two ways. In accordance with the first of them, lags are applied, and according to the second - floor beams.
Before proceeding to work, you need to thoroughly treat the pads, boards and logs with fire-resistance agents and protection against various pests, i.e., with an antiseptic. Under the future construction moisture-proof material is laid. Penofol or thick polyethylene film can be used. Penofol is more preferable, since it simultaneously protects not only from moisture, but also from excessive noise.
How to lay the floor correctly on the logs?
")
Laying the boards on the logs.
Lag can be installed directly on the foundation or walls of a wooden house. Put lags in the room and leave there for a few days to the material "accustomed" to the environment. Next you need to take 2 logs and place them on opposite walls. Between the installed lags, a dense thread is stretched in increments of 150 cm. In the future, you will be guided by these threads and will be able to correctly install all other lags. Be sure to fill the available voids and gaps with insulating material.
In the event that boards with a width of about 40 cm will be used for laying the floor, logs must be mounted 80 cm apart from each other. If the boards are up to 30 cm wide, install the logs in increments of 50-60 cm. And if you lay the boards wider than 40 cm, the logs should be installed 100 cm apart from each other.
To adjust the height of the log, use wedges made of wood or plywood. To strengthen the wedges, use long nails or screws. If there is a possibility of fixing the logs on the concrete, for this you need to use anchors or dowels. Fasteners should be made so that the caps of the elements about 3 mm deep into the base.
")
The main methods of waterproofing a wooden floor.
Checking horizontal position is a mandatory installation step. Only then can you proceed to laying and strengthening the flooring boards.
Retreat 15-20 mm from the wall and fix, being guided by the previously stretched line, of the plank of the first row. Prepare the holes for the screws in advance, if you fasten with them. Lay on the board on each lag and secure.To hide the gaps between the floor and the wall, use screws.
Step-by-step instructions on how to make a plywood base for the floor
")
Scheme of the plywood floor.
The floor in a wooden house can be laid on a pre-equipped plywood base. This is a pretty good option for arranging rough floors in residential areas. The advantage of plywood is that it is practically not deformed during operation, so that the base is very durable and reliable.
It makes sense to create plywood flooring also in cases when the existing wooden floor has deteriorated, i.e. it has cracked, loosened, etc. In the future you will be able to dismantle the floor covering fixed on the plywood base without any problems .
Another advantage of the plywood base is the absence of the need for additional preparatory work, which saves time. A new floor in a wooden house is laid directly on the plywood. It is not recommended to use plywood in a wooden house with high humidity and frequent temperature changes. For unheated and bathrooms, this material is not suitable.
")
Stages for laying the floor.
Before beginning to level the floor, place the plywood sheets on the floor, take the chalk and draw a diagram of their laying. In the future, the installation log will be performed exactly according to this scheme. The floor leveling procedure, as a rule, begins with the installation of beacons on the floor space. The surface is divided into a plurality of squares with a side of about 30 cm. Screws are screwed into the corners of these squares. They need to set with an electric screwdriver and building level.
The next step is laying the lag. Plywood will be laid on them. The step between the lags is directly related to the thickness of the plywood: the larger it is, the greater the distance between the bars should be. The average value is 40 cm. In some situations, transverse bars are mounted between the lags for extra strength. They should be installed at a distance of 50 cm from each other.
Pay attention so that the lags do not sag. If these are present, you just need to take a few pieces of plywood, grease them with parquet glue and put it under sagging logs. To attach the lag to the base, you can use plywood liners on glue, anchors, corners, screws. If anchors are used, their caps need to be drowned in wood by about 3 mm. The construction is additionally glued. If this is not done, the finished floor in the wooden house will pop.
Cover the lags with rolled glassine top. It will protect the wood from the harmful effects of moisture. After laying the protective material, lay the plywood. Lay it so that the edges of the sheets were on the logs. Leave a gap of 2 mm between the sheets. After the glue dries, the plywood needs to be additionally secured with screws. On one sheet of material takes about 8-9 screws. Sand the joints, they should be perfectly level.
In case the concrete base is already flat, i.e., the screed is made, the wooden layer can be laid directly on the concrete. However, care should be taken to avoid direct contact of wood with concrete. To do this, use polyethylene foam or soil mastic. In the case of polyethylene, it must be laid with an overlap. The material is relatively inexpensive, but, despite its simplicity and budget, provides excellent protection.
Recommendations for laying the floor
")
The wooden floor along the floor beams.
Laying the floor in a wooden house requires compliance with the rules that will provide the highest quality and reliable coverage. Stick to the next walkthrough.
Grind the boards and lay them on the boards to make the markings. The floor is laid in such a way that the ancient rings of wood are directed in opposite directions. After pre-fitting, number the boards to make it easier to lay them in the future. This will save you time from additional grinding and adjusting the material to size.
Start laying away from the wall. Leave a vent hole. In the future, you will be able to close this gap with the help of a plinth. Nails hammer at an angle, slightly deepening the caps into the material. After the first board is laid, you need to retreat about 40-60 mm from the edge and drive the brackets into the bars with a small gap. Insert the protective rail into the slot. After that, drive a wedge between the rail and the bracket, which is slightly wider than the width of the gap.
Nail the boards with nails and remove the brackets. Again, lay a few boards, press them with a rail and a wedge and nail them to the bar. For fastening wooden boards use nails and a piercer. Each next board should be sealed with a mallet, and only after that fix them with nails.
Improper grooving of dowels will create difficulties when laying boards.In some situations, you have to file the ends of the boards near the wall itself in order to make the bottom a little shorter than the top. Usually problems arise when installing the latest board. To facilitate its installation it is necessary to level the upper part of the tongue with a plane, preferably an electric one. After leveling, the board is glued and nailed closer to the edge with hidden-tip nails. In the future, these nails hide the plinth, so you can not worry.
After the installation of the flooring has been completed, it is imperative to grind the joints.
To get rid of drops and irregularities even at the installation stage, place ruberoid, cardboard or other similar material under the bars at the joints.
Wood chips are not recommended. Hide the gap between the flooring and the wall using a plinth. When these works are completed, you can start laying the finishing floor covering: parquet, laminate, parquet, etc.
Finishing
")
Floor insulation scheme.
In order for the wood to last as long as possible, it must be properly maintained. If you do not plan to use any additional coating such as laminate and parquet, you need to finish the flooring. It can be sanded, treated with soda, primer, paint or varnish. When applying paint, varnish or impregnation, you must move in the direction parallel to the wood fibers.
As a rule, when choosing a material for flooring, people are guided by personal notions about comfort and beauty, as well as the quality and cost of the material. Currently, a variety of solutions are available for sale, so you will surely find the most suitable option for your needs.
Thus, wooden floors can be laid without special skills, special knowledge, time and money. You just need to do everything in accordance with the instructions and follow the rules. Good luck!
Search
Related Articles
Natural ventilation of the house (buildings)
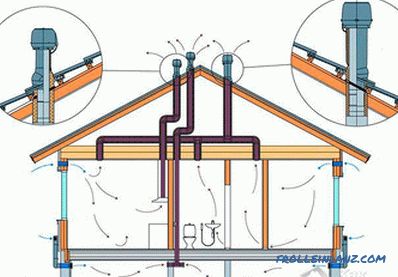
When there were no various conditioners, extracts and other systems, people used the natural laws of nature to ventilate the rooms. Natural ventilation was used in ancient civilizations. Her samples...
How to make a ladder to the attic with your own hands
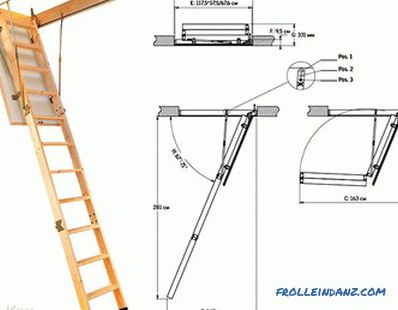
If in the near future you intend to retool the attic under the functional room, then it is worthwhile before work to consider where to install the ladder and how to manufacture it. A ceiling door or...
How to get rid of mold in the apartment with their own hands

Mold - this is a fairly common phenomenon. Constantly growing spots not only look unaesthetic. Mold brings many more problems: unpleasant smell and harm to health. In this article we will describe t...
Japanese style in interior design

The restrained and exotic Japanese style in the interior is consonant with modernity. It is often used to organize the space of small studio apartments, cozy summer cafes, living rooms or bedrooms....
How to make a pool with your own hands (+ photo)
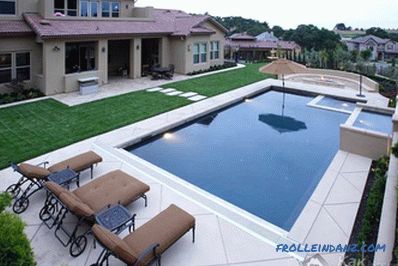
The swimming pool at the dacha is no longer a luxury item. After all, it can be done independently. If you have the necessary funds, the reservoir for the rest can be bought. However, a person who i...