If in the near future you intend to retool the attic under the functional room, then it is worthwhile before work to consider where to install the ladder and how to manufacture it. A ceiling door or hatch will also be installed here. Such a design can be ordered or bought ready-made, but let's find out how you can do everything yourself. So, you pretty much save the family budget and acquire new skills that may well be useful to you in the future.
Earlier the attic stairs were made outside, but hardly anyone will be pleased with the prospect of going up to the room across the street in cold weather or rain. Many people in the attic arranged the ceiling door, most often in the corridor, and if necessary to climb up, they use the ladder. But this is also inconvenient if you have to equip, for example, a study or a rest room on the upper tier. For a civilized person, a better choice would be the installation of a stationary or folding stepped lift. If there is no place for the first option, then the second will suit you very much.
Design requirements

Whichever way you choose, it must comply with safety requirements. The design should provide a safe passage to the attic and be strong enough. The screw type takes up relatively little space and is highly attractive, however, it will be very difficult for older people to climb these steps.
If the area of the corridor or hallway allows, it is better to make a wide enough opening so that you can install a good stationary staircase.
The larger the opening in the attic, the greater the heat loss will be, if it is, of course, not a heated attic room.
 Stationary stairs
Handrails and handrails provide sufficient security for a person climbing stairs . Therefore, if possible, make a design with these elements. Since in our case we are talking about independent production, it is also important to treat it with special means that increase the refractoriness of the structure. This is especially true for wooden stairs.
The capacity indicator should not be small, since, if necessary, heavy weight should be taken into account in the attic. So, the optimal load capacity - 260 kg.
The types

Attic stairs are divided into the following types:
- Monolithic. They can be marching and screw.
- Folding. There are lever, scissor, folding, sliding or telescopic.
- Portable ladders or side ladders.
Transportable views are a temporary connection between floors. If you plan to use the attic in rare cases, the additional structure is the best option. But with the arrangement of the upper room for a recreation area or for children’s games, a more reliable ladder should be made.
 Ladder
Most often, there is no place for a massive construction in residential buildings. It is therefore not surprising that retractable stairs and their folding counterparts are most in demand when arranging an attic. They are compact, safe and convenient, easy to use.
Sizes

The attic staircase has standard parameters, following which you can make a really reliable and easy-to-use construction:
- The width of the march should be 65-110 cm.
- Height to 3.5 m. This is due to the fact that a fall from such or greater height is fraught with injuries, and the rigidity of the high construction will be much smaller.
- Average number of steps - 15.
- Height of the risers - 19 cm.
- Step thickness - 1.8-2.2 cm.
- Tilt angle ranges from 60 to 75º. This is due to the fact that an angle of less than 60º will require a lot of space, and an angle of more than 75º is dangerous when used.
- If you have to make a folding option, then it must withstand a weight of up to 150 kg.
- Steps should not be slippery. They are set parallel to the floor.
Choosing a place

If you have to make the stairs yourself, then it is important to determine the installation location - inside or outside, if you choose the first option, then in which room will the opening be made to climb to the attic? It is important that the stairs do not interfere with households. Therefore, to install it in the kitchen or in the bedroom is not advisable.
If the upper tier is not used intensively, then a device for lifting it can be made in the living room. It is better that the staircase is closed or autonomous. In such a situation, folding design is a very good option.
Measurements

If you are going to make a folding ladder, then take into account its dimensions when folded and unfolded. Measure from floor to ceiling.Decide on the width, the number of steps, the angle of inclination. All data is fixed on paper, which will help you to make the most accurate drawing. Errors in calculations can lead to undesirable consequences. For example, the staircase will be inconvenient to use, the risk of injury will increase.
The steps must be arranged parallel to the floor. Doors must not open onto a flight of stairs.
Material selection

When manufacturing a wooden staircase, all parts should be treated with antiseptics to avoid rotting of the finished product. After assembly, it will be possible to paint the product with any varnish / paint suitable for the color. Usually attic stairs are made of pine. This material chooses the majority of home-made, since it is easier to work with wood than with metal.
If you decide to work with metal, use materials with a galvanized coating. This type of metal does not rust. Such structures have great strength. So, you can save space, galvanized elements are thin, and therefore do not take up much space.
To prevent metal parts from rubbing against each other, you can use plastic parts. Thus, due to interchangeable side plastic inserts slip will be prevented.
Form

Attic staircase feature - form. It should be ergonomic, compact, comfortable and convenient. In a small room overall design will look ridiculous. In a large enough room - there are no restrictions, you want to install a compact one, but you want to build a stationary massive one.
It depends on the available space and personal preferences whether the staircase will be one-, two- or three-flight. If from floor to ceiling is no more than 3 m, then it is quite possible to get along with the simplest type - one-shot. But, if you want to be more original, build a dvuhmarshevoe product.
To make a one-shot design look more interesting, make it arc-shaped. Steps can be made in the form of diverging rays.
Getting Started

If you made the measurements and outlined the drawings, then it’s time to make an estimate of the materials. You should stock up:
- Screws.
- Screwdrivers.
- Tape measure.
- Hacksaw for wood.
- Wrench set.
- Mounting foam.
- Protractor.
- Hinges.
Side and vertical beams are used as the base, which serve as a support. The amount of permissible loads on the structure depends entirely on the strength of the base.
Two-section ladder

One section of this design is folded up. The assembled two-section ladder is not hidden, but remains visible. This is allowed if the exit to the attic settles in the garage or other work space. At registration of the house in the corresponding style the two-section model will successfully look and in the corridor. For its production you will need the following materials:
- Roulette.
- A plain wooden staircase.
- Hacksaw for wood.
- 4 bars having a thickness of 2-3 cm, 2 of them must correspond to the width of the hatch, and 2 - be longer by 20 cm.
- 4 pcs. card loops corresponding to the width of the kosour.
- Fasteners.
The kosour is the base of the ladder on which the steps are laid.
Manufacturing technology

First you need to connect a short bar with hinges to the upper end of the ladder, another similar bar should be firmly fixed to the bottom. To end up with a reliable design, take 2 slats and nail them diagonally on the back of the flight of stairs. In this case, it is necessary to carry out these actions so that these reinforcing bars do not impede the movement of the stairs.
After this, it is necessary to measure 2/3 of the total length. Measurements are taken from below. In the intended place should be cut the stairs. These parts will subsequently be connected by card loops, which are fastened on the reverse side. Thus, the design can be easily folded.
The upper bar is fixed under the hatch. Thanks to the hook and loop, your product will not open arbitrarily. So, the hook is attached to the wall, and the loop - to the bar.
Manufacturing a folding ladder on string

The manufacturing process of a folding ladder consists of the following steps:
- Divide the height from floor to the attic hatch in 3 parts. In this case, the first part should be the same as the size of the hatch, the second - a little less, and the third - cover the remaining distance to the floor.
- Now you need to measure the angle of the hatch by the pit.
- Transfer the angle to the workpiece ladder, which will allow you to mark the steps.
- Drill holes between the sections for subsequent assembly of the hinge.
- Sand all the elements.
- Where the hinges are installed, the boards are sawn.
- Cut and grind steps.
- Make a notch in the string for setting the steps.
- Insert the steps into the string, putting them on the glue, and then tightening them with self-tapping screws.
- Loop the sections. To properly perform this stage of work, place the sections on a flat plane.
- Check the section functionality.
- Assemble the structure and temporarily install it in the hatch. If it turned out that the ladder needs to be adjusted a little, then do it.
- Now sand all surfaces and cover it with varnish in several layers. In this case, the following can be applied only after the complete drying of the previous layer.
- After the varnish has dried, install the finished product in the hatch in the hatch.
To speed up the process, do all the work with your partner. This will also help avoid injuries when working at height.
If you have questions on a topic, then by all means ask them to our expert. Would you like to add an article or provide useful additional recommendations? Leave your comments.
Video
Photo
The photo shows several versions of attic stairs:
 Stairs to the attic from
 Stairs above the entrance
 Original staircase
 Folding design

 Types of folding ladders
Schemes
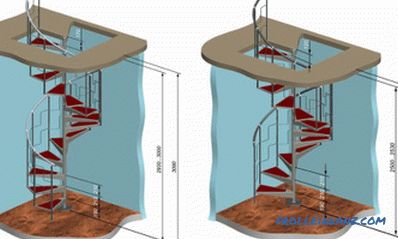
 Calculation of the spiral staircase
 Drawing of stairs
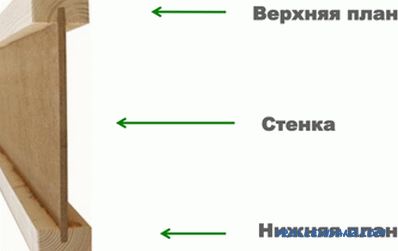
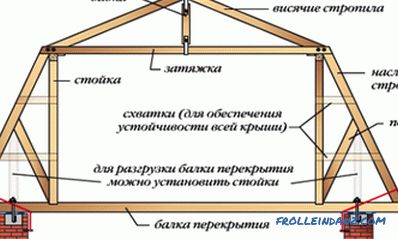
 Scheme of wooden stairs
 Layout
 Layout for determining the height and slope of the staircase
Search
Related Articles
tread width, riser height, number of steps (video)
A spiral staircase is an option popular with owners of small premises, as its design allows to save space considerably. According to most newcomers to construction and renovation, making such a lad...
I-beam wooden do-it-yourself from timber and OSB
Time does not stand still, therefore new technologies are replaced by new ones - light, practical and environmentally friendly. The wooden beam was always popular, but only in the XXI century they...
Do-it-yourself rafter installation: step-by-step instructions
Installing the rafters, as well as creating the entire roof, is a very important process. Taking into account the fact that the base of the roof can be fixed to the wall, using the available means...
Do-it-yourself retaining wall - features and installation (+ photos)
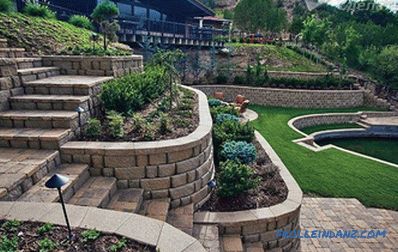
Regardless of where your cottage is located or a private house, you need to carefully prepare the territory. This issue is particularly relevant in hilly terrain. In this case, special fortification...
Fastening rafters to a brick wall do it yourself
Many difficulties arise during the construction of a brick house, but they are all quite easily overcome. The most popular complication is attaching the rafters to a brick wall, since this surface...