Armstrong ceilings belong to a class of suspended ceilings, which have become very popular. Most often they are found in various office spaces. It is not recommended to install ceilings of this type when finishing apartments, because the plates contain asbestos.
In the article we will tell about the installation of the Armstrong suspended ceiling with our own hands, we will give step-by-step instructions, as well as photo materials.
Work requirements
 Armstrong ceiling lamp
- The plates should be installed only after the completion of the installation and construction work in the room, including "wet" finishing works, laying the floor, installing doors and windows.
- Mounting the suspended ceiling is recommended at a temperature of 15 to 30 ° C.
- The recommended air humidity in rooms is no more than 70%.
 Strengthening suspensions
Only install solid luminaires and air conditioners on standalone ones bearing structures.
- If it is required to lay an additional layer of insulating material on top of the plates, or to install embedded luminaires, then it is necessary to increase the number of suspensions used.
- To prevent profile overloading, the outermost suspension should be located at a distance of no more than 0. 60 m from the walls (for plates ≤ 4 kg / m²) and 0. 45 m (for plates ≥ 4 kg / m²).
- It is necessary to maintain a distance of at least 120 mm between the frame and the base. This contributes to the further possibility of dismantling the slabs during the operation of the Armstrong ceiling.
- The mounting pitch must be no more than 1200 mm.
Installation steps
 Preparing wiring
Installation should begin after placing all communications behind a false ceiling, since their installation at the end of installation will be extremely inconvenient.
When choosing a suspension system, pay attention to the weight of equipment and communications planned for placement in a false ceiling. Armstrong ceiling is designed for a load of approximately 6.5 kg / m².
 Installation scheme
We proceed to the consideration of the stages of installation work.
- First, mark the horizontal surface of the future ceiling: put the first mark on any wall of the room at a distance from the floor or the existing ceiling so that the system you are mounting can close the communications laid on top or the projections. The markup should be based on the height of the embedded accessories.
- After you have applied the first mark, project in the same way the other necessary marks on all the walls of the room so that you can easily connect them with a straight line. The projection of the marks should be done using a special water level. You can also use a more modern laser level.
- After applying the walls to a straight, straight line that sets the level of the surface of the future ceiling, you can begin to mount the ceiling system.
- To the walls, along the line drawn, fix the L-shaped profile, which is usually included in the kit. It is possible to divide a profile into the required sizes with a hacksaw. Joiner's block or protractor use for cutting corner joints. The profile should be fixed with the painted side down and in such a way that it forms a shelf.
 Assembly of the ceiling construction
- Next, you should mount the guide profiles, which they look like the letter T, only inverted. Their length is different. At the two ends of the short profile are small protrusions, and in the long there are slots into which a short profile is inserted during installation. As a result, you should have a grid of profiles, consisting of cells with a size of 600x600 mm.
- Fill the resulting grille with Armstrong cassettes and along with the accessories with which you decided to decorate the new ceiling. It is best to start laying from the middle of the room. Gradually fixing the remaining plates in the direction from the center, you can perform a uniform trimming of the extreme plates and thereby ensure that the ceiling looks neat.
 Pasting of cassettes Armstrong
- The guide profiles are hung on a conventional wire, ≤ 2 mm, or with the help of hanging elements (2 thin rods of metal, threaded through holes in a curved plate, the so-called "petal"). If you decide to use the wire, then you need to straighten it beforehand using any available mechanical tool, and then form at least three loops at the attachment points to the profile system and the ceiling fastener.
- For dowels for screws, choose based on the quality of the ceiling material.
- Screws with a hook or ring are used as fasteners.
- Using a level, level the grid horizontally. Repeat the alignment of the Armstrong ceiling in a couple of days - by this time your new ceiling will have time to get a full load.
Properly executed installation of a suspended ceiling will help to decorate any office space.
Video
Installation of a mirrored Armstrong ceiling. The main attention is paid to the ceiling marking, alignment of the construction and cutting of mirror cassettes:
Assembly of the suspended ceiling Armstrong:
Search
Related Articles
DIY wooden shelving: manufacturing and assembly
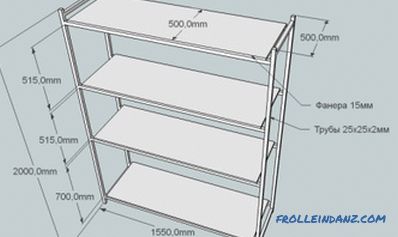
Shelving at all times was of great interest. This is quite a convenient thing that can be used to store various things, books. You can also put on high racks and pots with low plants that will look...
The best manufacturers of faucets for the bathroom or kitchen

A selection of the best manufacturers of bathroom and kitchen faucets are based on the technical features of the products, user reviews and ratings, as well as technological solutions. Such an eleme...
What filter for water purification to choose

The quality of modern drinking water, regardless of the method of its delivery, leaves much to be desired. This concerns not only the central water supply, but also well water, and even artesian wel...
Painting the house outside with their own hands: preparation, technology (photo)

Country house owners often have a question about which finishing materials to choose. A wooden house inside and outside is best covered with paintwork materials. Choosing paint for processing woo...
Children's sandbox with a cover with their own hands + Photo
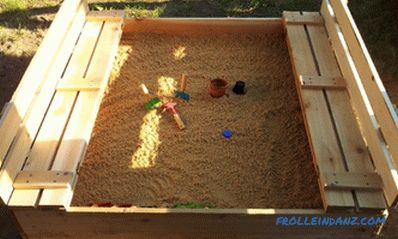
From the article submitted to your attention, you will learn how to make a sandbox with a lid with your own hands. Thanks to such a lid, the place for children's games will be protected from cats se...