From the article submitted to your attention, you will learn how to make a sandbox with a lid with your own hands. Thanks to such a lid, the place for children's games will be protected from cats seeking to use it as a toilet, but at the same time water will easily get in (rainwater or from a sprinkler), preventing the sand from drying out too easily. The latter aspect is very important not only to maintain the consistency of the material consistency ideal for building kulichikov and sand castles. Dry sand rises easily into the air and presents a risk to human health if released into the lungs. This construction has an open bottom, and (if you decide to use a barrier for weeds) the sand in it will remain wet for a long time.
The cover of our sandbox, apart from maintaining the purity of the sand, has another very useful function. At the time of children's games, she can miraculously transform into two comfortable benches with backs, on which mom and dad can comfortably sit watching the game of their baby.

Required materials and tools
As a material for building a sandbox, I recommend using wood that is resistant to weathering, rotting and insects and does not emit toxic fumes, like commercially available plastic boxes.
DO NOT use chipboard and preservative treated wood under pressure to build a sandbox. It contains formaldehyde and other harmful chemicals that protect wood from rot and insects. Making a sandbox from similar materials is equivalent to simply giving the kid an arsenic sandwich, tie his eyes and send him to play outside ...
To implement this project, you will need to purchase the following fasteners and fittings:
- A package of 30 mm self-tapping screws is long enough to securely hold wooden elements of the structure, but not so long as to go through two boards and injure your child;
- Eight (or twelve) 40 mm non-separable metal hinges;
Optional Required lumber:
- eight 2. 5x15 cm planks 120 cm long for the manufacture of side walls of the sandbox;
- twelve 2. 5x10 cm planks 120 cm long for making the top cover ( Try to choose high-quality, smooth, well-planed boards, because some of them will function as seats and their backs);
- six 2. 5x7. 5 cm of bars with a length of 20 cm for fastening the seat boards (make sure that the surface of the bars is well treated, because otherwise you will have to regularly remove the splinters from the priests of your little fidge);
- four 2. 5x7. 5 cm bar 45 cm long to fasten the backrest boards and hold the backrest in a vertical position;
- four 5x10 cm bar 28 cm long to strengthen the corners of the box (you can use 10x10 cm bars to make the structure really strong).
What you probably already have (if not, you should buy it immediately):
- Cordless drill / driver. I highly recommend the Hitachi brand tool. I bought a similar kit and use it regularly. This tiny drill is capable of anything. It has a shock mechanism and therefore does not require much effort when working. Lithium-ion batteries work almost forever and charge almost instantly.
- 3 mm drill bit for drilling holes into the boards to prevent the wood from splitting.
- Circular saw. I do not have a Hitachi saw, although I would use it with great pleasure. I just do not have to cut enough to justify its price. I use the tool easier.
- Construction Stapler. It is useful to you for attaching material that prevents the growth of weeds.
- Square. This tool for cutting straight lines and building right angles will undoubtedly be very useful in the implementation of this project.
- Pencil.

This is what our sandbox will look like in the closed state.
Construction of a sandbox
Before you start building a children's sandbox with a lid, make the drawings. I intentionally did not give my schemes, sketches and calculations here. It is possible that you want to make a sandbox of other sizes, and then my drawings can only confuse you. Carefully read the article, pick up a paper, a pencil and draw a sandbox that meets your needs. But after that you can take up the tools.
Work should begin with the preparation of boards and bars of the desired length. When making sawing boards, take into account that the cutting width of a circular saw is ~ 3 mm. Although this value is insignificant, it should be considered in order to reduce errors and inaccuracies to a minimum.
When all the wooden elements have been cut, you can proceed to assembly. Remember to drill the guide holes before screwing in the screws.
Start building the sandbox box by assembling the square base. To do this, I used boards 120 cm long by fastening them in the corners with four 5x10 cm bars 28 cm high. Use a square to make sure that all the corners are really straight (or you end up with a wobbly and curved box). Fasten a row of 2. 5x15 cm boards along the perimeter of the square, screwing two screws into each end of the board. Repeat the operation, "girded" bars-racks second (upper) row of boards. As a result, you get a fairly solid construction. If all your measurements were correct, then the box should turn out to be not quite square (its sides will be equal to 120 and 125 cm), since the short side boards overlap the ends of the long side boards.
After you have finished making the box, it is possible to fix the material that impedes the growth of weeds. Do not stretch it too tight, leave a small slack, otherwise it may break - soil irregularities and the weight of the sand will affect. (The photo shows not a sandbox, but two beds, but there are no fundamental differences in the installation of weed protection for these structures.)

Now you can start making the cover. Sort cooked 2. 5x10 cm boards by the quality of their surface. The roughest planed are located closer to the edge, the smoothest are closer to the center. At the same time, put each board on a smoother side down (toward the sand). Each half of the cover will consist of three pairs of boards.
Attach an extreme pair of boards to the previously assembled square box with self-tapping screws, without having forgotten to pre-drill the guide holes with a 3 mm drill. Do not tighten the screws too tight, so that the wood does not crack. Between boards, I advise you to leave a 1 cm gap.

The next pair of boards will perform the function of a seat, so carefully sand down their lower side with emery paper. The seat will be connected to the boards rigidly attached to the box by means of metal hinges, and the boards will be connected to each other by three short bars of a thickness of 2. 5 cm and a width of 7. 5 cm (these same bars will not allow the back of the seat to be tilted forwards). To better understand the above, take a look at the first photos posted on this page.

Place the assembled seat on a pair of planks rigidly attached to the box, and place a pencil between them. The latter will form the optimum clearance for the hinge. Fasten the hinges with screws and raise and lower the seat several times to make sure that everything works. To fix the seat (and then its back), you can use not two, but three loops, evenly distributing them along the length of the board.

And, finally, the last pair of boards will serve as a backrest bench. It will also be attached with hinges. Fasten the loop (opposite the first set), as shown in the photos. At the same time, use only one board back.


Now you can install and secure the last, sixth board. For this you will need 2. 5x7. 5 cm bars 45 cm long. They will perform a double function - to fasten the backboards between them and prevent them from tipping backwards. One end of each block should be aligned with the edge of the last (sixth) board, while the other end will cover the second board by ~ 4 cm. Ensure that the bars are perpendicular to the lid boards and that all gaps are aligned. Attach the bars with screws (only to the fifth and sixth boards!).

After I finished the work and my child started playing in the new sandbox, I realized that she had one structural defect. A child who rises from the sand to sit on a bench will inevitably grab the top of the back to help himself. This leads to an increase in the load on the screws securing the backrest hinges to the seat. I think that even if I used longer screws for fixing the hinges and somehow could screw them in without disturbing the surface of the board (this task is not an easy one), the hinges would eventually break out. I found a solution to this problem - you need to make small wooden rotating latches that will firmly hold the backrest in an upright position.
As I realized my idea, you can see in the photos. You need to install similar locking devices on each bar that holds the back (i.e., two latches on each cover).


So my sandbox with a lid and bench is ready, the construction scheme of which, I hope, you have become clear. Now you can make a place with your own hands, where your child will reincarnate into an architect and a builder with great pleasure, if only for sand castles.
Source of translation: perfectsandbox. blogspot. com
Search
Related Articles
Do-it-yourself kitchen set - making kitchen set (+ photo)
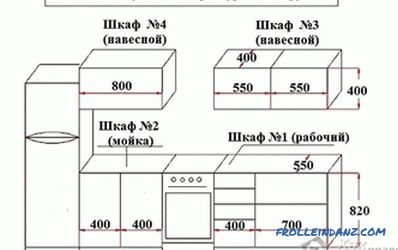
If you look at the market of kitchen sets, you can find a huge number of original design solutions that win the hearts of many housewives. However, prices for such works of design ideas are exorbita...
How to choose a door lock - choose the locks on the front door

A good door that will guarantee the safety of your home should have quality fittings. The hinges determine both the stability and soundproofing of the door, but reliability depends primarily on the...
Frame sauna do-it-yourself (+ photo)
Many owners of garden plots dream of building a bath on their own, which would correspond to all the wishes of the owner, that is, was planned completely "for him". Nowadays there are all conditions...
Burst pipe - what to do

What should I do if a pipe breaks through? There are quite a few answers: in such a situation, it is necessary either to urgently call the repair team, or try to block the channel of water entry int...
How to wash whitewash from the ceiling quickly and without dirt
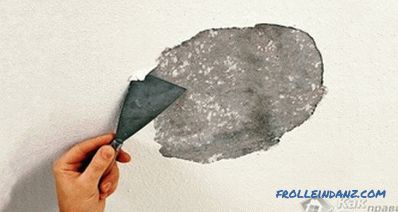
The variety of surface finish of the ceiling that can be observed today was not always the case. At one time whitewashing was one of the main options. One can argue about the pros and cons of this a...