Upon completion of the assembly of the framework of the bathhouse structure, it is possible to engage in internal finishing works, among which a special place is occupied by procedures for arranging the floors. In this article we will try to talk about how to make the floor in the bath with your own hands from wood and concrete, give a step by step guide, as well as photo and video instructions.
First of all, it should be noted that for the manufacture of bath floors can be used as wood or concrete, and ordinary ceramic tiles (in some cases, the floors can be made directly on the clay).
The main thing that should be focused on when working is to ensure the normal outflow of used water. We also note that when finishing floors in "hot" rooms, in no case should synthetic materials be used (linoleum, for example), which, if heated strongly, can release toxic and harmful substances to health.
 Floor insulation in the bath
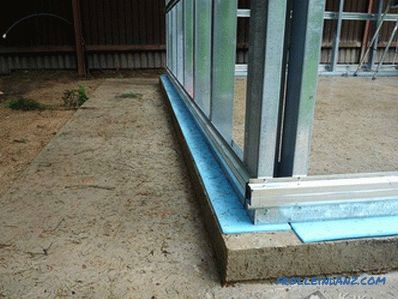
Special attention during the performance of such work should also be given to insulation flooring, which most directly affects the comfort of the procedures. In those cases when you decide to make the floor from concrete - be sure to worry about the top of it being covered with wooden flooring or special cork plates that provide comfortable washing conditions.
Wooden
 Pine as a floor
From the above, it follows that before you make the floor in the bath will definitely need to determine the material used for its manufacture.
Wooden floors are recommended to be made from softwood (fir, pine, larch or spruce); and in this case, you can use two options. The first of them involves the construction of a continuous, water-resistant coating, and in the second case, floorboards are laid with a small gap, providing free flow of waste washes.
Solid or "non-leaking" floors are made by building a lag directly into the clay or installing them on concrete (preferably with a small indentation), followed by densely stitched tongue-and-groove boards. But before this, a classic tie is made on the concrete surface, which has a slight bias towards the flow. At the same time at a certain point, on the edge or in the middle of the room, a collection of drains is installed, which is connected to the sewer system of your house.
 Protective floor
The preparation of the so-called leaky floor is made, as a rule, according to the following scheme:
- At first, a well-leveled and compacted soil is filled with a layer of gravel with sand, which is subsequently poured with liquid concrete.
- In its form, the surface to be filled in should resemble a funnel with gentle slopes and with a center at the place of collection of drains (with a protective grid installed in the drain).
- Then wooden logs are mounted on the columns of bricks, which serve as the basis for placing the flooring.
- And at the end of the work, trimmed floorboards are laid on these logs with a gap of 5-6 mm.
When arranging such a floor, take care of waterproofing the supporting posts of the posts by lining them with toli or roofing felt, folded in several layers. If there is no brick, fragments of old concrete slabs can be used as a support. You should also pay attention to the fact that the preparation of the floors in the steam room and the washing room can be started only after you have completed the installation of the water drainage system and prepared the foundation for the stove-heater.
We must not lose sight of the need for antiseptic processing of woody elements of the structure, and also not forget about the ventilation of the spaces under the floor, ensuring their safety. In particular, the removal of wet vapor can be organized through the use of stove blew.
Concrete floor in the washing and steam room
 Concrete option
Many experts consider the arrangement of the concrete floor in the bath as an economically correct and advantageous solution. In favor of this method of arranging the floor says the long life of the concrete. High-quality screed can serve more than 30 years. Among the advantages of this floor is worth noting:
- Resistance to temperature changes and high humidity.
- Does not rot.
- Harmful microorganisms and fungi do not develop on the concrete.
In order to care for a concrete floor, you do not need to buy expensive household chemicals. In addition, you have the opportunity to decorate the floor, for example, tiles.
Arrangement of the flow

A lot of water is used in the bath. This implies the need to arrange the flow. Before concreting the floor, you should design and implement a drainage system.To do this, you need to determine the point that will allow you to most easily equip the sewer system. At this point, an intermediate tank should be placed, which can be made in the form of a small pit, having a size of 40 * 40 * 30 cm. The simplest method of processing the pit is to concreting, at least 5 cm.
Then from this the tank should be drained into a manhole / septic tank. For these purposes, you can use a funnel pipe having a diameter of 200 mm.
Preparation of the base

The soil should be leveled and then tamped. Then cover the floor with gravel of a large fraction 15 cm thick. Gravel can be replaced with a brick battle. The next layer of crushed stone is 10 cm thick.
After the crushed stone has been compacted, it is necessary to pour a layer of concrete 5 cm thick. It should be done with a slope towards the preliminary wastewater tank.
Insulation

To significantly reduce heat loss in the bath, the concrete floor should be insulated. This is done after hardening of the first layer of concrete. As a heater, you can use expanded clay. It must be filled with a layer of 5-8 cm.
This is not the only insulation that is suitable for arranging a concrete floor. Often, construction felt or mineral wool is used for these purposes. But, it is worth considering the fact that when laying as a heater for mineral wool, you will have to carry out additional waterproofing. Roofing material can be used as a waterproofing layer.
Between the floor and the wall should be filled with bitumen.
Method of making a solution with perlite

Another floor warming option is to fill it with perlite cement mortar (volcanic rock). It began to be used in this direction relatively recently. The advantages of this component - high water absorption and thermal insulation characteristics.
Perlite is a very light material, therefore it is necessary to work with it indoors.
The kneading is done in a concrete mixer. It is important to strictly follow the instructions that appear on the package to the product.
Features of pouring the screed

On the insulation or waterproofing (it depends on the insulation material you have installed), pour the second concrete layer. In this case, it is necessary to lay a reinforcing mesh (this can be a wire or a reinforced mesh) before pouring concrete. In order to make concrete as a result durable, it needs to be tamped down, leveled with a rule, and poured concrete on top.
A sand-cement mortar or a self-leveling compound is used to fill the screed. If tiles will be used for decorating the floor, then it is better to buy a cement mixture intended for this purpose.
The tie should be poured in one go, so you need to act quickly. Begin pouring from the far corner, leveling the mortar with a trowel. It is necessary to rule it with circular movements that would be directed to the exit from the room. After the screed must harden, this process takes several days.
 Concrete screed
With the addition of plasticizers, the process of hardening of the concrete is accelerated. They, among other things, increase the strength of concrete, reliably interconnect the components of the mortar and prevent the occurrence of cracks.
The screed hardens completely in 3 weeks. In the first week it is necessary to water it from time to time.
The surface quality is determined after the concrete has completely dried. If the screed has a uniform gray tint, it indicates its uniformity. In addition, there will be no visible traces of a hammer blow on durable and high-quality concrete.
Finishing

Ceramic tile is most often used as a concrete floor finish in a bath. Effectively will look and tile. A significant disadvantage of tile - when wetted, it becomes slippery, which increases the risk of injury. Therefore, on the practical side, it is better to lay metlaha tiles on the concrete floor.
 The floor in the steam room is covered with tiles
You should not use it in the sauna rooms (even in those that are not as high temperature indicators as in the steam room) linoleum and other synthetic coatings. The fact is that in the process of heating, substances are released from them that can lead to intoxication, that is, severe poisoning of the body.
Auxiliary rooms
 Linoleum in the waiting room
In rooms with low humidity and relatively low temperature allowed to use prohibited for steam rooms laminate and linoleum. In the dressing room, such a coating is covered over a special flooring that provides the possibility of drying the floors.When using such a base flooring is obtained double, consisting of draft and finishing flooring.
Specialists' advice
When working with the floor, you should adhere to the following recommendations:
- the optimum height of the flooring above the ground is considered to be a level that exceeds this mark at least 30 cm;
- for the manufacture of natural wood floor, cut or grooved boards are selected with a thickness of about 25-35 mm;
- laying lag on brick columns in such structures is mandatory.
The procedure for arranging the flooring in the old-Russian-style bath doesn’t, in fact, differ from the procedures described above (given that the steam room may even be earthen). Before their preparation, it will be necessary to do the following operations:
- Along the base perimeter at a distance of about 50 cm from the foundation, the ground is first selected (to a depth of about 45-50 cm).
- The resulting site is filled to the required level with a mixture of fine gravel and sand, and then carefully tamped.
- The boards are made directly on the prepared base, which is quite consistent with the floors made according to old methods.
Recommended Reading:
- Warm floor water with your own hands in the apartment
- How to choose underfloor electric floors under the laminate
Video
This video contains answers to the most frequently asked questions about the floor in the bath:
In this video, the author tells how he did the floor in the bath. In order not to raise the floor too much, the author used a channel instead of lag, which is better not to do in a wet room:
Photos
 Final finish can be non-slip tiles
 Drain
Drain
 Floor with drain
 Perlite
 Wooden floor construction with a drain
 Wooden floor with a slope
Schemes
These schemes will help you in arranging the floor in the bath:
 Water outlet
 Designs for bath floors
 Warming is proceeding its floor
 Organization of insulation
 Floor heating for a waiting room
 Floor layers
 Diagram of the impassable floor
 Waterproofing flowing floor
 Board floor in the bath
Search
Related Articles
Metal garage do it yourself + photo, drawings
If you are not in favor of heavy capital brick or small-block garages that require a solid foundation and roofing, then you can opt for a metal one for one car. Such a construction can be done in a...
Mansard roof do it yourself - making a mansard roof + photo
The equipment of the attic room significantly increases the living space of the house. Even an unheated room will serve as additional thermal insulation of the dwelling. A mansard roof is made in...
at the end, nest-thorn, at half-tree
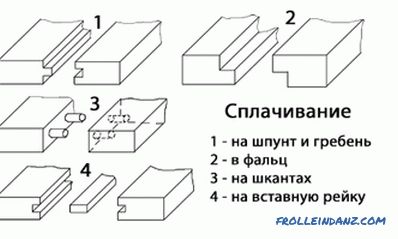
From time immemorial, mankind has used wood for construction purposes. Advanced technology can significantly simplify labor operations. This is also to a large extent contributed by various options...
The foundation for a brick house - types of foundations under the brick

Any home begins with a foundation, and the strength of the whole building depends on its choice. The base is chosen, first of all, depending on the type of soil on the site and the load exerted by t...
tools, stages of work (video)
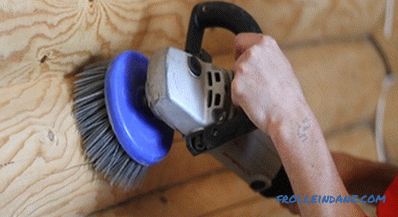
One of the most important stages of work during the construction of a log house is the processing of a log house, that is, its polishing. This operation should be carried out on a mandatory basis,...