Modern showers have many different functions, so many people prefer to entrust the installation work to professionals. However, subject to certain rules, you can easily make a shower cabin with your own hands.
Accessories for the shower
 Elements of the shower
As a rule, many elements included in the shower cabin are assembled directly at the factory, because they have a complex structure. To assemble the remaining blocks into a single structure, you do not need to have professional skills, it is enough to skillfully handle tools.
The external equipment of the cabin includes a pallet with a special frame, equipped with a regulator, and doors with guides for fixing to the roof.
In the case when the complete set of shower is limited to these components, for its installation an angle with two adjacent walls is required. In it the pallet to which door guides fasten is established. They are additionally fixed on the walls with anchor bolts. For the manufacture of holes for anchors need a punch. Fastening parts to each other is done with screws or bolts.
There are certain requirements for walls: their surface should be perfectly flat and trimmed with a moisture resistant material. As the finish, you can use plastic panels or ceramic tiles.
Basic and additional functions
 With hydro massage
Shower cabin includes a panel equipped with nozzles that regulate the water jet. With a minimum configuration, it is mounted directly on the wall using stainless anchors.
To increase comfort and functionality, additional elements may be included in the package, for example, the back wall, in which there is no need to install the device exactly in the corner, at the same time it serves as a shower panel.
Manufacturers add variety to the design by adding hydromassage, sauna, jacuzzi. Despite the fact that it significantly increases the cost of the booth, your expenses will be justified.
Assembly of all parts before installation
 Scheme of assembly guidelines
Before to begin installation, it is necessary to assemble the structure in a lighted spacious room. This is necessary to check the configuration.
If a defect is found during the trial assembly, it will greatly simplify the purchase return process.
Silicone sealant and most fasteners are not required for initial assembly. For this fit simple bolts. Do not neglect this stage. Carefully read the instructions, and in low-cost models and the quality of its translation. The description translated automatically is attached to cheap designs, so the essence is not always possible to make out.
Having dealt with the instructions, if necessary, having bought the missing fasteners, having ascertained the coincidence of all the seams, you can begin the installation according to the diagram.
Installation work
 Diagram of the installation option for the shower cabin
- Initially you will need to secure the drain pan and connect it to the sewer drain system. After installation, check the joints for tightness. This is done as follows: a large amount of water is poured into the pan, and the connection point of the drain is examined for leaks. This stage is quite simple, the main thing is to set the top edge of the pallet strictly along the horizontal line, adjusting it with the help of special nuts.
- When the installation of the pallet is completed, proceed with the installation of the rear wall or the shower panel and its subsequent connection to the electrical network and the water supply system.
- Having finished with the previous step and having checked the quality of the work done, proceed to fixing the doors and guides. This process requires accuracy, since a small imbalance will entail unpleasant consequences and the need for rework.
- After installing and checking the doors, it is the turn of installation of the ceiling panel. With proper implementation of all the previous stages, this work does not take much time and effort.
- Installation can greatly simplify and reduce the chances of possible damage using a large amount of sealant. As a rule, a colorless sealant is used, but to improve the aesthetic appearance in visible places, you can use white silicone or another desired color.
- The final step will be the installation of a decorative screen on a pallet, decorative overlays and the adjustment of all structural elements.
When connecting a structure to electricity, a separate line is always taken and the RCD is installed.
Features of installation of a shower cabin without a pallet
 Built-in shower cabin
Equipment without a shower tray - a simple and cost-effective option. Also, there will be no difficulties during cleaning.
The installation should be carried out according to a set of rules:
- First, you need to prepare the site for the structure. It is important to note that waterproofing of the floor is necessary.
- Secondly, it is necessary to consider the materials from which the pallet will be made. The best fit brick and concrete. The advantage of the latter is the shape and size of your choice. In addition, a high-quality finished brick or concrete base is practically not inferior in its appearance to an expensive shower.
It is necessary:
- to foresee a slope for the drain;
- in case the drain becomes clogged, make a threshold that prevents water from entering the room ;
- make a good waterproofing;
- perform floor insulation;
- cover the floor surface with ceramic tiles.
 Shower without a tray
It is very important to make a high-quality waterproofing of the floor, so as a large accumulation of moisture contributes to the appearance of mold and fungus.
In order to perform waterproofing works, you need to:
- completely remove the old screed to concrete;
- apply waterproofing in 2-3 layers;
- cover the walls with bitumen mastic;
- arrange an inclined drain;
- apply a screed to the floor of the entire room;
- lay the walls and floor with ceramic tiles;
- fix a flexible shower;
- install glass doors or a curtain.
On the walls, the level of waterproofing should be raised by 15-20 cm in case of emergency flooding.
Water head adjustment
 Waterproofing of this option
Quite significant The moment that affects the operation of the shower cabin is the adjustment of the water pressure. Unfortunately, in many localities, water supply is intermittent, so installing a booster pump to create the optimum working pressure and a spare water tank is simply necessary.
This is especially true for structures equipped with a hydromassage function. To do this, you need a certain water pressure, the exact numbers indicated in the instructions (mainly 1.5-4). The displacement of the spare water tank should be at least 200-250 liters.
Today, manufacturers offer a variety of models of shower cubicles with various built-in functions, the installation of which even an experienced professional can confuse. To solve this problem, you can contact the manufacturer, whose masters will perform all installation work. However, for you it will be a very expensive thing. But if you are completely confident in your abilities, carefully approach the study of technology, instructions and proceed to the installation work.
Manufacturing of a pallet
 Water connection
What materials and tools will fit for the manufacture of a pallet? Brick, cement, waterproofing mix, sand, self-leveling mix - with regard to materials. And from tools for work will be necessary:
- level;
- trowel;
- plaster beacon;
- drill;
- mixer tip;
- metal mesh;
- tape measure;
- paint brush;
- putty knife;
- drain for pallet.
 Brick Bottom
When installing the pallet, it is important what the base will be . First of all, you should completely complete the plastering of the walls, make a floor screed and only then proceed to the manufacture of the pallet. To avoid mold, the wall adjacent to the pallet is treated with waterproofing. First, waterproofing with a paint brush is applied on the subfloor, then on top of the screed and then under the tile.
For comfort, you can arrange an electric floor heating system. It is advisable to install the system as under the pallet itself, and around it.
When the first layer of waterproofing dries well, the marking of the future brick pallet is applied. It does not matter which brick the pallet is made of.
For this purpose, you will need a red or silicate brick. A mortar made of sand and cement or a special mix purchased from a hardware store are used as a brick base. For strength, a metal mesh is laid on the base.
The next step is to determine the location of the drain and the location of the system for draining water. Then you need to fix the building beacons and make a concrete tie, carefully aligning it with beacons as a rule.
The water drain system must be of the best quality, as its replacement is more complex.
 Waterproofing the floor and walls
After a while, level the screed surface with a trowel or spatula. When the screed is dry enough, it is necessary to impregnate it with a waterproofing mixture to prevent moisture from entering the concrete, as well as the formation of mold and mildew, both in the bathroom itself and in neighboring rooms.
The self-leveling mixture is distributed at the end over an already dry surface. After it is completely dry, waterproofing is applied, but more carefully to ensure protection of the joint between the wall and the floor, as well as drainage for the water. Now the construction is ready for facing with ceramic tiles.
Shower cabin from tile
 We make a coupler with a slope to the ladder
With The simple ceramic tile is used for facing the shower cabin, but it is important to pay attention to the fact that it is better to choose non-slip for facing the pan.
It is possible to revet a pallet and walls with a mosaic - this will be much more beautiful.
Materials and tools for tiling:
- directly tile or mosaic for the floor;
- tile adhesive (preferably water-repellent);
- level;
- rubber trowel;
- comb (notched trowel);
- tape measure;
- tile cutter or Bulgarian;
- rubber hammer;
- construction knife;
- crosses for seams;
- grout for seams (matched to the color of the tile, and it is better if it is water-repellent);
- drill with nozzle "mixer".
After tiling all surfaces with tiles, it is necessary to wipe all the joints thoroughly with a grout, and after drying it should be treated with antifungal impregnation.
Choice and installation of the door
 Tiling
It is possible to use plastic or glass doors purchased in the hardware store. Alternatively, a transparent door is suitable:
- corrugated glass;
- frosted glass;
- colored glass;
- with sandblasted or three-dimensional image.
The glass for the door is best to choose from thick tempered glass. Glazier will process the end of the door. When the thickness of the glass is already known, it is possible to purchase a fastener for the door — a movement limiter, awnings, hinges, latches, door handles — for convenience on both sides of the door. Glass can be pasted over with a special film with a decor. When using a mirror film there is a big advantage - from the outside of the door it serves as a mirror, and this is significantly cheaper than buying a separate mirror in the bathroom.
Shower stall with curtains
 With glass door
If you decide not install the doors, then you need to install a special ceiling cornice, followed by fixing the curtain of washable material. This option is the easiest, but not the most practical, as the curtains quickly get dirty, and it is very inconvenient to wash them. If the ceilings are high, then you can fix the eaves on the walls.
Polycarbonate shower cabin for giving
 With a curtain
Recently Polycarbonate shower is becoming more and more popular. What is polycarbonate? This is a new generation material made from synthetic polymers. Finished polycarbonate sheets are monolithic and cellular.
Advantages:
- durable shock-proof building material;
- bends well, and this allows you to give the desired shape;
- polycarbonate sheets are light - much easier than hot glass. For this reason, there is no need to strengthen the base and provide for additional fastening;
- is not afraid of temperature fluctuations, does not darken, does not deform (if a thermal gap is left during installation).
To manufacture such a cabin, you first need to weld a rigid metal frame of their square pipe, on which polycarbonate sheets will then be attached.
 Polycarbonate shower cabin
It is easy to make. The rectangular design is welded from straight sections of a square pipe (it can also be made from a simple pipe, but then it will be hard to fasten sheets to it, since the drill will slide off the round surface).
You can make a wooden frame, but it will quickly rot.
If the cabin is rounded, the workpieces first bend and only then the structure is welded. Then the door is fastened, everything is painted, and the frame is sheathed with corrugated flooring. If a large water tank is placed on top, a more powerful frame is made.
Photos of interior solutions
 Polycarbonate cab shapes
 Installation of the pan
 Podium for the shower
 Simple construction
 Installed
 With the hydromassage effect
Video: Installing the shower enclosure
Search
Related Articles
Do I need to level the floor under the laminate? Tools, materials, technology
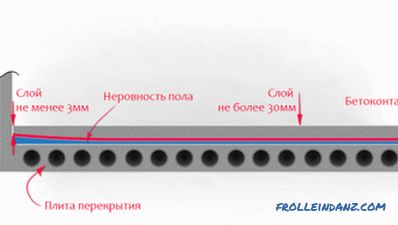
High-quality laminate flooring allows you to make comfortable and environmentally friendly floors. But the desire to make such a floor often comes up against a problem - the poor quality of the bas...
Laminate which company is better to choose and buy for an apartment or house

Laminate floors look stylish and modern, are easy to maintain and are not very expensive. Therefore, this material is very popular. Only there is one "but" - his choice is too great. Each manufactur...
Do-it-yourself wooden ladder installation (photo)
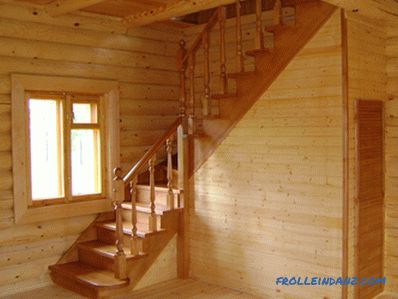
Before you do the assembly of the wooden stairs with your own hands, you need to carry out a series of preparatory work aimed at processing all its components. This is the use of antiseptics as pro...
Which cordless screwdriver is better - rating, comparison, polls
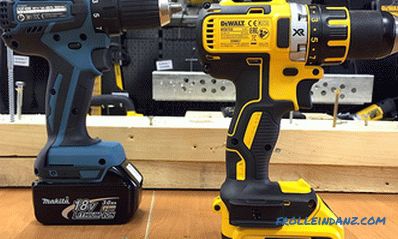
Today, few people will come to mind with a hand drill or a set of screws with an ordinary screwdriver. It is much more convenient to purchase a compact and efficient cordless screwdriver. There are...
Polycarbonate fence do it yourself
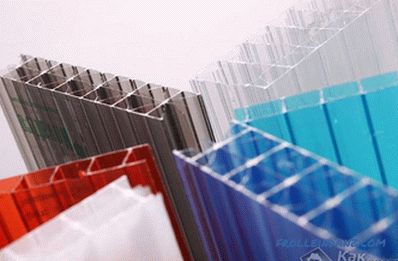
Modern walling, in addition to its main purpose, is an integral element of landscape design, the hallmark of any home. Livability and protection of private property is largely dependent on the quali...