Drywall sheets today are the most relevant material for leveling ceilings, walls in any rooms. In this article we will look at how to make a crate for drywall on the wall and ceiling, given the nuances of its manufacture.
Preparation - the key to success
")
To equip a certain structure, it is important to make correct measurements, selecting only high-quality materials, because the durability of the whole structure depends on it. Among the selected material when creating the frame can be noted quality wood or metal.
") Drywall Lift
Drywall Lift
It is important to note that if the preference fell on the frame from wood, such a structure should be constructed only in a room with low humidity. Otherwise, in the external environment, due to high humidity and temperature changes, such lathing will quickly become unusable, this also applies to indoor areas with high humidity. If this is not taken into account, such constructions will easily swell and the wall will change its original shape, becoming wavy.
Installation of a metal profile
")
The backbone for drywall is assembled from a metal profile, since such a device increases the service life by creating a perfectly flat surface. It is easy to work with this type of material, plus it is durable and reliable. For these reasons, most professionals who undertake the installation of a drywall lath, prefer a metal profile.
") Tools for working with plasterboard
Tools for working with plasterboard
To assemble the metal profile frame you may need:
- screwdriver with interchangeable nozzles;
- hammer;
- construction level to look for joints on drywall that require alignment (it can be a laser);
- drill or punch;
- construction drawing pencil.
Types of profiles
")
Then, when you start to make the frame, take into account the differences among the profiles, since it depends on what shape your design will become. They are divided into the following classifications:
- Mon - the guide profile is similar to the letter "P". Serves for mounting on the ceiling or for side products.
- Ps - standing profile. It has a stiffener needed to strengthen the designated points in the structure. It is used for the manufacture of partitions.
- PP - this type of profile is used to build ceiling structures. Appearance resembles the letter "P".
") Suspension for profile
Suspension for profile
When constructing the sheathing for drywall, you need to purchase the following components:
- dowels are needed for attaching profiles to a wall with a concrete coating;
- special brackets;
- self-tapping screws (they are important when installing drywall).
Calculations and installation on the wall
")
Having acquired all the necessary materials for the work, we proceed to the installation of the batten on the wall. First, the basis is selected for the selected surface, to which the whole structure will be joined.
") Mounting pattern
Mounting pattern
Next, an offset of approximately 65 mm or more is made from the wall, it all depends from the unevenness of its surface. Then a straight line is drawn on the ceiling (this mark serves as a guide for the profile). After all the work done, we put this markup on the floor. This procedure is carried out using a laser level. Thanks to this label, you can easily navigate the installation with the lower profile guides.
In this phase of the work, calculations must be carried out correctly, since they will affect the result and the flatness of the wall. Labels, both upper and lower, must be strictly perpendicular.
Assembly and fastenings of the frame
")
After all the procedures performed with marking, you should proceed to the installation of the frame. Take a punch, attach Mon-guides over the entire surface of the wall. Further, the installation and collection of racks, which contribute to the fixing of drywall, is carried out.
When assembling, you will need not only Mon, but also Nn profiles. Installation is carried out in this order:
- Markup is made to the profile fasteners. The distance from the ceiling is approximately 14 cm. This distance is made taking into account the installation, as well as existing or possible communications along the entire ceiling. After that, fasteners from "Mon" profiles are attached to the ceiling.
- In places where carrier profiles are located, suspensions are introduced, in 55 cm steps.
- Then, the guide is cut according to the necessary measurements and mounted in the profile of Mon.
- In the final stage, transverse profiles are used with fasteners.
On the ceiling
")
Unlike the walls, the installation of a drywall lath on the ceiling has its own specifics.At the heart of the frame uses 2 types of profile: UD and CD. If it is necessary to produce a shaped ceiling or a multi-level, then such profiles as CW and UW are used in the frame. The thickness of these profiles is 50, 75 and 100 mm. Now consider the process of manufacturing such types of frame:
- Cellular.
- Transverse.
- Complex shapes.
Honeycomb frame
")
This type of frame will be optimal for a single-level ceiling. The installation process is as follows:
- In this case, the crate will have an intersection of 90 °. To start the installation, you decide the issues related to the height and level of the ceiling. To do this, using the water level, in each corner of the outer / inner mark put.
- With this measurement you can find the lowest point on the main ceiling. From it must retreat about 25 mm, with a margin of up to 30 mm. This thickness is required to install the CD profile (this is in case you need to raise the ceiling as high as possible).
- You connect the resulting marks by chokline (you can also take a paint cord, dip it in a dye, stretch it between the marks and beat off the level), with the result that you will get the outline of the future level of the ceiling frame.
- Now it's time to fix the UD profile along the perimeter of the ceiling on the wall. It fits strictly on the line. Pitch of fixing dowels 30-40 cm. Often the profile is sold with ready-made mounting holes. In this case, the task is simplified.
- Since we are making a honeycomb or cross-frame, place labels on the ceiling above the profile every 60 cm on both sides. Next, beat off the line cord. Perform this operation perpendicularly, as a result of which you will have a grid with cells of 60 * 60 cm broken on the ceiling. You will need to fix the console on the received lines, but not at the intersection of the profile. Hangers are installed only for one direction of the profile.
- Suspensions are fixed at intervals of up to 60 cm in the direction of the profile. Please note that it is important to consider the direction of the solid profile, not the transverse one. Profile length can be 3.5 or 4 m.
- Suspensions are fixed to the ceiling with dowels Ø 6 mm. It is desirable that there was a ring at the inlet of the dowel. Due to this, they will not fall into the mounting holes on the suspension. If the hole is larger than a diameter of 6 mm, replace the plug with a larger one.
- Now it's time to install a CD profile. It should be shorter than the required length by 5 mm. Otherwise, it may be deformed during installation.
- When performing follow-up actions, you cannot be in a hurry. To set the profile level, stretch the nylon rope. In order not to be delayed by profiles, bend the overhangs slightly higher than the thread level, and at the same time grab the profile. After that, let go of the profile in turn and fasten it to the suspensions by level with small self-tapping screws, which are known as "fleas". They also fix a CD and a UD profile among themselves.
- When all the solid profiles are exposed and attached to the hangers, you can start making cells. For this purpose it will be necessary to use a special crab. At an angle of 90 °, fasten with crabs sections of a profile of suitable size across the existing frame. The crab and lintel are also fixed in "flea".
Cross-frame
")
Another option for a single-level plasterboard ceiling is to make a transverse frame. Many masters use just such technology.
The advantage of the transverse frame is that there is no need to use crabs and lintels, which entails additional material costs.
In this case, the CD profile is set in 40 cm increments. In this scenario, one sheet of the GCR will cross 6 profiles, 2 of which will be on the edges. The installation of such a framework is recommended to start from the corner of the room, which is as close as possible to the value of 90 °. As a result, on the one hand, it should be half in contact with the CD profile, and the next sheet of drywall will be screwed on the second part.
Otherwise, the principle of frame assembly, calculations and fastenings do not differ from the manufacturing technology of a honeycomb frame. Uses all the same suspensions and UD guides that will hold the entire structure.
Complex shapes
")
If you plan to assemble a multi-level ceiling with shapes, then the sheathing is assembled in a special way. At the same time for the manufacture of a particular design there are no templates. Each master can realize almost any shape and design on the ceiling of profiles and drywall. So, if it is necessary to bend the UD guide profile, then along its entire length, make cuts every 5-10 cm. Also in such constructions a UW profile is used, which is cut and screwed along the frame line. For the batten, the same CD profile is used, which is fixed by suspensions to the ceiling.
To perform shapes or make several levels on the ceiling, experience in working with plasterboard is required. If you do not have it, then you should not risk it, because it may end up with material damage.
Wooden crate
")
The framework for installing drywall can be made of wood. The choice of the necessary components, and in particular, wooden parts must be approached very carefully.
- For vertical poles, the bar must have a cross section of not less than 40 * 70 mm, and for horizontal 30 * 50 mm.
- All wooden frame elements should be treated with an antiseptic that will protect the wood from insects and rotting. They should also be treated with a fire fighting compound.
- The manufacture of the frame is recommended to be made of coniferous wood. As for humidity, the level should be no more than 15%. Otherwise, during the drying of the wooden frame, the screws can fall out of the wood.
- In places where the gypsum board joins it is recommended to use a beam of 40 * 80 mm.
For the manufacture of wooden crates it is necessary to have the following tools:
- metal corners;
- self-tapping screws;
- mounting dowels;
- level;
- screwdriver;
- screwdriver.
Step-by-step instruction for wall battens
")
The sequence of works is as follows:
- First of all, markup for the future frame .
- Next, the weakest points on the wall with outward plaster and irregularities are determined. If necessary, they can be strengthened or completely dismantled until the draft wall.
- The next step is to install the batten. It should start with a horizontal bar, which is fixed to the floor.
- To the horizontal bar, fasten vertical slats with an indent of 10 mm from the edge of the batten. The installation pitch of the vertical batten is 60 cm.
- All vertical bars must be level. To fix them on the ceiling, attach the horizontal bar to which the vertical slats will be mounted.
If the floor is uneven, then you can level the horizontal bar with the help of linings made of thin wedges or chipboard.
When the frame is ready, it remains for the small - the installation of drywall.
Simplified method for assembling a frame
")
In some cases, you can assemble a frame for drywall on the floor. Especially if the size of the wall and the whole room allows it. The size of the whole frame must match the size of the wall. Make it smaller on all sides by 5 mm. To do this, collect the frame of the vertical and horizontal bars. With a pitch of 60 mm fasten additional wooden crossbar.
Before installing the frame on the wall, insulate the wall. The frame is fastened around the perimeter with dowels, screws or dowels-nails.
By following these simple guidelines, you can do all the installation work on the ceiling and wall sheathing. At the same time it is possible to use both a metal profile, and wooden whetstones.
When all this is done in the correct sequence, you can proceed to the installation of drywall. Having the right tool at hand, having skills in construction work and applying the knowledge from this article, assembling the sheathing of the profile will not be difficult for you, and as a result, a good result will not keep you waiting long.
Video
In the provided videos, you will clearly see the principle of assembling the frame for drywall:
Schemes
On these schemes, you can take a closer look at the subtleties and features of the installation of a frame for drywall:
") Scheme of the frame of the box
Scheme of the frame of the box
") Scheme of the organization of the backlight
Scheme of the organization of the backlight
") Framework without perimeter guides
Framework without perimeter guides
") Fastening the wooden frame
Fastening the wooden frame
") Suspended ceiling layout
Suspended ceiling layout
") Sheathing plasterboard
Sheathing plasterboard
") Holding under Lights
Holding under Lights
") Wall cladding technology by profiles
Wall cladding technology by profiles
") Frame Location
Frame Location
") Gypsum Board Calculation Scheme
Gypsum Board Calculation Scheme
") The ceiling with the wall profile
The ceiling with the wall profile
") Location of drywall joints
Location of drywall joints
") Creating a cornice
Creating a cornice
") Cross-device layout
Cross-device layout
Search
Related Articles
How to bend drywall and profile for its attachment
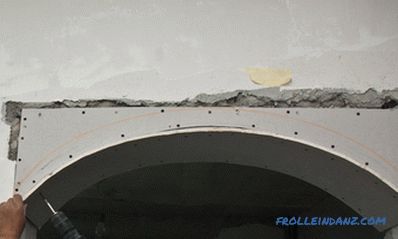
Drywall is usually used to create perfectly flat surfaces. However, curved plasterboard interior objects - arches of doorways, embossed multi-level ceilings, and niches with curved lines are becomin...
How to make an apron in the kitchen with their own hands (+ photos)
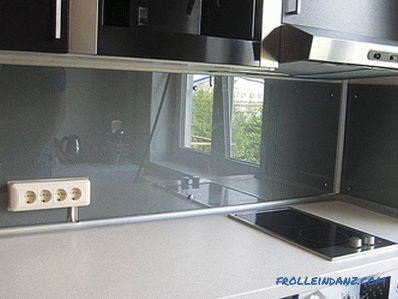
Each kitchen should be equipped so that the hostess feels comfortable and cozy. One of the important elements of this room is an apron. It performs at least two important functions: decorating and p...
How to choose a jigsaw for home or workshop + Video
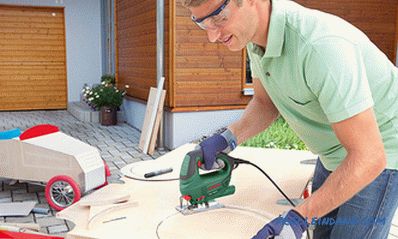
Among hand-held power tools, jigsaw ranks third in popularity after a drill and a grinder. This is not surprising, because it allows you to saw a variety of materials - wood and its derivatives (chi...
Drywall in a wooden house: the nuances of finishing
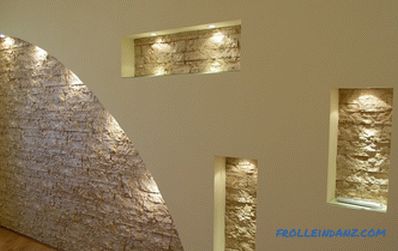
Many people are increasingly beginning to use drywall in a wooden house, for example in a country house or in a cottage, for wall decoration. Drywall among finishing materials is gaining incr...
Table in the garage with their own hands from the boards and timber
In the life of every motorist garage is not the last place. As for a woman, cleanliness in the house is important, and for a man, order in his garage is just necessary. The permanent attributes of...