The installation of all types of wall paneling requires that the base for laying should be level and precisely aligned vertically or horizontally. How to make a crate under the wall paneling, ensuring the quality and strength of installation? For this you need to thoroughly choose the material. The market provides a choice of three types of material.
")
Layout of the lining device.
The main and most popular is wood. Slats are sized in a diameter of not more than 5 cm. The shorter the slats, the cheaper they are. Therefore, when calculating the need, the long strips should be applied on the extreme parts of the surface, along the perimeter. The lack of wood will be an increased fire hazard, therefore impregnation with anti-igniting composition will be required.
The preferred material will be a metal profile, but it has a higher price than wood.
Plastic is also used for the batten, but it is rarely used, usually in special kits, for the characteristics of the coating material.
Mounting sequence
")
Fastening attachment scheme.
Walls, floors and ceilings almost always have irregularities, even if at first glance they seem to be even. And the smallest irregularity can cause deformation of the wall paneling, leading to internal stresses, and subsequently to destruction. Irregularities after the end of the work are also striking. Before starting work, you need to purchase the following tools:
- building level;
- tape measure;
- screwdriver;
- chisel;
- hammer;
- hacksaw;
- marking cord;
- pencil;
- saw.
First you need to create a plan of the batten on paper. It will help calculate the need for material and work in stages. When purchasing rails, be sure to inspect them for the absence of cracks and knots, pay attention to the end of the rails. At the end there should be no moisture and tar; the slats should be dry. With increased humidity, subsequent drying will cause unpredictable deformation. As a result, there can be no talk of any smooth surface of the wall paneling. The main importance is the evenness of the rails.
")
Tools for working with clapboard.
Self-tapping screws for fastening must be of various size . You may have to put wedges when fastening. Will require elongated screws. The distance between the slats should exclude the possibility of lining deflection. The overall location is usually chosen vertical when the lining boards are horizontal or horizontal when vertical lining. Sometimes, if necessary, installation of insulation, it is necessary to make a double-layer sheathing. The appearance of such a base will be cellular, in which the heater cell is placed in square cells.
The distance between the battens of the batten is chosen to be slightly less than the size of the insulation, so that when mated with it there are no gaps. With wooden walls, the crate under the paneling is fixed with nails. Thick nails should not be used to prevent splitting of the rails. Fastening to a concrete or brick wall with plastic dowels. The installation of the batten starts from the periphery of the surface. The correctness of the position of the batten is constantly monitored by the building level. Then the cord is tensioned, along which the ends of the rails are set in one plane.
Edging of windows and doors must be done.
")
Sheathing scheme for mounting the wall paneling.
The ends of the rails should not rest against each other: a gap is needed to compensate for thermal deformations. The marking of the batten on the ceiling does not differ from other surfaces. Only perpendicularity to the walls should be observed.
Electric wiring is laid between the battens of the batten and the installation of communications from pipelines is possible. When arranging the batten in a Russian bath, the horizontal arrangement of the boards is usually chosen. After some time, due to decay, it is necessary to change the bottom of the cladding of the clapboard. In this embodiment, it is enough to replace 1-2 boards. In the sauna, horizontal positioning of the wall panel is optional. In the bath, in addition, between insulation and clapboard, a gap of 2-3 cm should be left for ventilation. Under the crate is the installation of aluminum foil. Level check is required for final fixation of each element of the batten.
About the floating crate
In the bath, you can make the crate floating. Its peculiarity is that vertical bars are attached to the wall only at the upper edge. The lower part is attached with a screw that fits into the groove of the bracket attached to the floor. There is a gap between the lower end of the timber and the floor. When the wall is deformed vertically, the screw rigidly fixed at the bottom end of the beam freely slides into the groove of the corner.
The entire crate slides together with the vertical bars, regardless of the vertical wall that is deforming. So that the gap is not visible, the level of the finishing floor is made somewhat higher than the lower edge of the sliding sheathing.
At the end of the work, it is necessary to treat the crate with compositions against rotting, fungus and insects. If the work is done properly, it will greatly facilitate the installation of the wall paneling.
Didn't find the answer in the article? More information on the topic:
Search
Related Articles
Installation of a septic tank Topas own hands
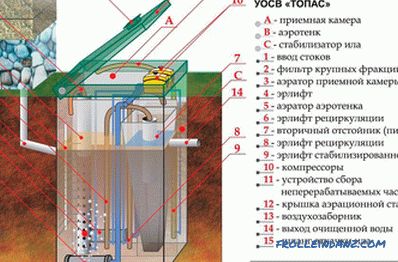
If, until relatively recently, the problem of wastewater treatment for country houses was rather difficult to solve, then today it is not even considered a problem. Previously, we had to make cesspo...
How to connect gas pipes
Currently, there are many modifications of products used specifically for the supply of household gas, the choice of which is determined by the peculiarities of laying gas communications. In additio...
Screw foundation with your own hands - how to do (step by step instructions)
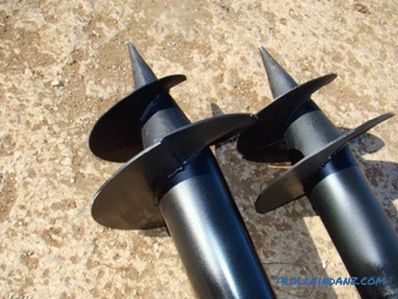
Modern technologies somehow completely imperceptibly brought one more innovation to our life, previously available mainly for the military and geologists (lovers of hard-to-reach places), a screw fo...
Concrete fence do it yourself - making a concrete fence
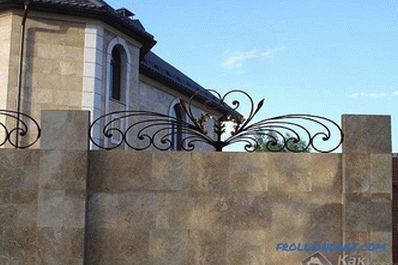
When it comes to building fences in a suburban area, it’s rare for homeowners to consider using concrete. This is largely due to the old stereotypes. But often, many gardeners or owners of cottages...
How to cover a roof with euroroofing material - a roof from euroroofing material

At the device of roofs of a flat roof and a roof of a difficult configuration, as a rule, rolled material is used. There are many types of roll material, but among them there is the best and most du...