Installing a sink in the kitchen can be implemented by several methods. The choice of method is determined by the type of the sink itself, the material from which it was made, as well as the overall design and style of the kitchen in general or a kitchen set in particular.
Some sinks can be mounted in different ways, depending on what you intend to end up with. But there are a large number of models that, due to certain nuances in their dispensation, are allowed to be installed only with one of all possible technologies. Overhead sinks and sinks with a relief board belong to their category. Many types of sinks can be fixed by embedding them in the table top. In this case, they can be attached as flush with the top board, and above or slightly below.
 Ceramic sink with high board
The most original and aesthetic looking is the last option. But it requires professionalism in execution and is used in those exceptional cases when the sink and table cover are made of durable, expensive material, for example, natural stone (marble, plagiogranite, onyx or tuff lime - travertine). The sink recessed inside the top cover of the table "exposes" a section of the stone structure, making it possible to evaluate the natural pattern of the material. It is worth the luxury of big money, so this method of installation is rarely used.
 Installation below the tabletop
Ideally, the same choice as installing a sink is done at the design stage appearance and furniture filling the kitchen. The choice of material for the top board of the table and sink depends on the design style of the kitchen room, as well as on the material possibilities of the installer.
Surface wash
The most common and popular model of sinks is the consignment note. It is mainly stamped from stainless steel and embedded in a rectangular base or table. Covering the entire upper plane of the base frame, this sink plays the role of both sinks and countertops.
Installation of such a wash can easily be done by everyone. The product is attached to a special table that does not have a board-cover and back wall.
For the connection, it is preferable to use L-shaped fasteners that have a slanting cut on one part. 4 of these mounts quite enough.
Before the assembly begins, it is necessary to build in a mixer and other sanitary equipment, because after assembly these manipulations will not be very convenient to carry out). First, L-shaped mounts are applied to the inside of the base or table. The points of their application are outlined in pencil, then self-tapping screws (self-tapping screws) are screwed in there. They take a length of 16 mm. After screwing, they must protrude no less than 5 mm above the point of the pencil mark.
A layer of sealant is applied in advance on the end surface of the wooden base, playing a role of not only glue, but also a protective film for rough wood. The sink sits on the attached screws and slides until it is completely adjacent to the surface. Fasteners are tightened until it stops, and the protruding sealant is wiped off with a piece of rags (since its remnants look ugly, and it cannot be painted). Upon completion of the installation work is done connecting to plumbing and sanitary.
Photos
 Installation of special fasteners
 Fixture for surface wash
 The top edge is treated with a sealant
 Installation with fasteners
Flush-mounted sink
Another mount technology is flush-mounted washing It is used, if the headset in the kitchen has a solid upper surface (board), in the depth of which an opening is made for the placement of the sink. Sinks in this case can be made not only from stainless steel, but also from any other material.

Mounting such a sink is also quite simple, although it has a number of relative difficulties when compared with the previous version. First, you need to establish exactly where and what shape to make a cut under the sink. For this purpose, it is often enough just to flip the sink, put it on the table top and draw around the contour. Many manufacturing companies complement the set of the sink and its components with special templates that facilitate the task of cutting out the opening, which is very helpful in situations where unusual outlines are inherent in washing. The template is pressed against the board at a distance of 6-9 cm from the edge and is outlined along the contour. The cutting line is marked not along the contour itself, but 1.5-2 cm deep into it, which then will provide support for the sink side. On the marked line of cut, a hole is drilled into which the tip of the manual jigsaw is placed, with which the contour is cut.
When sawing, you should fix the table cover below, so that the piece to be cut does not fall out. The seam of the sealant is smeared along the contour, preventing the penetration of moisture to the place of cutting and firmly fixing the sink. From the bottom, a sealant is also applied to the sink, after which it turns the other side and presses strongly against the table top with clamps (vices) that are included in the same set with the sink. After that, excess sealant is removed, and all communications are connected.
The mortise washer can also be placed flush with the table top. This technology is much more complicated and requires competence in the installation of plumbing. When installing under a sideboard wash a layer of wood. The depth of cutting of the tree is equal to the height of the board plus a layer of sealant. The last to fill all existing joints and slots in the design.
Photos
 Template for installing the mortise wash
 The hole is cut with the jigsaw
 Sealant treatment
 A sealant is also applied to the sink
 The sink is pressed against the worktop
Setting below the level of the table cover
The sink can also be placed below the level of the top table board. This method makes it possible to minimize the number of joints, and also creates an aesthetic appearance. Often, this technology is used when the surfaces are made of materials that are expensive and unusual in their characteristics. But then the mounting process is very difficult, and the requirements for materials like washing and table covers are increasing. The sink is fixed with the help of brackets (supporting structures-consoles) or screws; if stone is used as a material for a sink, then it is advisable to take self-tapping screws.
 Sink under the tabletop
The openings under the sink are cut using special equipment of a special device, for example, a jigsaw with diamond blades. The edges of the resulting opening are meticulously polished and closed with a film to protect it from moisture. It is not recommended to put a car wash with this method on your own, it is advisable to resort to the services of a master.
Features of installation of sinks from different types of materials
 Sink stone to the kitchen
Sinks of different types of materials may have specific properties that should be considered during their installation. For example, plagiogranite sinks mostly do not have a finished opening for the mixer, but only a template and not fully drilled recess on the reverse side. To install the mixer, it is knocked out with a screwdriver (or a special chisel) and, if necessary, expanded.
Sinks from other types of stone (onyx, tuff, etc.) may also require cutting openings, so in such cases it is better to turn to professionals who have all the necessary tools. It is too difficult to cut a hole of a suitable size and shape with one's own hands in such washers.
General installation tips
 It is better to use sealant
Choose What method of fixing the sink should be done by the installer or designer, guided by the technological requirements and the style of the kitchen. There are several general installation tips that are suitable for all possible installation technologies:
- Rubber seals have recently been replaced mainly by sealants. Rubber is rarely able to fit tightly over the entire surface, and its useful life is too short. Due to its inherent fluidity, silicone sealant fills all cracks and crevices. When dried, it does not lose its water resistance and adhesion properties (adhesion of the surface of dissimilar bodies) for a fairly long time (up to 15-20 years).
- When installing sinks from various natural or artificial materials that may be damaged in the event of a blow or fall, you should use the help of a partner.
- When attaching the sink to a wooden base or table top, self-tapping screws (or screws) are screwed in exclusively by hand. Drill-screwdriver (screwdriver) can pull fasteners, which will lead to the inevitable deformation or even the destruction of the sink due to cracks.
Search
Related Articles
Stages of repair in the apartment
To build a house or buy a house is not even half the battle. The next step the happy owner begins to puzzle over where to start to bring everything to mind. That is why it is important to know the s...
How to conduct water from the well to the house
Want to improve the comfort of living in a country house or at the cottage? Then you certainly need to hold your own water supply. The task is complicated if the house was built a long time ago. Bef...
How to install the door with your own hands

Hinged doors differ in both their design and the materials from which they are made. Before embarking on the self-installation of doors, it is necessary to acquire a certain theoretical base - to le...
Installing dormer windows do it yourself
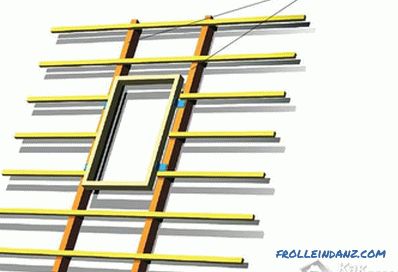
The desire to increase the floor space of the living space made the attic a very popular premise. The space, which was a dark cold attic, due to alteration and insulation becomes a full-fledged room...
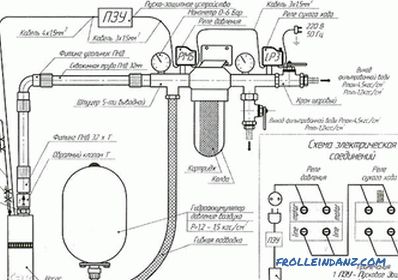
How to choose a membrane tank - the choice of membrane tank
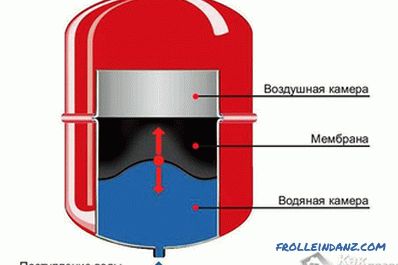
Constantly varying temperature and pressure in the plumbing system can create problems for devices that require stability to function. Uninterrupted water supply may also be affected. Diaphragm t...