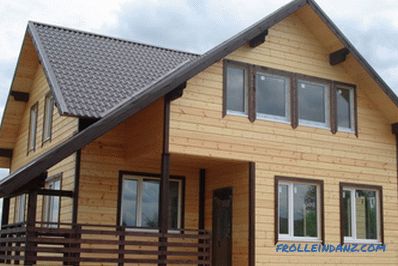
Eco-friendly housing with natural and safe materials is increasingly being built today. The cost of such buildings is much lower than that of traditional concrete and brick, but many indicators, including thermal properties, are much higher. Of the benefits it should be noted that the design of the house can be assembled by hand, if you have some experience with wood. How to build a house from a natural log? First you have to choose the appropriate project, and then strictly follow all the recommendations and rules of work.
")
The basis of almost any wooden house is a blockhouse.
Walling
To build a house of logs, you can use various options for connecting crowns. The technology itself wall construction remains the same. The first crown cannot be put on a tape of the base, for this purpose waterproofing is applied. Without it, the tree will quickly begin to rot, and this can not be allowed. As such laying the usual cut board is applied, the best option - lime. Its thickness should be 50-100 mm, width - 150 mm. After the board is fixed on the tape with anchors, you can begin assembling the house.
")
Scheme of assembly of a log from a rounded log.
At the first crown, the lower part is cut with a width of 150 mm so that the wall fits tightly against the gasket. The bezel has grooves of a different shape, they are perfectly visible, so they cannot be confused with other types of logs. The walls are simply assembled, the logs are laid out in a certain sequence, which strongly resembles a large designer. Usually, no solutions and fasteners are needed anymore, properly made grooves for assembly perfectly withstand the load. Most often today the compound is used "in the bowl", it is the most economical and simple.
The walls are assembled strictly according to the project, but there is nothing complicated here: 3-4 men will assemble such a house in 2 days. In addition to the traditional connection, pins are used and wooden studs for a very strong connection of logs. This ensures the durability of the structure, its excellent thermal and physical qualities. It is important not to forget that you just need to cut openings under the windows and doors, perform mortgages under the ceiling.
Roof for a house from a log
Roof structure for a house from a log.
Once the frame is ready, you need to take care of the roof. To fully put the house with your own hands, you must use the same wooden elements for the construction of the roof. If a set of materials is purchased with the project, then the rafters, beams, etc. are supplied with logs for the walls, only the roof covering is purchased separately. It is best to use ordinary metal tile in this capacity. The first to be mounted on the roof rafters on the upper crown of the log house. But for some types of construction, you can put the first Mauerlat. Careful attention should be paid to the features of the selected project.
All fastenings are made using studs, screws and special metal plates. Rafters are mounted in 600 mm steps. Bar for rafters should be with a cross section of 50 * 200 mm, this is quite enough. After the basic structure is assembled, it is necessary to mount the batten, for this, regular edged boards or sheets of plywood can be used - everything depends on the roofing material. Before fastening the lathing, a waterproofing film is laid on the rafter system.
Caulking of the walls of the house
")
Layout of cracks and crevices between individual bars or logs.
To build a house from a log, a special heat insulation system is used - a caulker. Such works are carried out after the frame of the house has been erected. For caulking, a special tape material is used. This is usually felt, but sometimes flax, jute and other materials are used. Today, you can find a variety of products for this type of work.
A tool resembling a spatula is used for the caulker. They tape will literally push through the logs. It is best to start from the bottom, about 5-6 cm of material is pushed through the slots using a caulk, creating maximum compaction. Some experts advise you to perform a caulker after the roof has been installed, but the first time it is better to carry out the work immediately after the construction of the log house .
After about a year, the caulking process must be repeated. This is done after the initial shrinkage of the house ends. This is usually done after the winter, when the house will last about a season with working heating. Insulation ensures the absence of cracks and heat loss through them, the quality of thermal insulation is good.
Installation of windows, doors, floors of the house
The last stage of the work is the installation of window frames, doors, arrangement of floors and floors.It is important even during the construction of the building not to forget to make openings under the windows and doors, to arrange mortgages for overlapping. Windows and doors are usually used wooden, which allows you to avoid heat loss, to make the structure attractive and harmonious.
")
Scheme of window arrangement in a log house.
The design of the window opening includes:
- The first seal from the opening log is a special sealant, for which a gap is left for shrinkage.
- The inner box is made of wooden beams with a square section of the required size.
- Platbands are mounted on the inner box. They are rails with a profile of the required type.
- To install the window during the construction of the walls, special mortgages are made in the form of bars on the sides.
- About these mortgages the fastening is carried out by metal plates.
- Internal platbands are made of wooden slats.
- A special mezhventsovy sealant is mounted below, which allows you to avoid heat loss through the cracks.
- The window frame can be 2- and 3-chamber.
- On the outside, the casing is made of a flat wooden slat.
Installation of windows and doors can only be started after the shrinkage of a log house has ended.
Otherwise they will warp, and the glass may crack. Time for shrinkage requires quite a lot, most often it is 12 months, after which you can continue to work with the structure.
")
In order to protect the frame from the effects of the environment, it must be treated with an antiseptic.
Do not put doors and frames directly into the openings. Required boxes, casing frames, which have a compensatory mount. Structures are inserted into such frames. Special seals are used, which eliminate the gap, reducing heat loss. These measures are necessary, because the complete shrinkage of the log house lasts about 5-6 years, and such boxes are plastic, they perfectly withstand all shrinkage processes. Frames of windows and door frames will not be skewed, they will remain in their places.
After the windows and doors are mounted, you can begin to work on the installation of floors and floors. The log house has a ceiling of wood, the floors are usually installed on the logs. For the device of floor slabs, the bars are inserted into special embedded walls. Then perform a strong connection of spikes, grooves, anchors. To ensure the ventilation of all wooden elements, it is necessary to put the floor logs 1 crown higher. From above they are sewn up with a usual cut board.
Final work
After the work has been completed, you can proceed to the installation of interior doors, a heating system, and subsequent finishing. Warming on the inner walls is usually not done, since there is enough external caulking. If a log house is being constructed in a cold region, such measures will not be superfluous, usually mineral wool is used for this purpose, after which the walls can be stitched with natural wood clapboard or plasterboard, onto which any finishing material can be fixed.
A log wooden house is a warm and reliable structure that you can build with your own hands. For work special processed logs are used, which can be joined into the crowns by various methods. Today, manufacturers offer ready-made logs that come with a set. Pre-selected project, only after that you can begin to purchase material for work. It is important to remember that the tree needs preprocessing. After the construction of the walls it is necessary to wait for the shrinkage, and after that to carry out the finishing work.
Didn't find the answer in the article? More information on the topic:
-
")
How to repair stools with your own hands
Do-it-yourself stool repair: basic repair options for individual parts. Repair legs: installation with glue; thread restoration and improvement of the old thread. How to repair a seat.
Search
Related Articles
How to sheathe an iron staircase with a tree: features
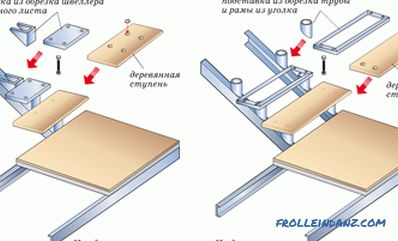
Wood and metal: agree, a good combination. Many designers use it for their projects. And it's not just about the stairs. But today we will talk about them and how to sheathe the iron staircase with...
The best manufacturers of faucets for the bathroom or kitchen
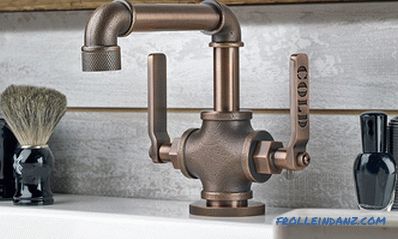
A selection of the best manufacturers of bathroom and kitchen faucets are based on the technical features of the products, user reviews and ratings, as well as technological solutions. Such an eleme...
Which siding is better acrylic, metal or vinyl
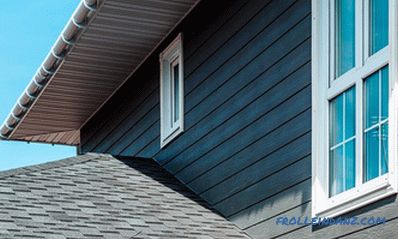
Siding is a wall cladding for a curtain wall. These are flat, profiled longitudinal lenses, which are sewn onto the frame subsystem attached to the base wall. When deciding on a hinged facade, you h...
Arbor in the country with their own hands: a plan of action
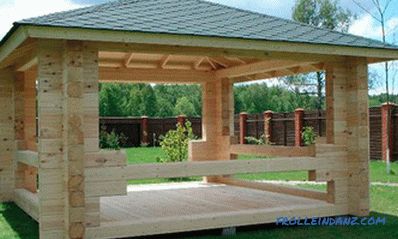
There is practically no such person who would not like to rest away from the noisy bustle of the metropolis, in the lap of nature. Often this function performs a country site with a cozy gazebo. He...
exterior finish and basic facing options (photos and videos)
Timber is one of the most popular building materials. From it build houses, baths and other buildings for domestic use. Houses from a bar possess a special microclimate thanks to a natural origin o...