You can not do without an elegant and comfortable dressing table in the bedroom. Otherwise, where should the hostess fold cosmetics and necessary trifles? And a large mirror is not a luxury, but a vital necessity. Of course, you can buy ready-made furniture, assembled at the factory, or order the production of an exclusive model in a specialized workshop. And you can assemble an elegant, but simple table with your own hands. It will take very little time, perseverance and skills in handling carpentry tools.
")
It is quite simple to make a small dressing table; only a few boards and carpentry tools are needed.
Preparatory stage of work
Before you start to assemble the table with your own hands, you need to create its drawing with all the dimensions you need. This scheme will help in the work, and you can avoid annoying mistakes and miscalculations. You can make a similar drawing yourself by inventing your own furniture model, or take a ready-made counterpart for the sample. For example, a table scheme (Fig. 1) can be created from drawings from a catalog of furniture of a famous brand.
Of course, you can use your own dimensions and change the design to fit your needs. Looks good dressing table, equipped with both one and two side tables. In the drawers, you can remove the necessary stuff, and on the shelves - put cosmetics, home first aid kit and books. But you can redistribute storage space to your liking.
")
Figure 1. Drawing of the dressing table.
In any case, you need the following tools for work:
- electric drill and drill set for woodworking;
- screwdriver and set of necessary bits ;
- electric jigsaw or handsaw with small teeth;
- a set of screwdrivers with various pins and hex keys.
Do not forget to prepare measurement tools: a measuring tape, a ruler, a square and a building level. They will help you to connect all the elements correctly. If you neglect to check the installation of fasteners, the furniture can turn out to be deformed. For the necessary markup, use an ordinary pencil.
Required materials for making the table
At the preparatory stage it is worth determining the location of the mirror. It can be made an element of the table or mounted on the wall. The easiest way to use ready-made mirror. Then you will avoid the laborious and rather difficult work on its installation.
It is also necessary to decide exactly how you will decorate the table top sections. The house masters either simply grind them, or putty and paint over. But both of these methods are not very reliable. Experts advise to use furniture edging tape (it is also called the end). You can buy it in stores selling goods for the repair of interior items. And for its installation you will need an iron or a low-power building hair dryer.
")
Figure 2. Diagram of the vanity table top.
If you want to make a fancy-shaped worktop, it is easier not to cut it out yourself, but go to the carpentry workshop. In this case, it is necessary to make a paper or cardboard piece of the surface in full size. The same service is provided in some stores selling chipboard and plywood. Experts can help you find the necessary form for the table cover (Fig. 2).
Lastly, accessories are chosen. In addition to the handles, you will need furniture hinges, awnings and drawers for the drawers. You can choose roller or ball designs. The advantages of the first are quite low cost. Ball guides are safer and more convenient to use.
Self-tapping screws and eurobolts are used to fasten the elements. All knots can become more reliable and more durable if they are additionally glued with ordinary PVA glue. If you choose this method of fixation, then you will also need clamps to tighten the parts until they are completely dry. And to improve the appearance of the table, use special plastic plugs that cover the caps of the bolts.
To make a table you will need a chipboard, laminated chipboard or plywood that is thick enough (at least 16 mm thick). In addition, such an interior item can be assembled from a solid wood panel, but then the furniture will be much more massive.
Assembling the dressing table
")
Figure 3. Assembly diagram of the dressing table.
When making a table with your own hands, you first need to create a tabletop. If you cut it yourself, then pre-paste the surface of the sheet on the markup with building paper tape. And then form a cut on top of it. This will allow you to get rid of chips, chips and excess chips.
Next, you need to process the front edge of the cover.It is polished with coarse-grained sanding paper in rough form and ground with glue (the standard “Moment” is suitable for this). The primer layer must be allowed to dry completely. Then you need to smear the surface again with glue and only then install the end edge.
Next, the tape must be glued with an iron. The temperature of the device must be set to "cotton". In no case do not spend a hot surface on the tape itself. Lay a clean cotton rag between the iron and the furniture. Excess edges are cut with a stationery knife and trimmed sections. Similarly, the stand is made under the mirror.
Next, the sidewalls of the pedestals (pre-cut to your size) must be marked for the installation of the drawer guides. Determine the location of the box as follows.
The ordinal number of the box (starting from the top) x wall height + height of the finishing edge = 25 mm.
If the height of your box is, for example, 140 cm and the height of the edge is 4 mm, then the following calculation is obtained:
- 1 box: 1x140 cm + 4 mm - 25 mm = 119 mm;
- 2 drawer: 2x140 cm + 4 mm - 25 mm = 259 mm.
Accordingly, the guide (its center) for 1 box is mounted at a distance of 119 mm from the top edge of the sidewall, and the second - 259 mm. After fixing the guides, it is necessary to assemble the table drawers themselves. Pay attention to the scheme of works (Fig. 3).
In the side blanks of the walls, holes are drilled into the plane, in the front and rear parts they form the same sockets in the end. Eurobolts or wooden dowels can be used as clamps. First, the walls along the perimeter are assembled, then the bottom is fixed on them. It can be made of thin plywood or hardboard. Then, from the outside, screws are attached to the guides. If you use roller constructions, do not forget that for each side a separate guide is installed.
Final processing of the table
Next, thumbs are mounted. To lateral details the top cross ties (levels) join. Then the bottom is fixed. Before you install the screed, form holes in them for fixing the table top. The last to be installed are the table cover, the facades on the drawers, the fittings and the doors on the storage compartments.
If you collected a table from a laminated plate, then this work can be completed.
In case of using chipboard or plywood, your product needs to be finished.
First of all, all cuts and cuts must be carefully sanded and sanded. Then the surface can be covered with stain or paint.
In the first case, you can make the tree structure more explicit. And if you use a tool with coloring pigments, the table will look assembled from precious woods. If you want the furniture to get a glossy shine, then polish the surface. Otherwise, the table will remain dull. If desired, this piece of furniture can be painted.
Didn't find the answer in the article? More information on the topic:
-
")
How to arrange the ceiling in a wooden house
Information on types and requirements for flooring in a wooden house. Advantages of the beam and girderless ways to device floors. Recommendations for the selection of wooden beams.
Search
Related Articles
The need for a passport for waste and features of the certification process

The daily work of any organizations, and especially industrial enterprises, is accompanied by the formation of various wastes. Many of them have a harmful effect on the state of ecology. To assess t...
How to connect a washing machine to the water supply and sewage yourself

Even the most notorious skeptics finally realized that with an automatic washing machine, life in life becomes much more comfortable. Not necessarily long and tedious to prepare for the "big wash" -...
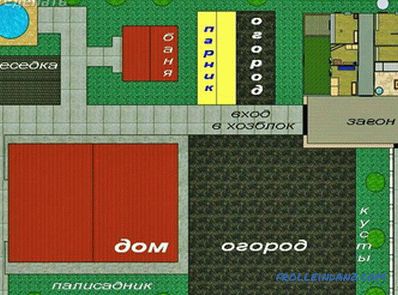
Hozblok for giving their own hands
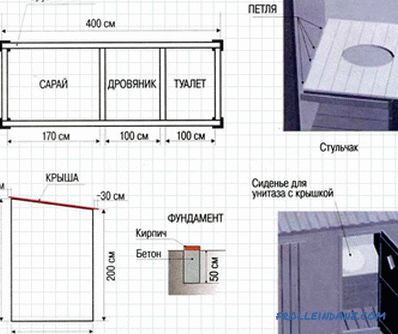
Are you a country owner? If yes, then you know that in the country to do without a hoe-block (or a shed) is simply impossible. In it, you can store supplies, various tools, agricultural tools and ga...
How to build a barn with his own hands (+ photos)
A shed is an integral commercial building on a summer cottage. A well-designed barn can last more than ten years. In addition, you can save well if you build a barn yourself. First of all, to start...
How to raise the floor on the balcony with your own hands

In many cases it is necessary to raise the level of the floor on the balcony. This is due to the fact that when leaving the balcony, in most layouts, the floor level is much lower than in the apartm...