Over time, even the most reliable and sturdy wooden chairs fail. The most common problem is the loosening of the chair. As a rule, he may begin to wander if the connection is unstuck in some place. Even a non-professional can repair the chairs with their own hands.

Wooden chairs lose their luster and loosen over time, with the result that they need repair.
The main feature of old wooden chairs is that they consist of many small parts that are interconnected by glue. Over time, the tree can dry out and shrink. In this case, the connections often diverge completely or become loose. Also, the connection may disperse due to the fact that the glue has cracked. In this case, all the elements of the chair remain in full repair, so fix it is not difficult.
Basic repair rules
The most simple to repair design includes 4 legs, which are inserted into the grooves in the bottom surface of the seat, which is one solid board of sufficient thickness. By the same principle, stools are made. It is enough to remove the loosened leg, clean the glue from the recess so that the surface becomes clean. After that, you need to put a portion of the new glue on the leg and insert it back into the groove.

The construction of a simple wooden chair.
A more complex structure is represented by chairs with crossbars between legs or a side under the seat. This design contains a large number of spike connections, which are fixed with glue. In order not to damage the details of the chair, you need to disassemble it very carefully. If the glue seam disperses only in one place, it is not necessary to completely disassemble the chair. You can make a hole in a damaged area with a thin drill from the inside (to maintain an aesthetic appearance) and pour glue into it. It is possible to use a syringe to inject glue.
If a pin is damaged (a thorn in the upper part of the leg for joining), you can use a piece of paper to seal it. In this case, a strip of paper needs to be folded several times so that it is not wider than the pin. This will seal the connection. Paper is better to smear with glue, so that the connection with its use is more durable. After making such a kind of bandage, it is necessary to glue the foot into the seat in the seat.
Repair of a chair with curved legs should be carried out especially carefully. It is recommended to glue the legs alternately. If you try to glue all the legs at once, then it will be quite difficult to get the correct position of the chair.
Features of work

Scheme of repairing an old wooden chair with hot water.
If the pin has shrunk badly, then a wedge must be inserted into it. First, the part is removed from the groove, then its upper edge is split with a saw, and a wedge is inserted into the resulting slot. It must be thin and not very long, in order to protrude a little from the surface of the trunnion. As a wedge is best to use wood chips. As a result, the trunnion will be extended and the connection will become more reliable.
If the pin has shrunk, but is firmly attached to the glue, then it can be quite difficult to get it out of the groove. In this case, you need to try to push the details of the chair as far as possible and inject the glue into the resulting space. However, it is recommended to remove the foot from the groove.
It may be necessary to soften the adhesive to separate the glued parts. If you are repairing a chair with crossbars between the legs, even strong joints will need to be separated. It is recommended to apply water vapor to a strong glue joint. Steam is effective even for well-closed adhesive joints. To create a directional steam flow, you will need a thin rubber hose (6-7 mm in diameter), 2 pieces of metal tubing of a suitable diameter, a stopper and a kettle. At both ends of the hose you need to put on the tubes, insert one of them into the hole drilled in the cork, and the cork - into the teapot spout. Such a simple device will allow you to direct the steam to the seam.
Before steam treatment, it is recommended to install the chair as close as possible to the stove, it is necessary to provide access to the treatment site. After cooling, the steam will turn into water, which is desirable to remove. It should not be allowed to fall on other wooden parts or upholstery. It is necessary to perform the steam treatment with gloves. You need to wear at least one on the hand in which there will be a hose. This will protect against heat. As a rule, 1-2 minutes of steaming is enough to separate the wooden elements. Re-glue them only after full drying.
Repair of chairs with fixed corners

Methods for repairing frequent stool destruction: 1 - leg destruction; 2 - destruction of the tsargi; 3 - replacement of the destroyed leg area; 4 - replacement of the spike of the dorsal; 5 - elastic crack screed with spike reinforcement with an insert; 6 - seal wide crack rate.
It is quite laborious to repair the chairs, in which the lower backs of the seat are connected to the legs with a finger joint. In such structures, additional corner fasteners are provided - solid wood chocks. They can be in the form of a trapezoid or a triangle.
With such a connection, it is usually not enough to sever 1 glue line. It is necessary to disassemble at least 1 angle, and in some cases - the whole frame. Do not apply force to disconnect such a connection. In this case, you can damage or completely break off the spike of the tsarga. You can glue the parts using steam softening glue. When gluing back, it is very important to keep the angle. Small wedges can be inserted into the spikes on the tsars to seal the joint.
In some cases, it is necessary to strengthen the frame of the chair.
This may be required if the seat panel is not firmly and securely fastened to the frame. To reinforce such a structure, it is necessary to fasten a triangular or trapezoidal shape from the inside of each corner joint. Over time, with high loads on the chair, even such fortified compounds can loosen. In this case, you will need to tighten the screws or replace them with new ones.
Sometimes you need to replace the chocks. This is necessary if they are cracked, split, exfoliated or split. New parts must be fully consistent with the old. In addition, it is very important to fit the side surface of the chocks under the frame. If the new chocks do not match the old ones, then the whole frame may be skewed. Chocks must first be glued to the inside of the frame, and then additionally fixed with screws.
After gluing the frame, it must be secured with clamps. It is not recommended to create a very large pressure in order not to squeeze out too much glue from the seams. Tensioning takes about 12 hours. It is very important to keep the correct angle for the chair and not to allow it to skew. Tension pressure should be uniform.
Thus, the repair of chairs with their own hands can be performed even by an inexperienced master, who in his work will adhere to accuracy and precision. Do not put too much effort on the frame of the chair, as this may cause damage to its parts. Some glue seams may require steam treatment to separate them.
Didn't find the answer in the article? More information on the topic:
Search
Related Articles
Apartment design project: how to make yourself
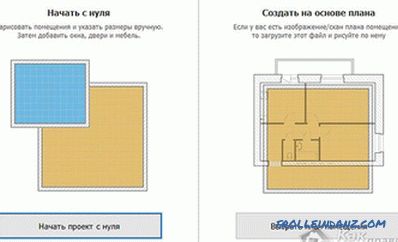
Repair is getting closer and closer, and you still can not decide which of the many ideas is better? The surest solution is to try them all. If this advice seems crazy to you, then you probably have...
DIY laying linoleum - step by step instructions
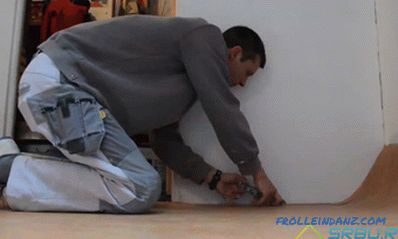
The floor of linoleum, of course, very practical. It looks, of course, simpler than the currently fashionable laminate, but it does not get wet and is not afraid of scratches. Yes, and it is much ch...
Do-it-yourself drainage well installation
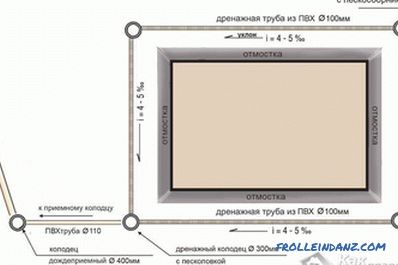
Buying a land plot always implies concerns. Not everyone can afford to buy good land, so you have to make attempts to improve it. A big problem for many sites is the occurrence of groundwater close...
How to caulk log house with your own hands
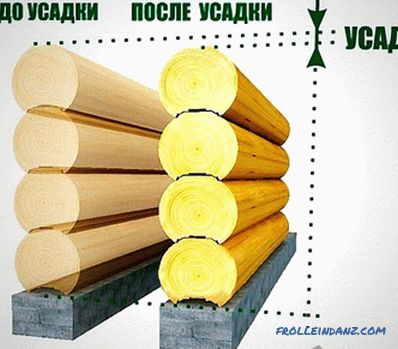
Typically, the construction of a building is not the end point of the entire project. In order for the house to serve a good time, it is important to follow the rules of care and preventive maintena...
How to make concrete - concrete with their own hands
The preparation of high-quality concrete is impossible today without the use of technologies that have been used up over the years, which will allow you to get a mixture with specified technical cha...