The need for a table that you can bring to a picnic, and there you can quickly assemble and disassemble yourself, is great. Making a picnic table with your own hands is not too difficult, and not much time is wasted. This skill is useful in later life, as the ability to work with wood and knowledge of basic tools are important for a comfortable life. It is best to choose a tree for the manufacture of the table, since this material is light, durable and environmentally friendly, if all the stages of its processing are completed. Working with wood is easier than with plastic, and basic woodworking skills are well mastered on such simple household items.
: production procedure")
The scheme with the dimensions of a folding table with removable legs.
Picnic table - varieties
The appearance of the picnic tables differs in the shape of the table tops - it is most often rectangular, but there are also models with a round or square, and sometimes shaped surface. The legs can be made of steel, aluminum or wood.
: production procedure")
Most often folding picnic tables are rectangular in shape, but there are also round ones.
If the legs are arranged in parallel, it will be convenient to sit at such a table, but the design will become less durable. If the legs are located crosswise, they are very stable, but sitting at such a table is not very comfortable. For uneven surfaces, it is advisable to provide legs removable, which could be adjusted in height. When choosing tables of this kind, you need to focus not on the appearance and size, but on the design features.
For picnics and other nature trips, a tabletop made of varnished plywood is a good option, since this material is moisture resistant and will last for many years. This type of material refers to those that are easy to clean and do not absorb odors. Conveniently in the center of the tabletop to provide an opening for an awning, to make outdoor recreation more comfortable, but the ratio of the table and the awning should be well thought out so that the whole structure does not overturn from the wind.
Folding table with your own hands
Tables made of wood or laminated chipboard with parallel legs look very neat. The materials and tools needed to make a picnic table with your own hands are common, and you can find them in almost every hardware store. For a folding table you will need:
: production procedure")
A drawing with the dimensions of a folding rectangular table.
- a shield glued from a natural tree;
- a bar;
- reinforced washers;
- furniture corners;
- furniture hinges;
- wing nuts;
- rivets;
- screws;
- handsaw;
- electric drill;
- a screwdriver or screwdriver;
- a pencil or marker.
A picnic table, depending on the functional, can have different sizes, but one detail for all folding tables is common.
The legs, namely the folding part, must be shorter than its height, otherwise the table cannot fold.
You can not stand up on such tables, as the folding design of the legs can withstand less weight than a constant. Having made a table with your own hands, you can then decorate it with a tabletop with paints or with the help of decoupage.
Table manufacturing order
: production procedure")
Folding square table layout.
The purchased timber is required to be cut to the size of the table, legs and crossbars between them will be made of it. It will take 4 identical lengths for legs and 4 identical crossbars, which will fasten the legs between each other at the bottom and top. You will also need a transverse beam, which will prevent the table from folding and its legs to skew.
The pairs of legs are laid out parallel to each other on a table or on a workbench according to the width of the table and the crossbar. Place two crossbars in the upper part of the legs and twist the structure in the corners with screws. The diagonals of the rectangle, which turned out, should be equal - this will provide a table for a picnic stability. After checking the design twist tightly, adding metal corners. The second pillar is created in a similar way.
Furniture hinges made by the racks are attached to the table top. Paddings from the edges are made 3-5 cm. Then the keepernaya tape is fastened on the picnic table. It is needed for fixing the legs-racks in relation to the tabletop. The tape on the table top is fastened with screws, then, putting the stands in a vertical position, cut the tape at the optimum length. At the rack, the ends are fixed with rivets and in such a way that you can detach at any time.
Folding picnic table
This design is quite light and is therefore used for hiking, gardening and fishing. To get started, cut the bars, with a prudent stock of diameter. Cutting this kind of material is very convenient on the circular saw.For the countertop, you can choose any material, but preferably varnished plywood or wood covered with several layers of varnish. The saw cuts should be closed with edge banding, and the bar, prepared under the legs, is rounded with a jigsaw or grinder.
First, proceed to the assembly of the legs and supports. The legs are criss-cross attached to each other with a large bolt 3-3.5 cm long. With a marker or pencil, the markings for fastening are applied on the tabletop from the inside. Installation of all parts using screws on the tree. Parts are numbered, and pre-assembly takes place, after which the structure is reassembled and all the parts are varnished. After a day for which the lacquer should dry, you can do the final assembly.
Didn't find the answer in the article? More information on the topic:
-
: production procedure")
How to make a wooden floor on the ground?
Wooden floor on the ground: the device of the coating, the required materials and tools. Technical features of the work stages. The process of mounting your own hands.
Search
Related Articles
Mansard roof rafters: step by step instructions
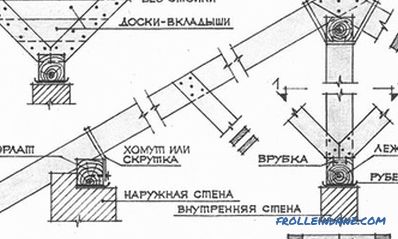
When installing rafters for an attic, it is necessary to withstand all the technological requirements so that the supporting structure can fully perform the tasks assigned to it. Farms and other re...
How to make a wrought fence with your own hands
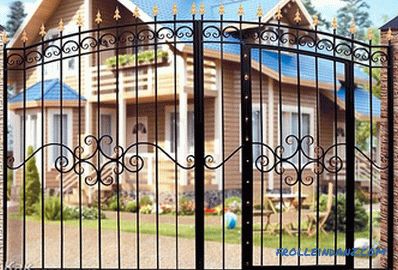
The fence of any private house is a business card. Due to the huge amount of materials and innovative technologies, anyone can build not a simple fence, but a real decorative element that will add t...
design features (photo and video)
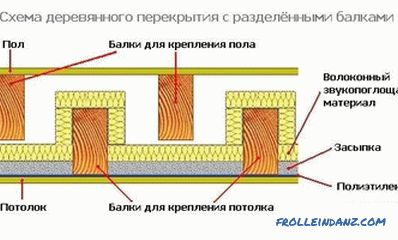
The ceiling in a wooden house can be made with your own hands. House made of wood refers to a warm and comfortable buildings with high thermal insulation properties. Arrangement of the ceiling stru...
Align the ceiling with your own hands - align the surface of the ceiling (+ photos)
When repairing an apartment or office, all major work is often done after the ceiling has been finished. The main task of this process is to level the surface. This is also the most difficult part o...
Decorating the house with wood outside panels and block house
The appearance of the house, its durability and practicality will depend entirely on the correctness of the choice of building material. Decorating a house with a tree outside is a fairly common wa...