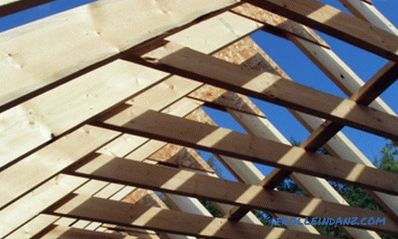
Construction of the house involves the installation of rafters. The rafter system is the base of the roof structure. Before installation, you will need to find out the design features of the roof.

Scheme of the truss system of the attic.
Roofing slopes provide for the installation of a truss system and a batten. Initially, this structure is calculated, taking into account the type of roofing material, the thickness of the snow cover and the strength of the wind. To increase the rigidity of the frame, produce a connection rafter legs with each other.
Species and their features
Rafters are of the following types:
- Inclinations.
- Hanging.
For rooms with a large area, builders recommend building trusses. From a constructive point of view, such a system is presented in the form of rods of a certain shape, which are in the same plane and have a reliable connection with each other.

Types of roof systems.
At the heart of the construction under consideration is a triangle that provides maximum rigidity. Triangles are installed along the slopes and are designed to support the crates.
As for the hanging rafters, they are installed on 2 supports. To perform work on bending and compression it is recommended to use hanging elements. This design allows you to create a certain effort that can be reduced by puffs.
Such a system is also used in the case when roof spans vary within 7-12 m. At the same time, additional supports are not provided. There is vertical pressure on the mauerlat. The main elements of the hanging system include:
- tightening;
- legs.
Carrying out calculations
The building structure, presented in the form of wall rafters, is installed in houses with a supporting wall or intermediate column supports. The last elements are set in the center with respect to the external bearing walls. Such elements act as beams.
The installation of the roof structure over several spans is carried out by simultaneous installation of flat and hanging trusses.

The table of coefficients for calculating the elements of the truss system.
Where intermediate supports are not provided, hanging analogs are used. If roofing material or roofing material is used as a flooring, then the lathing is arranged as a solid construction, which consists of two layers of boards. Under the tile and slate, equip the crate of bars with a cross section of 50x50 mm.
To build a roof, you need to make accurate calculations of the rafters. If the roof of a two-story house of 8x10 m with a wall thickness of 0.51 m is equipped with a wave slate, then you will need to make a truss system in 1 m increments. At the same time, the angle of inclination of the roof is 27.3 °.
Rafters are calculated in this case, taking into account the stacking of three rows of slate. Since this roofing material has high strength, it will be necessary to observe a distance of 0.55 m between the central axes. Wave slate provides for the arrangement of the batten in 10 rows.
Step-by-step instruction
The installation of the truss system is carried out using the following tools and materials:
- bars;
- logs;
- level;
- roulette;
- hammer;
- nails.

Attachment points for the truss system.
The rafter construction is made of high quality lumber. Bars and boards will need to cut to fit the right size. To do this, use circular saw. Before construction begins, the rafters will be debarked. Then make a markup on the template.
The assembly of this design is made on the striker in the template. The elements to be assembled are installed in the appropriate order. Originally put with charcoal or chalk scheme rafters. To fix the legs you need to fill the planks.
The truss system is made of barked round wood with a diameter of 18 cm. Special fasteners, which are made of good quality wood, are used as leg connecting elements. Tightening is made by hand from several logs. They are interconnected in length.
The struts and shorter stands are made from scraps of logs. Then you need to cut the cut points. To do this, use a sharp ax. For the arrangement of floors and the formation of truss belts use beams that are installed on lamellar Nagelka.
Builders recommend using systems with an assembly section in such cases, presented in the form of structures with two or three bars. The last elements have a reliable connection.
They are installed in the beams in length. An exception may be the middle part, which is characterized by slight shearing forces. Beams are made of 1st grade timber with a humidity of at least 20%.This indicator for plate dowels should not exceed 10%.
Beams are assembled using a special unit, which consists of two supports with a shaft that performs rotation in the sleeves. In this design there are trestles. To shift them, it will be necessary to insert plate type dowels.
When bending beams, it is necessary to ensure that the planes of the bars, which are in contact with each other, are fitted to each other correctly. Then (taking into account the template) mark the place of installation of dowels on the roof. The corresponding dowels are inserted into the nests.
On one side, the trestles move out, and the shaft turns with beams 180 °. Now the trestles can be set in place. On the other side of the beams, pins are installed. These components will need to be clamped tightly in the socket.
Didn't find the answer in the article? More information on the topic:
-

How to self-level the floor quickly?
How to level the floor quickly? To do this, you must know the styling technology and the sequence of steps. To achieve the desired result, you should know the basic types of base smoothing.
-

How to mount the power plate?
Instructions for mounting the power plate. Fastening with anchor bolts, wire and pins. Features mounting Mauerlat. Necessary for fixing the power plate tool.
Search
Related Articles
How to start building a private house
If you are going to build a house, you need to think about everything carefully. After all, if there is a clear plan of action, all stages of work, from design to finishing, will be more successful,...
Semi-commercial linoleum technical characteristics and properties
In European countries, it is customary to divide linoleum into only two types: household and commercial. Well, in Russia they decided to single out another kind. This is semi-commercial linoleum, wh...
How to increase the water pressure in the water supply

Quite often, residents of country cottages, houses, and city apartments face weak water pressure in the plumbing system. And if for personal needs and domestic purposes you can still make a certain...
What should be the slope of the sewer
For those who have not encountered the laying of sewer pipes, it may seem that everything is elementary and simple, but it is worth noting - it only seems that way. The question of what should be th...
The distance between the rafters under the metal, step rafters
The distance between the rafters under the metal tile necessarily takes into account the efforts of the wind, snow load, its own weight of structures, roof. In addition, the following factors influ...