The stool still does not lose its relevance. This piece of furniture, perhaps, has already been ousted from homes with wealth, but in millions of small-sized kitchens it remains indispensable, due to its compactness, subject. Stools can fill the lack of furniture for sitting with a large gathering of guests. The design is simple, and many have done it even at school lessons of labor.
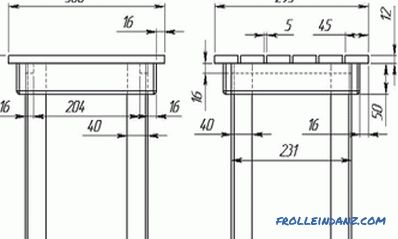
Drawing stools.
Those who are interested in how to make a stool with their own hands, it is necessary to remind you that you will need:
- a pencil;
- a jigsaw;
- ruler;
- square;
- drill / driver;
- Allen key;
- a sheet of cardboard or paper for the template.
A simple stool made of chipboard or plywood

Plywood specifications.
In order not to immediately put complex tasks before domestic craftsmen, you need to start with a description of the manufacture of the simplest model. The stool is assembled from 16 mm laminated chipboard or plywood of the same thickness. It consists of only 4 parts:
- 2 figured cut sidewalls that serve as legs;
- jumpers between them;
- seats.
When assembling a structure, only 8 confirmatory 6.3 x 50 are required.
With the help of the piece, it will be better to withstand the symmetry of both sidewalls. The instruction on how to make a stool is simple:
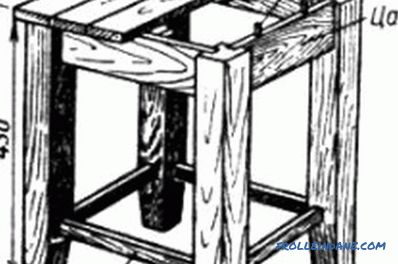
Stool device.
- A markup is made on the chipboard.
- The lines of the sidewalls are drawn on the template.
- The slab is sawn into blanks.
- The edges of the parts are covered with melamine tape heated by an iron.
- In the legs holes for reinforcement are drilled and countersink. The diameter of the holes - 4.5-5 mm.
- 4 blind holes are drilled in the lintel.
- 3 details come together.
- The seat plate is cut. Its corners should be rounded. In addition, the sides of the seat can be arched.
- Ends are glued with edges.
- After marking, holes are drilled in the chipboard.
- The seat fits on the uprights and snaps onto them.
- Plastic plugs are installed.
The stool is almost ready. It can be ennobled by gluing polyurethane foam to the seat and wrapping it around with leatherette or thick cloth. Upholstery is fixed on the back side of the cover with type 53 brackets. Additionally, brackets are punched with a hammer.
Instead of euro screws, long self-tapping screws can be used to tighten the structure, but the connection of the legs and lintels should be reinforced with wooden dowels. For them, 2 holes are drilled in the sides and 4 blind holes in the ends of the crossbar. Shkanty planted on glue.
Making a stool out of plywood
A light and durable stool is obtained if you make it from plywood with a thickness of 16-20 mm. It can be assembled from laminated chipboard, but over time the structure of chipboard can loosen. It should be said that for screws it is necessary to prepare holes of smaller diameter.
In order for all the legs to be the same, you need to create a template.
Attachment of the leg to the seat.
First, a rectangle is drawn on the cardboard. After that, the contours of the support are applied within it. 4 legs are cut out according to the patterns. All surfaces are treated with antiseptic. Carpenter glue is applied on the plane of pairing of the legs. Supports are fastened with fasteners.
The seat can be made round or square with rounded corners. The diameter of the circle or the side of the square should be equal to the distance between the outer edges of the opposite legs of the stool. The circle is cut by a pre-printed line. It is drawn with a kind of compass from a pencil tied with a cord with a nail. The length of the tensioned cord is the radius of the seat.
After sanding, treating with an antiseptic, and applying glue to the contact surfaces, the cover is screwed to the feet with screws. The stool can be coated with 2 layers of lacquer or paint.
Stool with cross legs
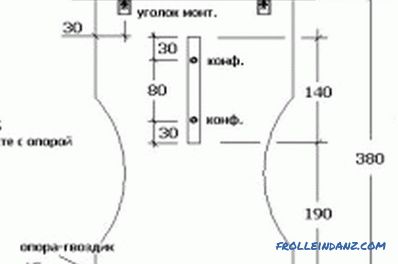
Scheme of the side part of the figured stool.
To make a stool with cross legs, you need:
- 60 x 60 mm bars;
- 60 x 30 mm bars;
- 12 mm plywood;
- 1 cm foam;
- upholstery;
- decorative studs;
- brackets of type 53.
The legs are 2 crossings. The length of each bar is 48 cm. A cut of 3 and a width of 6 cm is made in their centers. Earthed bars are assembled into 2 rectangular cross-pieces. The ends of the legs saw off at a 45 degree angle. Bars are connected to each other with glue. The length of the jumper between the crosspieces depends on the width of the stool you want to make. The crossbar is tightened with screws with supports (2 on each side).
On top of the crosses, slats of 60 x 30 are superimposed and tightened with the first fasteners.Treat the wood with antiseptic, wood stain, varnish or paint (apply new coating layers only after the previous ones have dried).
While the base of the stool is drying, make a seat:
- Glue foam rubber on the plywood.
- Cut material of the required size.
- Cover them with a seat.
- Secure the material to the bottom of the cover with staples.
- Shovel the edges of the seat with decorative studs.
After that, the seat is attached to the legs. The fastener is inserted into the holes drilled in the slats. Upholstery can be made differently. After the slab is attached to the base, foam is glued and fabric is applied to it. She tucks around the perimeter of the seat and upholstered with carnations.
Manufacturing of plywood chairs
Scheme of stool cover.
For those who are not satisfied with furniture without a back, you can try to create such a structure. Its form may be somewhat different. The details of the chair are cut from a sheet of 20-millimeter plywood. When making it, follow the following dimensions:
- The seat should be from the floor at a distance of 42 to 45 cm.
- The back is 20 cm away from the surface of the seat.
- The seat is not installed vertically, but with a 5-degree bias towards the back.
- The back deflects from the vertical back 10 degrees.
- The top of the rear legs should not extend beyond the vertical plane on which their bottom is located.
The chair will significantly strengthen the side piece, which connects 2 sidewalls under the seat.
To make the sidewalls, again it is necessary to resort to the use of a pattern. As an alternative, you can consider cutting the pillars from a double plywood plate, but it is necessary to make sure that the jigsaw was located vertically and both panels were securely fastened to each other, for example, with clamps. The surfaces of the sawed blanks are sanded. The seat, the back and the sidewall are cut. After sandpaper treatment, they are impregnated with an antiseptic composition. They also processed sidewalls. As the impregnation can be used linseed oil.
The markings for the holes for fasteners are made on the details. Confirmats with a cross section of 7 mm can be screwed into 20 mm plywood. First going to the sidewall and king side between them. It is located in the center (you can install and 2 crossbar). Details are fastened with fasteners. Then the seat is put and fastened with confirmats. Finally set back. After attaching it to varnished surfaces, a varnish or other coating is applied. It should be said that the veneer needs careful sandpaper re-processing, since the villi that are inconspicuous earlier can be forced into the lacquer and this will worsen the look of the chair.
The work is completed by installing decorative plastic plugs.
Didn't find the answer in the article? More information on the topic:


