The milling cutter is necessary for processing wood. This tool allows you to groove, cut grooves, work edges, perform spike connection. Its use can be inconvenient, since the master has to ensure that the workpiece is stationary and simultaneously processed. Coping with their own hands milling table, which is considered a reliable and convenient addition to the equipment, helps to cope with difficulties. The design of the table is so convenient that it allows you to make products in everyday life that are not inferior in quality to factory analogues.
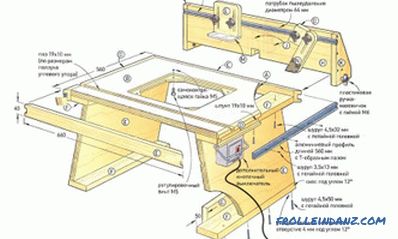
Scheme of a milling table.
Highlights
Such a design simplifies the processing of wood products and increases the level of tool productivity. Its options, dimensions and design meet the individual requirements of the wizard. It is necessary to begin work on the product from the drawing, which will indicate the size and location of the working parts.
The production process involves the use of the following materials:
- trimming of pieces of plywood or chipboard;
- square bars, 4 pcs. ;
- jack;
- hardware;
- steel plate, 6 mm;
- metal profile;
- aluminum guides;
- milling cutter for manual work;
- carriage-stop movable.
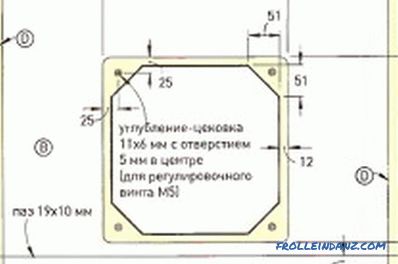
Drawing of the tabletop of the milling table.
To make a milling table, you need a bar (50x50 mm), plywood, tape measure, jigsaw, saw. Pre-prepare a stationary base of chipboard scraps and wooden bars. Of these, it is necessary to twist the legs of the support. You can increase the rigidity of the structure additionally with the help of plywood and horizontal connecting panels. On the right (side) you want to cut a hole that is intended for the start button. She joins the hand mill.
The table top is recommended to be made of chipboard, it should be lifting. Then set the loop and prepare an additional base-support of a single piece of plywood with a thickness of at least 15 mm. Moving carriage-stop will need to smoothly, without movement, to move the workpiece along the table. In the tabletop you need to cut a groove under the guides of the rolling support. A metal profile is installed in the groove. A guide from an old, unused saw can replace the stop carriage.
Manufacturing Instructions
Longitudinal stop is preferably made of chipboard. It must be movable (to regulate the gaps around the cutter). To do this, you will need to cut perpendicular grooves in the upper part of the support, securing the support to the base with clamps. In the center it is necessary to cut a small groove for suction of milling waste.
A box with a hole that will serve to connect the hose from a vacuum cleaner can be made of thin plywood. The vacuum cleaner will remove shavings and dust generated during operation. The box is mounted behind the perpendicular stop.
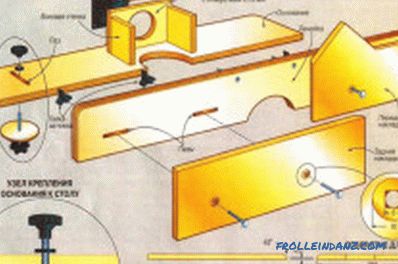
Scheme of manufacturing the support for the milling table.
The steel plate must be screwed to the table top so that it aligns with its surface. In the process of fastening, it is advisable to ensure that the edges of the plate do not protrude above the level of the table top, so that the parts to be machined cannot catch on it. Hand mill is required to attach to the bottom of the plate.
The tool is fixed by an aluminum sole with the help of bolts, having previously drilled holes for them. By fixing the device not to the tabletop, but to the plate, the depth of milling will be less, which allows, if necessary, to change the cutter.
Then it is recommended to proceed to the construction of the mill elevator using a car jack, which allows you to easily change the height of the unit with ease and accuracy. Instead of handles, you need to attach aluminum guides, connecting them with a jack.
Components of the milling table
The milling cutter is the main element of the installation. Its power depends on the specifics of the wizard.
Experts recommend choosing equipment with manual adjustment and the function of automatic stabilization of the frequency of rotation of the spindle.
Convenient models can be called those that are additionally equipped with quick stop and soft start functions, and those in which there is a button to lock the spindle. In such units, you can change the brush without opening the case of the apparatus.
The frame on the supports, on top of which the table top is fixed, is called a bed. It can be made of chipboard, wood, MDF, steel. The unit must provide a high degree of rigidity and be stable. The dimensions of the bed depend on the parameters of the parts that will be processed by the carpenter. The size, which is considered universal, is the height of 850-900 mm for standing work. It is recommended to equip the frame with adjustable supports so that you can change the height of the table and compensate for uneven floors.
The table top is presented in the form of a kitchen counterpart from a chipboard 26-36 mm thick with a coating of wear-resistant plastic. Such material will allow the workpieces to slide easily over the surface and dampen the vibration. Replacing the kitchen countertop can be made of MDF or chipboard with a thickness of at least 16 mm.
It is necessary to save the amplitude of the milling cutter departure, taking into account the worktop thickness from 26 mm, using the mounting plate. The thickness of the product should be small, and the strength should be high. The plate can be made of metal, but textolite is called more durable and convenient in processing material. The product should turn out to be rectangular in shape, with a side of 150-300 mm, 4-8 mm thick, with a hole, the diameter of which corresponds to the hole in the bottom of the router, in the center.
To the bed you need to temporarily attach the tabletop, on which the mounting plate is located. Its outline should be cut around with a pencil. Manual frezer in the bed choose a seat under the plate, so that it was installed on a par with the table top. The corners of the seat should be rounded.
It is necessary to start making the table after determining its design features. Instead of moving the tool (during machining parts), the milling table allows the workpiece to be moved, while the switched on device remains stationary.
Didn't find the answer in the article? More information on the topic:
-
How to choose the bits
for the screwdriverBits for the screwdriver: how to choose high-quality nozzles. 3 rules on the choice of bits. The choice of bits depending on the brands: nozzles of types Sl, Pz, Torx. Selection parameters according to generally accepted characteristics.
-
The nuances of the circular saw device
Device circular saw: design features, main categories. Requirements for a circular saw. The right choice of device and drives to it. Basic security measures.
-

Sharpening the saw blades yourself
Sharpening circular saw with his own hands, a description of the structure of the disc, as well as the basic principles of sharpening. What you need to know about grinding wheels? How to easily make a tool for sharpening the house?
