The times of total deficit generated by the Soviet era have long passed. After all, then the decoration of the walls in the room was clear and simple. Today, a variety of various finishing materials have appeared:
- liquid wallpapers;
- facing panels;
- modern paints.
But decorative plaster is a real breakthrough in construction and repair technologies. This is absolutely not the kind of plaster that is placed under the wallpaper, but a completely new independent material.
The excellent qualities of decorative plaster do not need additional recommendations. Two rooms, even decorated by the same person, using the same materials and equipment, will never be the same. Each is exclusive, because the drawing of plaster on the wall can not be repeated. With its help, you can create interesting effects, you only need to master the necessary equipment. This coating is very durable to all kinds of harmful effects. It is difficult to stain it, but if it somehow happened, it is easy to clean it.
Plaster is environmentally friendly, does not emit harmful chemical compounds.
In addition, it improves the soundproofing of walls. In stores such material is sold in a dry form, it is made on the basis of binding materials. Crumb, sand, stones or fibers with additives of antiseptics, dyes, thickeners can be used as fillers. In this article we will explain how to make decorative plaster of the walls with your own hands, what methods and materials for this exist, and also show photos and video instructions.
Views

Conventionally, the plaster is divided into:
- facade;
- interior.
Facade plaster is much more resistant to the aggressive influence of the environment and is used for external work. The interior, in turn, is divided into:
- mineral;
- silicate;
- latex.
There is also a classification according to the type of surface that is obtained as a result. For example, under the "roller", "fur coat", "rust", etc.
Tips

In general, each type of plaster has its own characteristics in applying . For example, expensive "Venetian" plaster is applied in several layers, in a special way, which requires solid professional skills, it can be coated on top with wax. This is beyond the power of a beginner, so it’s better to turn to a professional.
If you still want to do the repair yourself, it is better to choose a bark beetle plaster. For its application will require only an ordinary spatula.
Working with ordinary decorative plaster will submit even to a beginner, because to ruin such a coating is extremely complicated. And there is no need to prepare the walls too thoroughly - it will even out all defects. Such decorative plaster walls will also give a flight of your design ideas.
Preparing walls for finishing

It is necessary to thoroughly clean the wall from the remnants of the previous coating (paint, wallpaper, etc.). The exfoliated areas are removed, and the gaps are filled. This will be enough for bark-like plaster, but Venetian and some other varieties require a perfectly flat surface.
After priming and drying the surface, it is necessary to decide whether the entire area of the wall will be plastered, or part of it will go under another coating.
Zones of different facings can be divided with masking tape or window sealer.
Minimum set of tools:
- Spatulas of various sizes.
- Grater (wooden or plastic).
- Metal float.
- Tanks for solution and for water.
- Roller for textured plaster.
Application
 Putting plaster
The solution should be prepared according to from the recommendations on the package, then you get the necessary consistency. Moreover, it is necessary to prepare such a portion in order to select it at a time, otherwise the solution will “grab” directly in the tank. This is a job that does not tolerate lengthy smoke breaks.
Apply plaster with a spatula. When it is slightly thickened, you can float on it without excessive pressure, creating the necessary pattern. It is better to practice beforehand in a small area.
To create a unique relief, a spatula, a grater and your own hands are enough. You can use any available tools.
Most often, beginners create rains of different directions on the walls, circles, waves, crossed lines. The most simple in execution is a horizontal relief. You can also use a special shaped roller, then apply the pattern is much easier.
All this should be done at the maximum pace, because the layer of plaster dries very quickly. It is necessary to pay special attention to the joints of the sections in order to avoid overflows.
Next, in 15-20 minutes, when the wall loses its wet luster, it is necessary to slightly smooth the relief using a wet trowel.The ironer is recommended to constantly clean and dip in a container with water.
If your wall was prepared for different types of coatings, you must remove the tape in areas where the zones are divided before the plaster dries, later it will be more difficult to do, and minor defects may remain.
After complete drying (usually about 24 hours), the plaster should be treated with fine sandpaper, which will remove all excess material.
 Liquid
On this, the decoration of the wall with decorative plaster can be considered finished. But there are people whom this does not suit, and they want to paint the wall. In this case, you should use only high-quality paint that is resistant to moisture, sunlight and mechanical stress.
When carrying out work, you must first paint the textured surface areas, and only then smooth.
After the first layer has dried, apply a second layer of paint.
Bark Beetle

Decorative bark beetle plaster is increasingly being used to finish the facade. Even an apprentice can apply it, the main thing is to become familiar with the technology and adhere to it as accurately as possible.
As a rule, bark beetle is used for facade works, but because of its attractive texture, this type of decorative plaster has recently been used in interior design, for example, in eco style.
The bark beetle is used to finish vertical surfaces, but if you have experience in this matter, you can even apply it to the ceiling.
Wall preparation and primer
 Wall preparation
Before application bark beetle need to poshpaklevat the surface of the walls, in the case of plastered walls. It is very practical to apply the bark beetle directly on the foam, pre-pasted on the facade of the house. Alignment will be reduced to grouting.
To avoid the formation of cracks at the joints of the foam should use a reinforcing mesh when applying putty.
In order to achieve proper adhesion of the plaster to the wall, use a primer that includes quartz sand, which provides excellent adhesion of the plaster to the base of the wall.
Ceresit products are the most in demand on the market. If you decide to purchase such a primer, then you should use the mark ST 16 for decorative plaster.
Walls are coated with primer shortly before applying the bark beetle. At a temperature of + 20 ° C, the primed surface will dry within 30 minutes. Consumption of the composition - 150 g / m 2 .
 Primer
The primer is slightly visible through the plaster, so its color should be as close as possible to the color of the bark beetle. To do this, it should simply be tinted to the shade corresponding to the color of the bark beetle.
If the bark beetle is applied to cement-sand plaster, then priming of the surface is not necessary. Just wet the wall one hour before applying the bark beetle. To maximize traction, moisten the base with plenty of water.
Making a solution

In the market you can buy ready-made mixes, it can be Ceresit CT 63 or a dry mix that you will need to prepare yourself. If we talk about the price, then from the economic position it is better to purchase a dry mix, since it is cheaper.
To make decorative plaster from a dry mix, you will need a drill with a mixing nozzle, water, and a mixing container.
The bark beetle dries quickly and cannot be mixed with water. Therefore, make a small batch, especially if you do not have experience in working with decorative plaster.
Given the size of the marble chips, the amount of bark beetle is calculated. For the small XS fraction, the consumption is 700 g / m 2 , for XL - 1700 g / m 2 , and for XXL - 2000 g / m 2 . To make the joints invisible, applying the bark beetle to the wall is necessary at a time.
So, to prepare the mixture, pour the amount of water indicated on the package into the container. At the same time, the water temperature should not exceed 15-20ºС. Inject the dry mixture into the water gradually, while stirring the composition with a drill with a mixer mixer. Leave the finished plaster for 10 minutes, and then mix again.
It is possible to tint only acrylic-based bark beetle, all other types of plaster are best painted on top.
Application

The main thing when applying a bark beetle is to distribute the composition over the surface evenly. This can be done with a metal trowel having a length of 30 cm. You can remove excess bark beetle from it with a spatula 10 cm long.
The layer of bark beetle should correspond to the size of marble chips, that is, within 2-3 mm. This is an important condition, because if the layer is too thin, the primer will be very visible, as a result of which the protective properties of the finish will be degraded.Well, if the layer of plaster is too thick, the texture of the bark beetle will not be visible and the appearance of the facade / interior will suffer.
Since, as mentioned above, the bark beetle dries quickly, it will also have to work quickly. To the surface of the walls was as uniform as possible, it is better to apply the plaster at a time. But if this is unrealistic due to the large area of the wall, then separate the strip with masking tape and apply the composition slightly to the adhesive tape. Then separate the adhesive tape, without waiting for the plaster to dry. Continue to apply the plaster in the same way until the entire wall is covered.
Rubbing
 Rain
Rain
The most important stage of the work is the rubbing of the bark beetle. It depends on him what will be ultimately drawing on the wall. This work should be started immediately after the plaster begins to dry out (after about 20 minutes). If the palm does not stick to the wall, then you can begin to rub, which is performed using a plastic trowel.
 Spatulas
When rubbing the marble chips, chaotic recesses are formed.
Thus, you can get the desired effect:
- "Lamb" - the pattern is formed due to short circular movements. So, on the wall remain chaotic grooves, which are visually similar to the wool of the lamb.
- "Rain" is the most common rubbing technique. It is created up and down. So, you get a vertical rain. If you do a rubbing from the upper left to the lower right, then the rain will be diagonal. To the corner rubbing remained unchanged, you can mark the wall masking tape.
- "Carpet" - the rubbing should be carried out alternately up and down and left-right.
If you are unable to apply the plaster in one go, do not rub it to the very edge. Finish the next part of the wall better, and then carefully rub the joints. This way you can make an inconspicuous transition.
Painting

You can paint the walls the next day after applying the bark beetle. Painting has some advantages over tinting plaster. After the bark beetle has dried without a color coat, the layer of sandpaper can be completely leveled. It is impossible to level the plaster with the color scheme in this way, since the rubbed pieces will be noticeable.
Painting provides more opportunities for design work. This aspect is especially relevant when using the bark beetle in the interior design of the premises.
The grooves underlined by a dark shade look very impressive. To achieve it, first you need to paint the wall with a dark color. After the paint coat has dried, apply a second lighter coat of paint. In this case, the second layer should be applied with a semi-dry roller. In this case, the paint does not penetrate the grooves, and they will remain dark. Consumption of the coloring composition is 300 g / m 2 .
To enhance the performance characteristics of the walls (this is especially appropriate when decorating walls), they can be lacquered with gloss or glitter.
Putty

Preparing to apply homemade decorative plaster made from putty begins with determining the room in which it will be applied to the walls. The choice of texture, tool collection and even the method of mixing the composition depend on it.
Tools and Materials

So, to successfully decorate the walls with putty, you will need:
- Putty.
- Capacity for kneading.
- Spatula and trowel.
- Metal grater.
- Construction Mixer.
- Plastic film for the pattern or package.
Calculate the amount of material

Measure the walls so that you can roughly calculate the amount of starting material for finishing. It will help you in this indicated on the package approximate consumption of putty. To save money, you can purchase putty powder. To make the mortar in this case, you will need:
- 6 kg of dry putty;
- 200 g of PVA glue;
- 2 l of water.
Dissolve the putty with water in a suitable container. This can be done using a mixer. You should have a homogeneous mass. Then add to the mixture of PVA and bring it back to homogeneity.
Gypsum or cement plaster can be used to finish walls in rooms with low humidity. And for rooms with high humidity it is better to use cement.
Prepare the walls

If the walls are damaged, then all of the flowing parts need to be cleaned. All grooves should be covered with cement. So, you can level the walls. If the surface is unreliable, then it should be pasted on the plaster grid, which you subsequently putty.
After the putty layer dries, rub it in so that the surface is even. Then the walls should be primed.Use for this purpose the composition of deep penetration.
Applying homemade plaster

You can apply decorative plaster, made by yourself from putty, in several ways:
- Scales . Apply a putty thickness of 3-5 mm, and then make vertical strokes with a spatula having a width of 10 cm. After the composition dries, it can be painted in the desired color.
- Scala. Begin to apply a thin layer of putty from the top corner of the wall. Layer should be about 3 mm. Then take a metal trowel and attach it so that one side of it remains in the air, actually does not touch the wall. Without lifting your hands to hold straight lines on the putty.
- Cave. Apply putty on the wall, align it. Then compressed into a lump of polyethylene, make a pattern, pressing it against the wall. This can be done in another way by applying a covering film to the wall. It will need to be torn off the putty in a day.
- Venetian from putty. Type a little putty on the spatula, make it uneven strokes. After 24 hours, sand the walls with fine-grained sandpaper. If you need to erase only sharp corners, then make it a grid. Submerge the surface and allow it to dry. Paint the wall base color, after the surface. It needs to be wiped off a little from the convex parts of the plaster immediately after application with a damp cloth. Ultimately, the walls should be coated with wax / varnish on acrylic base / gilding.
- To create an original pattern, you can use other stamps from scrap materials. For example, pieces of foam rubber, branches, foam plastic, flowers, cloth cuts, a roller wrapped in cloth, stencils, etc.
After your homemade decorative plaster dries, paint it or open colored wax.
In general, this science is simple and even an inexperienced "plasterer" can. If you did everything right, the interior of your home will delight you with originality and originality for many years.
Photos
 Effect of cracks
 Creating textures
 Plaster imitating concrete
 Figure
 Relief Venetian
 Application of stencil
 Unusual application technique
 Imitation of brickwork
 Artistic finish
 Textured stucco in the interior
 Bas-relief

 Exclusive

 White plaster
Video
Pr We present to your attention a series of videos about various decorative plasters and methods of their application:
If you want to order a wall finish decorative plaster, we recommend turning to professionals, as the price of this product is very high. You can find out the cost of decorative plaster on the websites of companies producing decorative coatings. Also pay attention to the Venetian plaster, it is great for covering walls.
Search
Related Articles
wood moisture table, moisture determination
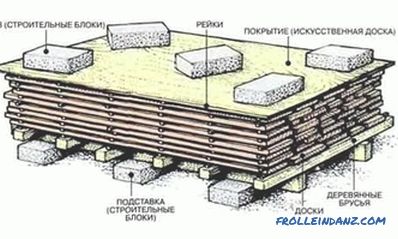
No matter where the intended use of wood raw materials - in construction, in the manufacture of furniture or joinery blanks - its humidity will be the main indicator of the quality and durability o...
Wall insulation foam with his own hands in detail about the main thing + Video
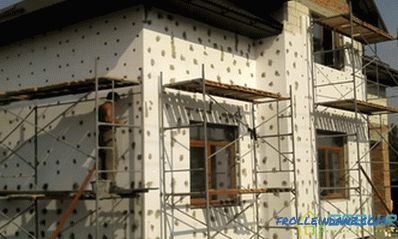
After reading this article, you can learn how to easily and quickly warm your house outside. It discusses in detail all the stages of the insulation work, and also gives tips on choosing the right m...
DIY mixer repair in the bathroom, shower, in the kitchen
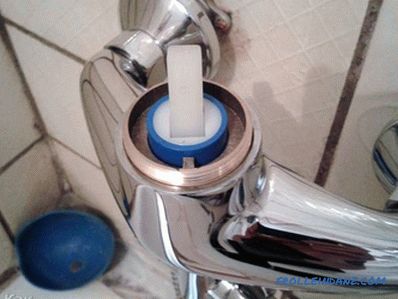
What could be worse than the sound of dripping water? To save all households from such an unpleasant situation can replace or repair the mixer. In this article we will describe how to repair the mix...
We lay laminate flooring on a wooden floor with our own hands - features of work (video and photo)

Laminate flooring today is one of the most popular flooring materials. It is used in both residential and commercial establishments. In order to lay the laminate on the floor, there must be a previ...
Finnish frame house with their own hands: design and calculations
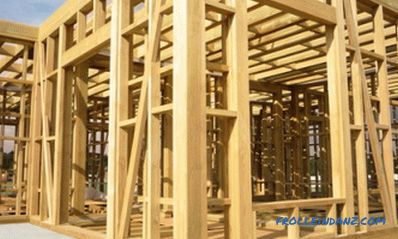
A frame house with your own hands can be built very quickly in time, while financial costs will be insignificant. The cost of building a frame house is relatively low compared to other buildi...