Today, along with modern materials and technologies, many individual developers, paying tribute to the tradition, build log houses with their own hands. With this approach to the construction of your home, the developer fully assumes responsibility for the final result.
")
Pine is used for building a log house, as it is the most reliable and durable.
Choice of material for a log house
Before you make a log house, you must select a material for its construction in an amount appropriate to the project and satisfying in quality. Pine wood is mainly used for construction. Log houses erected from pine have good performance characteristics and are very moderate in price.
Also, the quality and durability of the log house is greatly influenced by the time of logging. In any case, regardless of the season of harvesting, the tree should be smooth, healthy, without signs of rot and traces of damage by tree borers. Optimal for the construction of a log house are logs that have a runoff size not exceeding 1 cm per 1 m length.
A log house consists of crowns. Structurally, the crown often consists of four logs, laid in the shape of a square or rectangle and fixed in the corners with the help of special cuts (locking joints).
What may be needed for work?
")
Tools for making a log house.
To build a log house on your own from the minimum necessary tools you will need:
- carpenter's ax;
- marking cord;
- construction hydraulic level ;
- carpenter's trait.
The presence of a gas or electric saw is not necessary, but it significantly speeds up and facilitates the process of building a log house.
When building a log house with your own hands, you will need to master the following most common operations:
- cutting the log into the edging;
- slot selection;
- making the lock connections.
The cutting of the log into the piping is necessary for the lower rim of the crown. If you want to get a smooth surface of the walls of the logs are subjected to the cutting of one or two edges. In other words, the result is a carriage and a semi-lafet, respectively.
")
Scheme of preparation of logs for building a log house.
To strip a log, at its ends, vertical lines are marked along which the processing line will pass. The number of lines at the end will correspond to the number of edges (one or two).
Then you need to mark the line of cutting along the entire length of the log. This can be done in several ways:
- By installing the marking cord on the end lines along the plane of the edge and punching it along the log. The result is a line along which processing will take place.
- A string is fastened along the plane of the future edge with the help of nails, and a processing line is drawn along it with a marker or a colored pencil.
- You can also use a stretched cord as a guide when working, but there is a high probability of cutting it when it is cured. Therefore, this method is suitable for those who have a good eye.
After marking, the processed log is mounted on stands and secured with brackets.
")
Scheme of the device of the framework.
To facilitate the process, intermediate nicks or cuts are made along the line of the edge. Then, with an ax, along the marking line all the excess wood is cut down. To obtain a more even and smooth surface of the internal walls of the log house, the hemmed edge is additionally processed with a plane.
Sampling of grooves in logs serves to increase the density of the connection of the rims between them and is carried out in the process of assembling the log house.
A log is laid on an already laid crown, and with the help of a carpenter's line, a groove sampling line on the upper log and a line on which the upper log with the already selected groove on the lower log is laid. Sampling of the groove is carried out with an ax. Along the groove marking line, the toe of the ax carries out the selection of excess wood. For the periodic removal of the selected material along the entire length of the future groove, preliminary cross-shaped incisions are made. They provide chipping of the material being cut. With a certain degree of skill and skill, the groove can be sampled with the toe of a chain benzo or electric saw.
And finally, the main element that secures the logs and the spatial rigidity of the structure are the lock joints.
Main characteristics of connections
There are two main types of corner joints:
- Connection with the remainder - chopping into the bowl. The ends of the logs with such a connection go beyond the limits of the corner joint and well protect the angle of the log house from cold and precipitation, increases the spatial stability of the structure.
- Connection without residue - chop into the leg or finishing angle. The ends of the logs do not go beyond the angle. Thermal insulation properties of this type of corner joint are somewhat worse than when chopping into a bowl. To protect against precipitation, such an angle should additionally be sutured with a laid-on board.
")
Scheme of connecting the angle of the log in the paw.
Connecting to the paw is somewhat easier to perform, which is an advantage for self-construction, which is carried out, as a rule, by the forces of one person who does not have the richest experience in building chopped houses.
The assembly of the log house begins with installation on the foundation of the house and waterproofing of the lining board. The best material for it will be larch, but in its absence, pine can also be used with a good antiseptic. The main purpose of the lining board is to isolate the lower (covering) crown of the log from the foundation and to remove it from the ground as far as possible. It also allows to level the influence of minor level drops that could have occurred during the manufacture of the foundation.
On a laid-out board, logs made of one edge are installed, making up the lower crown. Installation is edging on the board. When installing, it is desirable to lay an additional layer of waterproofing between the patch board and the crown.
Depending on the selected type of corner joint, at the ends of the logs or at some distance from them, cut the “paw” or “bowl”, respectively. It is necessary to strive for the most accurate matching of counter parts in the corner joints. From this will depend on the strength of the log house, and its insulating properties.
")
Scheme of assembly of a log from rounded logs.
In any case, regardless of the type of connection and the experience of the cutter, almost always the details of the connection have to be adjusted to each other several times.
After fitting, the joint is assembled and fixed using construction brackets.
Making the second and all subsequent rims includes a sample of the groove for a tighter fit of the logs. Most often, the groove is chosen from the underside of the overlying crown, so that precipitates flow down the wall, without falling into the inter-crown space.
To improve the insulation of the house, the installation of the crowns is carried out on the insulation layer. Both natural materials (moss, tow, jute fiber) and synthetic can be used as an inter-coat insulator. The advantage of synthetic heaters over natural ones lies in their durability and the absence of the need to periodically pierce the walls.
Additional recommendations
")
Scheme for assembling a log house from a rounded log on the dowel.
For greater rigidity of the structure of the log, especially for long walls, use wooden pins that are driven into pre-drilled holes at certain intervals. The length of the dowel should be such as to ensure mutual fixation of two, less often three rims, and to ensure free shrinkage of the log house in the future. For what the depth of the hole for Nagel perform 7-10 cm more than the length of the Nagel.
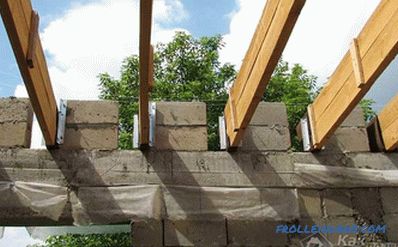
The cut-in of the transverse beams of the ceiling and floor, as well as the internal partitions, is carried out in grooves prepared in the rims beforehand. To increase the structural strength, the cutting can be done according to the “dovetail” type of connection. At this point in time, in order to facilitate the work and speed up the construction process, the cutting of crossbeams is more often carried out half-timbered or completely limited to fastening using specialized mounting plates with self-tapping screws. 3>
For the convenience of work, especially for self-construction, a house from a log house is assembled using a logging method with relocation. This method consists in assembling a log house into separate parts, which are then divided All of the main works on the selection of grooves and fastening elements are carried out on the ground, which significantly reduces the complexity of the work and increases their safety.
We did not find the answer in the article? More information on the topic:
-
")
Features of the device floor on wooden beams
The device of the floor on wooden beams is 1 of 2 possible variants of its construction. Floor beams are important structural elements of the structure. To lay the floor on them need to special rules.
-
")
Wooden house: do-it-yourself process
How to build a wooden house with your own hands? Choose a suitable project, purchase materials and tools and, following the recommendations, start construction. Recommendations further.
Search
Related Articles
Natural ventilation of the house (buildings)
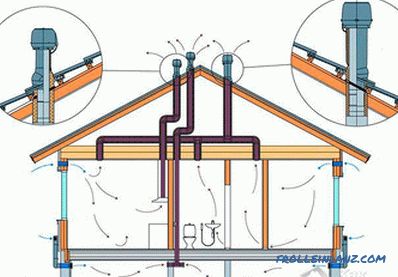
When there were no various conditioners, extracts and other systems, people used the natural laws of nature to ventilate the rooms. Natural ventilation was used in ancient civilizations. Her samples...
How to make a staircase to the second floor: installation
The happy owners of two-story private houses invariably face the question of how to make the stairs to the second floor. You can use the services of professionals, but with a limited budget this is...
Installation of lining their own hands (video)
Lining is a durable and moisture-resistant material that has gained great popularity in construction. With it, you can align the walls, as well as visually expand the room. To properly perform, you...
How to install beacons on the wall
It is well known that plastering walls and floors involves the mandatory installation of special landmarks (the so-called "beacons"), allowing you to control the level of the applied composition. Th...
How to make a hardwood floor
In this article, we will acquaint you with how to properly make a wooden ceiling on the ceiling beams with your own hands, and also tell you about the general procedure for holding events of this ty...