This article is about how to build a gazebo with your own hands. It is quite easy to do this, especially if you have all the necessary materials and tools at hand, and a ready plan in your head.

Required materials, tools and preparatory work
We recommend that you, while getting to work, study the construction standards valid in your region (foundation depth, distance between rafters, recommended materials, etc.) and legal requirements. Always use high-quality materials and professional tools if you want to make an arbor, for the appearance of which you will not be ashamed.
If funds allow you, purchase quality lumber — cedar, pine or mahogany. Ensure that all materials used are weather resistant. So, we build a gazebo with our own hands ...
| Materials: | Tools: |
|---|---|
| A - Foundation: sand, cement, gravel, tubular formwork (9 pieces); | Circular saw, saw for cutting at an angle, jigsaw; |
| B - Racks: timber 10 * 20 cm long 325 cm (8 pieces); | Drill and drills; |
| C - Perimeter of the floor grating (bottom piping): 5 * 15 cm beam 360 cm long (2 pieces ) and length 472. 5 cm (2 pieces); | Hammer, level, joiner's pencil, tape measure, meleny cord |
| D - Intermediate beams of the floor frame: length bar 165. 5 cm (4 pieces), 455 cm long (1 piece) and 224 cm long (2 pieces); | A drill for digging holes under poles; |
| E - Floor lags: bars 5 * 15 cm, length 175 cm (10 pieces) and 232. 5 cm (8 pieces); | Ladder; |
| F - Flooring: bars 5 * 10 cm long 240 cm (40 pieces) and 180 cm (52 pieces ); | Protective gloves, goggles. |
| G - Top trim: bars 5 * 15 cm long 360 cm (2 pieces) and 472. 5 cm (2 pieces); | |
| H - Fencing: bars 5 * 10 cm long, 223 cm (9 pieces), 163 cm (12 pieces) and 67. 5 cm (92 pieces); | |
| I - The ridge of the roof: a bar 5 * 15 cm long 244. 5 cm (1 piece), a bar 5 * 10 cm long 193 cm (2 pieces); | |
| J - Angular rafter legs: a bar of 5 * 10 cm and a length of 276 cm with ends cut off at an angle of 61º (4 pieces); | |
| K - Rafters: a bar of 5 * 10 cm, length 245 cm (10 pieces) and a length of 137. 5 cm (4 pieces) with ends cut off at an angle of 34º; | |
| L - Rafters: a bar 5 * 10 cm long 80 cm (4 pieces) and 136 cm (4 pieces) with the ends sawn at an angle of 45 °; | |
| M - Roofing material: sheets of 20 mm plywood 120 * 240 cm (11 pieces); | |
| N - Rolled roofing material: roofing material or roofing, 56 square meters. m; | |
| O - Exterior roofing: bituminous roofing tiles (tiles), 600 pieces. |
Tips:
- At the end of basic construction work, fill the holes for the caps of the self-tapping screws with a putty wood and level the wooden surface.
- Apply several layers of wood stain to all wooden elements of the structure.

Scheme of a rectangular arbor.

Arbor roof scheme.
Construction of the base of a rectangular gazebo with your own hands
Before starting construction work, you must mark the perimeter of the future gazebo on the ground, using pegs and a rope stretched on them. With the help of a carpenter's square, make sure that all angles are straight. Measure the diagonal of the rectangle. If necessary, make the necessary adjustments.

Marking on the ground.
Installing arbor racks is perhaps the most important step in the construction process, so you must approach it with due attention and responsibility. Dig holes 60-90 cm deep (at least 15 cm below the frost level) and tamp the bottom layer of soil. Place tubular formwork in the hole and fill in a small amount of concrete, after which racks can be installed.
Tip: Use a spirit level to ideally set up wooden posts vertically. Temporarily, until the concrete is frozen, fix the racks in two directions. Make sure they are all on the same level.

Installation of arbor racks.
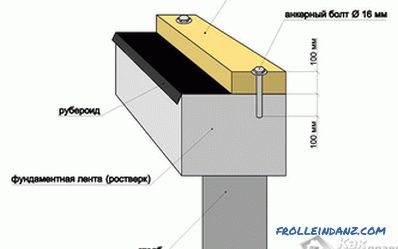
Allow the concrete to harden for several days before installing the bottom trim. Cut the bars of the desired size and secure them to the outside of the racks with 9-inch self-tapping screws. In order to prevent splitting of wood, before drilling the screws, drill guide holes in the right places. Make sure that the strapping bars are arranged horizontally - it will depend on it how flat the floor of your gazebo will be.

Install the bottom trim.
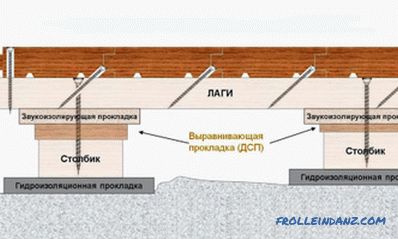
The next step in the project is to install intermediate lags for the floor.As you can see in the picture, they must be fixed to the middle racks. Make sure the logs are horizontal.

Location and installation of the support lag for the floor.
Lags should be placed every 40 cm to evenly distribute the load. Place the spirit level on top of the mounted bars to ensure that the floor crate is level.

Set the floor log.
To fix floor logs in their place, we recommend using special steel clamps to support the ends of wooden beams. Make sure that the clamps are at the same distance from each other and on the same level.

Fastening elements of the flooring.
Flooring is a simple process, but you should think in advance about the most appropriate design. Fix the floor boards to the logs with 6-centimeter galvanized screws, pre-drilled and riddled holes.
It will be necessary to leave a gap between the boards. This will allow water not to accumulate on the floor, which means that it will not be exposed to the damaging effects of excessive moisture. In order for the gaps to be the same everywhere, we recommend inserting carnations between the boards when laying the floor.

Flooring.
Install the top trim components on the top of the racks and secure them with 9-inch self-tapping screws. Use the spirit level to make sure that the beams are horizontal.

Install the top trim.
Installing a pergola fence
Making a pergola fence is easy enough; the main problem here is to choose a design that matches the style of your home and garden. First of all, it is necessary to establish horizontal crossbars between racks, securing them with 9-inch galvanized self-tapping screws. Use the spirit level to control the horizontal position of the mounted structural elements.

Rail installation.
After the balusters are securely fixed to the place intended for them, secure the railing on the upper horizontal bar with decorative studs (you can additionally use glue to increase the strength of the joint).

Installation of balusters.
Construction of a gazebo roof
You can choose the shape of the roof at your discretion. There are many options here - from the simplest gable construction, the construction of which any person with basic skills can handle to a unique roof, the construction of which will require a lot of effort and materials.
To begin the construction of the roof, you need to install the ridge and angular rafter legs. Make sure that the ridge of the roof is mounted horizontally, otherwise the roof of your arbor will be asymmetric.
Tip: Ask a friend to help you with the construction of the roof frame. One person must hold the elements in their place, while the other will fasten them with screws.

Installation of main truss legs.
Now you need to install rafters on the sides of the roof. They should be located at a distance of 60 cm from each other, starting from the center. Drill the guide holes and fasten the rafters with 9-inch galvanized screws on the corner truss legs and top trim.

Installation of auxiliary truss legs.
After that, install the rafters on the front and rear slopes of the gazebo roof. Their mounting is carried out by screws to the ridge of the roof and upper trim.

Installation of side rafters.
In order for the roof frame to bear its weight, it is necessary to place the rafters every 60 cm, starting from the center. Align the rafters at both ends and secure them with self-tapping screws. To prevent splitting of wood and at the same time get a rigid joint of elements, drill the guide holes at an angle.

The layout of the rafters.
Attach 20 mm thick plywood sheets to the rafters as shown in the figure. We recommend that you saw off the sheets with a circular saw before attaching them to the rafters. Plywood sheets are fixed using 3 cm self-tapping screws, which are screwed along the rafters every 15 cm. Do not leave between the sheets of gaps and gaps.

Roof lining with sheets of plywood.
To protect the gazebo from water damage, we recommend that you cover sheets of plywood with roofing sheets or roofing felt. Make sure that the bands of material overlap by at least 5 cm and secure them with brackets. For a roof ridge, cut a piece of roofing material 30 cm wide. Mount the drip along the perimeter of the roof, placing its edge under a layer of roofing material. Before laying shingles, carefully read the manufacturer's instructions.
Tip: When laying tiles, each subsequent row should be displaced horizontally relative to the previous one by half tiles.Vertical layers of tile stacked overlap.

Roofing layer flooring.
Attach a decorative strip to the ends of the rafters, fix it with the help of finishing nails. Do not leave gaps between the plank and roofing sheets.

Decorative trim on the edge of the roof.
The gazebo is ready, you just have to take care of the minor touches. Fill the holes with wood putty and allow it to dry for several hours. Sand wooden surfaces with fine sandpaper.
Cover all wooden elements of the structure with several layers of wood stain or paint. This will help not only protect the tree from rotting, but also improve the appearance of the arbor.
Now you know how to make a gazebo with your own hands. Anyone with elementary woodworking skills will easily cope with this work if they follow our step-by-step instructions. However, be careful and do not forget common sense if you want to avoid costly mistakes and potential problems.
Video: Arbor project
Source of translation: www. howtospecialist. com
Search
Related Articles
How to weld a ceiling joint by electric welding

The use of welding joints in the assembly of metal structures is considered to be the simplest and most reliable method of their installation not only in industry, but also in everyday life. It is c...
Laying a rabbeted board do it yourself: scheme (video)
Grooved boards are usually used to clean the floor. It is made from solid pine or spruce. A tongue is provided on one edge of the grooved board, and a groove for it on the other. This greatly simpl...
How to install a storage water heater - installation of storage water heater
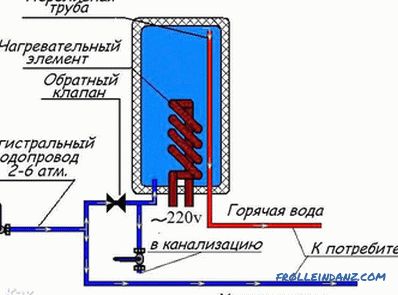
To understand the installation principle of the storage water heater, it is necessary to know the technical characteristics of the equipment. Storage water heater is a cylindrical tank of vertical...
How to fix the timber to the timber
When building a house with your own hands with a bar you need to know almost everything about how to fix the bar to the bar. Here are the most basic mounting methods: Bottom rail. Vertical fast...
Summer kitchen in the country with their own hands + photos, diagrams, drawings

In the fresh air not only the appetite is stronger, but the food is absorbed much better. In warm weather, do not want to sit in the room. Conservation for the winter is also easier to do outside. I...