Chipboard - a relatively inexpensive material, which is often used in construction and finishing works. Independently level the floor with its help is quite simple. At the same time the design turns out strong and durable.

Chipboard floor plan.
Leveling the floor of chipboard with plates is accompanied by a number of activities. We should talk about them in more detail. Leveling the floor with chipboard chipboard panels will be performed correctly only if the technology is strictly followed. About her and need to talk in more detail. So, how to align the floor chipboard panels.
Preparatory work
Before leveling the chipboard floor, you need to pick up all the necessary tools and material. For example:
- roulette;
- level;
- handsaw;
- pencil;
- hammer;
- screwdriver.

Tools for installing a chipboard floor: tape measure, saw, pliers, cutter, level, screwdriver, saw.
First you need to decide how much chipboard you will need to level the floor. To do this, measure the length and width of the room where the work will be performed. Further, these 2 parameters are multiplied together. The result is a number that will characterize the area of the panels required for the work.
If you come to the hardware store, then you can find that all sheets of chipboard, presented here, have the same standard geometric dimensions. Most often there are instances that have a size of 260 * 180 cm. To determine the area of a single sheet, these 2 parameters must be multiplied together. Get a certain number.
To determine the number of sheets, it is necessary to divide the geometric parameters of the room by the size of the sheet. As a result, you also get the number of chipboard sheets needed to level the floor. As a result of the calculations may result in a non-integer number. In this case, it definitely needs to be rounded up.
Other materials will be needed for the work. Do not do without wooden bars and level to measure the horizontal surface. To connect you will need a variety of fasteners. It is best to use self-tapping screws, which will be tightened with a screwdriver. To protect sheets from moisture, a protective compound can be applied to them after work is completed. So, now you can proceed directly to work related to the installation of chipboard on the floor surface.
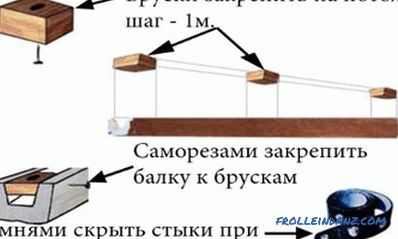
Installation of the batten: nuances of

Floor sheathing scheme.
At the first stage of work, it is necessary to install the crate. Sheets of chipboard will be laid on it. In this case, bars can be used that have a relatively small cross section. Quite enough square materials, with a sectional size of 2.5 cm. You can take the bars and more, but in this case, the laying technology can be broken. They must be attached to the old surface.
It is absolutely necessary to use the level for horizontal alignment. The old surface may be uneven, but more often than not, this is exactly what happens, since it’s about leveling the floor. If you place the bars horizontally, then you can avoid bending them over time.
The fact is that chipboard is quite sensitive material to temperature and humidity variations. If you set the bars unevenly, then you can eventually pay. As a result, the flexing of the finishing material simply cannot be avoided. The floor will become uneven, and the work will have to be done from the very beginning.
It is necessary to fix the bars to the old floor with screws. However, their length should be at least 2 times the thickness of the material. Otherwise, you can simply forget about a rigid construction. In this case it is necessary to adhere to the interval between adjacent bars. It should be approximately 80 cm. This is quite enough to then ensure the strength of the base.
Chipboard sheets are quite thin, so if you make the interval much longer, they can simply bend under the action of mechanical forces, and this will lead to their rapid wear, which is unacceptable.
It is better to make this distance even less so that the rigidity of the batten and of the whole structure is at its best.
Chipboard installation: practical recommendations

Layout of sheets of chipboard.
Before attaching the first sheet to the crate, it is necessary to make a preliminary marking of its position on the bars.
This is done in order to maintain the accuracy of the DSP to the crate. Sheet need to move a little away from the wall.
After that, the layout of the center of the bars is marked. Sheet necessarily need to move away from the wall by about 2-5 cm. This measure is a necessity.
This is a compensation gap. Material during operation can significantly change its geometric dimensions.This occurs under the action of temperature and as a result of drying out. Compensation gaps will preserve the integrity of the entire structure during its operation. These gaps will then be closed, because over the chipboard there will be another floor covering. In addition, along the walls there are often baseboards that eliminate all existing defects.
Marks must be put on the reverse side. When the rezok is connected using a line, the location of the center of the batten sheet can be detected. This marking will greatly facilitate the process of attaching chipboard to the crate. Of course, you can do without it, but in this case, no one can guarantee that everything will be done really smoothly. Markup always helps in any business. Especially in such a responsible, as the alignment of the floor using chipboard.
The alignment process takes not so much time. In some cases, the sheets will have to be cut. Chipboard is quite easy to finish. Here you can use even the most ordinary saw. For these purposes, suitable and Bulgarian. The more convenient to work, the more you need to do it.
Some features
After all the sheets are installed in their rightful place, you can proceed to the surface treatment of chipboard. This measure is necessary. Sheets need to be treated with various antiseptic compositions. Their structure is such that at the slightest ingress of moisture, they begin to change their properties. Made chipboard of a mixture of sawdust and glue.
This structure is very sensitive to moisture. To protect necessarily need an antiseptic. It will prevent the formation of fungus on the surface of the sheets, protect them from the development of other microorganisms, and simply will not allow moisture to penetrate into the depth of their structure, which is necessary in this case.
Thus, the leveling of the chipboard floor is quite easy. Most importantly, follow the instructions provided above. It will allow to carry out all the work with the highest quality and in the shortest possible time. She can be a real helper not only for those people who first decided to level the chipboard floor, but also for those who have long been doing it on a professional level.
Reliable material has been compiled here, which can be a real teaching aid. With it, each person without any problems will make laying chipboard to level the floor in his apartment.
Didn't find the answer in the article? More information on the topic:
Search
Related Articles
DIY PVC pipe installation
Today, any construction store is replete with a huge assortment of building material that can be used in the construction of water supply and heating systems, as well as their periodic replacement....
types, style selection and installation (photos and videos)
Ceiling beams as an element of decor are installed in the premises to give the interior originality and uniqueness. It can be both outward-carrying beams, and imitations depicting ceiling beams. In...
How to change the door lock in the apartment yourself
It may be necessary to replace the lock for various reasons. Most often it is, of course, its failure. Also, locks change when they no longer satisfy the owner. For example, the old system is unreli...
Vintage style in the interior + photo

Literally everything connected with France has always attracted the attention of people following fashion trends both in clothes and in the design of their homes. The interior style vintage has a un...
How to drill ceramic tiles + Photo and Video
When the walls in the bathroom and in the toilet shine with new tiles, it is nice to look at them. But the repair is not finished yet - it is necessary to hang the shelves and fix the mirror. But no...