A stepladder is required in any house. This oversized chair (or stand) with long legs allows you to reach things that are too high. It is useful when replacing the light bulb and greatly facilitate the removal or hanging curtains on the eaves. The construction on the summer cottage will become an indispensable tool when harvesting or forming a crown in the trees. A stepladder with your own hands will allow you to take into account all the nuances and requirements of the owner and master.

Drawing of a ladder for making a stepladder.
Selection of models and materials
There are several varieties of such small ladders, among which it is possible to choose the right one. The most common stepladder, which is a stand with bolted to her legs. These supports can be folded, while the space occupied is significantly reduced. The design of the ladder may be more complex. For example, it can be made in the form of a chair stepladder. It is folded and transformed into a chair that can be used for its intended purpose. Another example of an unusual step-ladder device can be a ladder, in which several tiers can be folded due to the presence of guides and special latches.

Drawing step ladder.
The stepladder can be made of metal in combination with wood. But at the same time, if it is made entirely of wood, it is in no way inferior in strength and reliability to metal counterparts. That tree is the material from which the chair ladder with his own hands would be the best option.
Wood, besides simplicity of processing, has a number of advantages (environmental friendliness, natural beauty, possibility of making from improvised means), which allows it to be chosen as the main material.
In order for the chair ladder chair to be fairly reliable and stable, it is necessary to keep some proportions. For example, the seat (or supporting platform) should be 30x50 cm in size, the distance between the supporting leg and the adjoining leg should be 60 cm. The number of steps will be determined independently and depends on the pitch of their location. For such dimensions, 2-3 are sufficient, which are located at a distance of 20-30 cm from each other.
What may be needed for work?

Scheme of the ratio of the height of the stepladder with the number of steps.
The ladder stepladder begins with the need to prepare all the consumables and tools with which the work will be done:
- electric or cordless drill with drills that are suitable for woodworking;
- self-tapping screws;
- bolt, nut and washer;
- electric jigsaw or saw with fine teeth;
- tape measure, pencil and angle bracket;
- emery paper;
- linseed oil and varnish, a brush for applying them;
- wooden bars with a section of 40x70 mm for racks;
- strips of a section of 20x70 cm for the foundation.

Hinge mounting scheme for a ladder.
The construction of the staircase itself provides for the sequential manufacture and assembly of parts:
- a seat or support platform;
- stands for a support;
- stairs with steps;
- slats that group all the parts together.
Begin by cutting measured slats with a jigsaw. They must be knotless. After the cut is completed, it is necessary to treat the surface with an emery paper or a grinder. This will make the surface smooth, but will retain the color and texture of the wood. 7 details are cut off at once: 5 - for seating and 2 - for lintels.
In order to get a comfortable seat, as well as a comfortable platform when climbing to a height, it is enough to fasten 5 rails together. They will serve as the foundation that must be fastened together with a transverse crossbar. To do this, at the same distance have 5 rails and 2 cross-bars perpendicularly. Parts can be fastened to each other in 2 ways:
- using self-tapping screws, caps that need to be deepened;
- by performing a slot on the main slats equal to the width of the cross member and gluing together the elements of the seat.
If gluing is chosen as the fastener, after finishing the work, it is necessary to allow the glue to harden, and the seat to gain rigidity and reliability.
Parts of the supporting structure

Main view and dimensions of a small stepladder.
The support elements are cut from the beam. Just like the slats, it should be of good quality, without chips, cracks and other damages that may affect the reliability of the ladder in the future. If, nevertheless, the use of the knotted part cannot be avoided, then maybe there is a need to revise the design of the ladder, which will allow more efficient use of the source material. The final distance between the supporting parts must be such that the seat made earlier can be fixed precisely.
The supporting part is a combination of 5 pieces of bars, 2 of which are basic and 3 are connecting. Two of the fastening parts are perpendicular to the main ones. They form a rectangle, and one is attached diagonally. Such a connection provides the necessary rigidity.
They can be joined using a specially made spike-groove joint or self-tapping screws and a screwdriver. If fastening without the use of metal elements is used, then after making the groove and tenon, these parts should be glued before assembly. After that, it is desirable to place the entire assembled structure between the 2 boards, which will firmly hold it until the glue is completely cured.
Installation of the stairs: recommendations
The elements of the stairs can be made of timber, and its steps can be made of a rail.

The device of a stepladder.
But it should be remembered that the stairways should be sawed off taking into account that they will be at an angle to the horizontal surface in the future. In this case, the steps are strictly perpendicular.
The angle at which the ladder will be fixed can be determined by fitting. For this, it is necessary to assemble without fastening all the elements of the ladder in such a way that the distance between the supporting part of the ladder and the ladder is approximately 60 cm. At the same time, it is necessary that the seat (or upper platform) is strictly vertical. After determining the angle produce saw cut bar.
Cuts are made on the sides of the stairs, which are equal in thickness to the height of the steps. The number of holes is equal to the number of steps. After that, the prepared elements are laid in cuts and fixed with glue. Mounting can be done on screws. Additionally, under the steps you can fasten planochku that will expand the platform for support steps.
The ladder, the supporting structure and the seat are interconnected. So that when folding, there are no problems, the upper parts are rounded. Then they will not cling to each other. Fastening is performed on bolts with a nut and a washer. This mount allows you to fold the ladder for storage.
The finished product is coated with a primer and several layers of varnish. And on such details as the steps and the seat, it is better to make their number large. This is due to the fact that these elements are most susceptible to wear.
Didn't find the answer in the article? More information on the topic:
-

How to make a self-leveling floor on a wooden floor
Recommendations for how to pour the self-leveling floor onto the wooden floor with your own hands. Tools and materials needed for work. Preparation of the basis for filling by solution.
Search
Related Articles
What is the slope of the sewer pipe should be
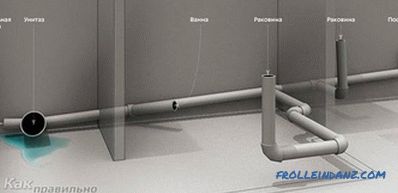
When designing and installing a sewer system, it is necessary to know about the correct inclination of the sewer pipe. The system is gravity, drains move through the pipes under the influence of gra...
How to replace the heater in the washing machine (LG, Indesit, Samsung)
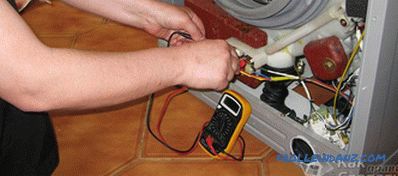
Teng serves to heat the fluid. If we talk about the washing machine, the washing process occurs at a certain temperature, which you expose on the instrument panel. It is the heating element that hea...
tools and materials, drawings, diagrams (photos and videos)
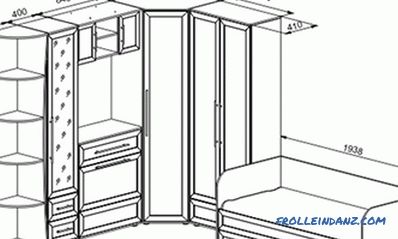
Many home craftsmen try to bring a piece of their soul into the house by means of their own making furniture. In order to make a corner cabinet with your own hands, it will take a lot of effort, a...
How to make your own furniture in the hallway: materials and tools
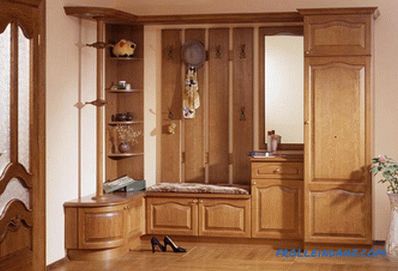
Choosing a new furniture in the hall, everyone wants it to meet all the stated needs, it was beautiful, not bulky, spacious, affordable and made from high-quality materials. However, given the char...
Which laminate is better to choose - how to choose

Every person wants the floor in his house or apartment to be reliable, durable and strong. Laminated floors look modern and stylish, they are relatively inexpensive, and care for them is very simple...