A chair is an essential attribute of the life of a modern person. These pieces of furniture have differences in size, configuration, materials and other features. A wooden chair with its own hands will add variety to the interior, significantly reduce material costs and save time searching for the desired option in the store. Having a sufficient amount of material and a set of tools, you can easily carry out installation work.

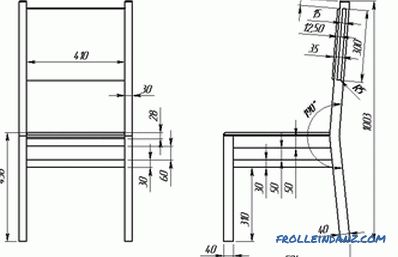
Drawing of a wooden chair.
Preparation for work
Beech, pine and oak are used as suitable bases for the manufacture of the chair. In order to make an independent assembly of such a structure, one should take into account the type of model, its functionality and stylistic identity.
It’s easy to make a wooden chair with your own hands. Most often, a large number of beginners make an elementary version of the design. This is a wood structure with a flat back and a fabric seat.
Before you begin work, you need to make a drawing of the future foundation. Necessary parts and workpieces must also be prepared. Wooden chairs will be a practical and interior-decorating solution. They will harmonize well with the general situation in the room, furniture and other room attributes. Designs of this type are suitable for rooms designed in any of the directions.

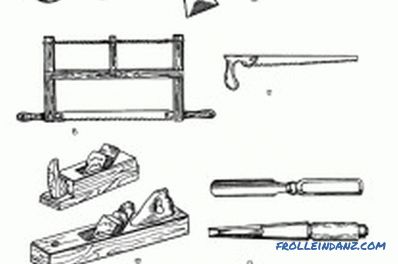
Tools for making a wooden chair.
This is a classic win-win option that is always in fashion. Chairs from a tree are perfectly combined with a table from the same material. Good results are given by a combination of natural rocks and glass. Speaking about the combination of wood with plastic or metal, it should be noted that such combinations are quite complex, the difficulty of selection lies in a clear choice of color, which must certainly be combined.
Folding designs complement the room with small dimensions. The selected model is convenient during reception.
List of necessary tools and materials
Naturally, wood is necessary for a wooden chair. Special attention should be paid to the quality of the material. Knots and cracks should not be. Beech, pine and oak are often used as fundamental species. With the exception of pine, all other breeds are easy to polish, but the result will be amazing. The following materials are needed as materials:
- bar 40x60 mm, 40x40 mm;
- strong fabric for the seat;
- thick foam rubber for the chair;
- board 10-15 mm thick;
- sandpaper;
- glue for furniture;
- screws.
The beam can be made by yourself. It is enough to remove the chips from it and make the surface smooth. The processing of the plane is carried out using emery cloth of large grain at the beginning and shallow - later.

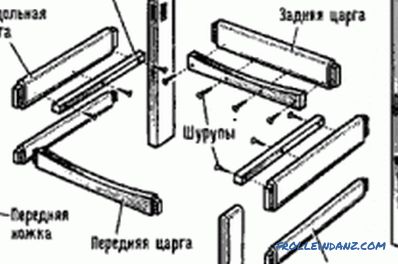
Scheme of assembly of the chair.
Tools used:
- emery cloth;
- construction stapler;
- fine-tipped saw;
- conductors;
- kiyanka;
- chisel;
- planer;
- electric jigsaw;
- tape measure;
- screwdriver.
Detailed plan for the assembly of the chair
2 bars should be prepared: one intended for the back, and the other for the front legs. The length of the first will be 80 cm, the second - 44 cm. Holes are made in them for the base, they should be on the same level. Finished bars stacked on top of each other. Leg slices must be combined. With a pencil marked grooves. It is very important to make 2 slots per base. They are made on adjacent legs. The result is a peculiar rectangle on the legs.
With a chisel you need to make holes, chips and sawdust are removed. The rear legs of the chair are cleaned, their faces are carefully cut, making a gradual transition, and brought to a perfect state.
As soon as the legs are done, then the projectiles and the longitudinal slats are made. Both parts are 2 pieces each. For the manufacture of taken bars in the amount of 4 pieces, they are marked with the future size of the spikes. They will correspond to 10-12 mm. Then spikes are cut. In carrying out this work, you need to be extremely careful, because the spikes must firmly enter the grooves. There should be no gaps.
Seat seating fastening diagram.
Now do back. The material is best to use a trim board. On the rear supports grooves are made from the inside, which are equal to the thickness and height of the backrest. A back is inserted into these holes. The seat is fixed with screws. To give the chair the desired degree of rigidity and ensure the fastening with ease, you need to attach small braces.
On the outside, the legs and back are rounded, then polished.
The finished base of the chair is varnished and polished.
After this, the product should be completely dry.
Work with varnish or enamel should be in a well-ventilated area. However, you can buy a varnish without persistent odor, protecting yourself from undesirable consequences. Such coatings are water based. Drawing on the base of a dark color lacquer will mask the individual irregularities and heterogeneity of the tree.
To make the seat soft, you need to cut the foam of the desired size, wrap it in the chosen thick fabric. The finished fabric base is fixed on the seat with a construction stapler.
As soon as all parts of the overall structure are dry and polished, it is necessary to assemble the chair, process the spikes with glue and hammer it into the holes. Be careful not to spoil the lacquer coating. Completion of work will be screwed to the back seat and seat. Screws are used as fasteners.
To fasten furniture screws, it is necessary to use a drill designed for such hats. They can be neatly hidden. To do this, take sawdust and glue PVA. Of them is a thick mass, which is applied to the cap and dries. While covering the chair with lacquer, these points are also subjected to processing, as a result of which they become almost invisible.
The process of assembling a folding and wicker chair
A wooden chair differs in its small mass. It is made of 2 boards, the back of 3 planks, the seat of the shield and the bottom thin board is fixed on it.
In order for the seat to hold well in the desired position, and the shield has a slope, it is necessary to make spikes. The seat is held on metal pins. You can also make a wicker version of the chair. This will require:
- thick straps or braid;
- nails;
- oak timber;
- saw;
- self-tapping screws;
- hammer;
- Danish oil;
- drill;
- emery cloth.
Work sequence:
- To begin with, the length of the legs is measured on the basis of the bars. Then you need to take 4 bars with a length of 14 and 18 cm.
- At the connection points, grooves are made, which must be reinforced in advance.
- In order for the slats to be smooth, it is necessary to polish their base with emery cloth. After that, you can begin to assemble a wicker chair design. Work should begin with finishing legs. They are connected with screws.
- Once the chair frame is complete, it can be coated with Danish oil or varnish for furniture.
- Then you can weave using belts. As such material used straps made of leather or other material. After that, you can weave the base.
So, the manufacturing technology is simple. Having understood the principle and method of independent production, one can easily construct structures for a veranda, a summer residence, a living room, a children's room.
Didn't find the answer in the article? More information on the topic:


