When repairing a loggia you need to take into account all the details, since the room has its own specifics. Often, the cladding of a loggia with their own hands is carried out with certain assumptions, since the masters do not focus on direct access to the street, which is why a number of shortcomings occur.
")
Lining keeps heat well and absorbs moisture.
Preparatory work
Tools and materials:
- jigsaw;
- screwdrivers;
- steam insulation membrane and stapler ;
- bar;
- heat insulation;
- level.
At the very beginning, you should decide what kind of result you want to get, since a warm loggia will cost much more than a cold one. For cold work begins with crates, and then immediately go to work, while for warm you need to do a number of additional actions.
At the very beginning, a vapor barrier is attached over the entire working surface to allow the tree to breathe. This step does not make sense only in monolithic houses with completely concrete walls, but it is desirable to close the tree or brick.
")
Schema of the battens of the loggia for clapboard.
Now you can begin the installation of the batten. If the insulation will not be used, then you need a rail 40 * 25 mm (fit flat), but if the insulation is, then 100 * 40 mm (fit on the edge). The arrangement of the batten depends on how you plan to arrange the facing material, since there are 3 options:
- Horizontal. The crate is fixed strictly vertically with a step of 40-50 cm.
- Vertically. The crate is fixed horizontally in increments of 30-35 cm.
- "Herringbone". Here, the mount depends on the preferences of the master (most often vertically), while the step depends on the parameters of the pattern (20-50 cm).
When shaping the batten on the ceiling, a pitch of 30-35 cm is used, since it requires maximum reliability.
All installation is carried out by dowels or screws, depending on the wall material. When using self-tapping screws here and further, first drill a small diameter hole with a drill, and after that only the part is screwed in. It is necessary to remember about the angular perimeter, that is, at each corner there must be a bar (rail), which will serve as a reference point during installation. Sometimes it happens that the walls of the loggia are uneven, so you have to level the situation with the help of the installation level and wooden wedges that are enclosed below.
At this the preparation of the cold version ends, whereas for the warm one there is still a choice of insulation. There are 2 options:
")
Lining installation scheme.
- Mineral wool. It is used on a wooden base, because it lets a large amount of air through. The average service life is 10-15 years, regardless of what the manufacturer promises. If this option is used, then on top you will have to close another 1 layer of vapor barrier.
- PPU and polyfoam. PPU is more reliable and easier to install, whereas expanded polystyrene is much cheaper, and immediately the desired thickness.
Only after the insulation has been laid can the work be started. But last time you need to check the crate for durability of installation.
The main working activity
Tools and materials:
- screwdriver;
- level;
- jersey;
- wall paneling;
- clamps;
- baseboards.
The most difficult part in this part of the work is to secure the very first plank, since this must be done with extreme caution. It is mounted in the corner (lower or right) so that the tooth is located adjacent to the adjacent wall. Screws are screwed into the tooth in each timber so that the fixation is of the highest quality. On the other hand, the board is fixed with clamps with a similar frequency. In klyammerah are used nails or screws (the latter is more reliable). Here you need to use a level before screwing in each screw, because even an error of 5-10 degrees at the end will make itself felt.
Now you can proceed to the main work, which will move much faster:
- The board is put in front of the previous one, and the tooth is inserted into the groove.
- A wooden bar is put on the back side, after which, with careful hammer blows, the casing is finally fixed in its place of dislocation.
- Fixing with clamps.
On 1 board with 7 fixation points it usually takes up to 5 minutes, but if the hand is not full, then a little longer. After that, you need to make the final touches to close the corners. The corners of the balcony paneling are covered with wooden plinths, which are fixed with staple nails (short and thin).
Completion and debriefing
Tools and materials:
- flat brush;
- protective compound.
After the main paneling of the loggia with your own clapboard is completed, you can begin to work on protecting the material.For protection, a special composition is used that will protect the wood from moisture and insects, while you can leave the color scheme in its original form, or give any interest (the palette is limited only by imagination).
Then the lining is left in this position for 48 hours for complete drying. Even if nothing sticks to your fingers anyway, it is still impossible to stay there for a long time, since the evaporation will still remain for a specified time.
The sheathing is done with an electric jigsaw or band saw, as all other options put the material at greater risk.
The total total room covering takes up to 2 days, and anyone can cope with it, even without helpers.
Didn't find the answer in the article? More information on the topic:
-
")
How to level the floor in a new building with your own hands?
Instructions on how to level the floor in a new building in case of serious drops in the horizontal surface of the base. Preparation and leveling of floors using log or cement-sand screed.
Search
Related Articles
Karkasniki do-it-yourself: nuances and features (video)
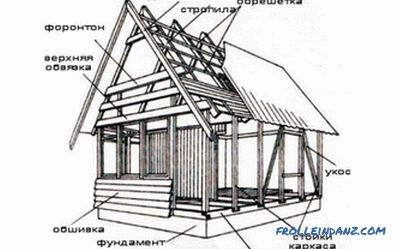
When planning to start building your own home, any person thinks about its attractive appearance and convenient layout. The essential point in this question is the method of construction and the ch...
Sewage in the bath with their own hands
A bath is a structure in which people take pleasant procedures under the influence of hot steam. For steam, as you know, water is needed, and it should be discharged into the sewer system during the...
How much does it cost to fill in formwork - prices for pouring formwork
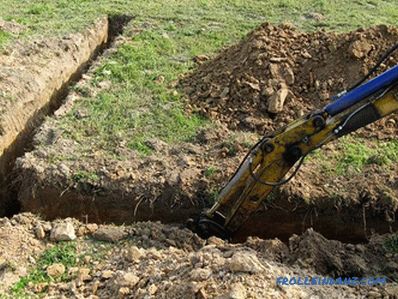
Any person who had to build, when building a foundation, faced with a question concerning its strength, sufficient for the future home. In some cases, a strongly powerful foundation is not needed, b...
at the end, nest-thorn, at half-tree
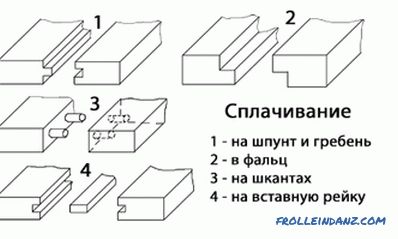
From time immemorial, mankind has used wood for construction purposes. Advanced technology can significantly simplify labor operations. This is also to a large extent contributed by various options...
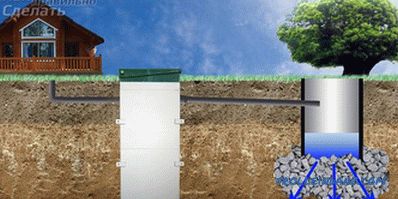
Septic from Eurocube do it yourself
The arrangement of sewage systems in a private house has become a noticeable trend. For the device septic tank often used eurocubes. In this article we will consider the installation methods of such...