To protect the site from intrusion, wind and noise, for the demarcation of the territory, fences of various designs and qualities are used. For many centuries, wooden fences, which can take on different looks, have been popular. Wooden fence do-it-yourself construction of various shapes. This may be the simplest palisade or solid solid fence, where the tree is perfectly combined with stone pillars. It is quite possible to make such a fence with your own hands, you only need to create a project and then prepare the material.
")
Forms of wooden fences.
Types of wooden fences
Wooden fences can have a different appearance:
- Solid, divided into ordinary ordinary, paling, dog-like ears, royal , peak, concave, double concave, convex.
- Fence classified as convex, picket fence, ordinary private, peak, concave, double convex, "cat ears."
")
Construction of a wooden fence made of a picket fence.
A classic wooden fence is made from a picket fence, wooden, metal, and brick pillars are used as supports. All shtaketiny come with small gaps between them, they do not reach the level of the soil. A Christmas tree fence is a type of solid fencing. The boards are nailed parallel to the ground with a small angle, and as a result we get a beautiful pattern with a Christmas tree. Overlapping boards are fastened, there remains a minimum air gap between them to provide ventilation. Below is a strip foundation.
The fence of the Cross variety is also solid, the bars for it are laid parallel to the ground, the strip foundation is used. The cross-section of the bars for the fence is best to take a round or with grooves for installation. The result will be to achieve greater decoration.
A fence made in a checkerboard pattern with a clearance is very popular. This is a very interesting fence, boards are nailed on both sides of the cross member in a checkerboard pattern. Gaps remain between the boards, it turns out the so-called double fence, the strength and reliability of which is exceptionally high. Externally, the design looks attractive, but it is difficult to care for it, because painting the internal surfaces of the board with a brush or roller is no longer possible; only the spray gun is used.
")
Elements of a wooden fence.
The grille fence is one of the most attractive. It is made up of wooden slats, which come together in the form of a lattice. The bases are boards, wood is also used for support posts. Such fences are translucent, but decorating with climbing plants are excellent for them. After installation, the fences are painted with white paint to give the structure extra lightness and elegance, although in fact such a fence is durable and stable.
The ranch fence is a low fence. What is the peculiarity of this design? Boards are nailed in several rows in a horizontal direction, creating an attractive cascade. The supporting pillars are made of wood, they dig into the ground. Usually the number of rows does not exceed 4, such a fence is mounted inside sections, the functions are strictly demarcating.
How to install a wooden fence by yourself?
It’s easy to build a fence made of boards with your own hands, but for this you need to properly prepare materials. It is recommended to use only dry wood, best of all, if it is coniferous soft breeds, but it is possible to take also broadleaved hard breeds. All shtaketina before work necessarily ground, after which treatment is carried out from parasites and rotting.
The boards are impregnated with antiseptics and flame retardants to provide reliable protection against mold, mildew, rot and parasites.
Flame retardants provide protection against open flames. Only galvanized nails or screws, metal plates, and corners are used as fasteners. Some experts advise that nails should be covered with linseed oil before work.
Materials and tools
Before you begin work on the construction of the fence, you need to prepare materials and tools. To make a picket fence, you will need:
")
Attaching the picket with a template (dimensions are in millimeters): 1 - cord; 2 - template; 3 - board to which the cord is attached.
- wooden boards that have been processed;
- bars for cross-cut sticks;
- supporting posts for fencing;
- nails and screws for fasteners;
- bitumen or creosote is used for waterproofing;
- a drill; a standard shovel;
- marking pegs; a rope;
- cement, sand, gravel or ready-made dry mixture, which is sufficient to dissolve with water;
- concrete solution tank;
- saw, jigsaw;
- hammer;
- construction level.
Do-it-yourself construction of the fence
First, you need to perform the marking. To do this, wooden pegs are installed along the perimeter of the site, between which a rope is pulled. This will be the length of the fence, with the help of such a simple markup you can get the following data:
- Determine the position of the two extreme pillars, between which there will be a gate or gate.
- Determine the length of the fence, according to which the amount of material is calculated, the points of the supporting pillars are calculated.
- When calculating it is necessary to take into account that the extreme and angular columns must be made more massive, since they will have the largest load.
After that, you need to remove the markup, leaving the pegs in place of the future support pillars. The next stage of manufacture is digging holes under the supporting pillars. Even during marking, it is necessary to ensure that the distance between them is the same, since the appearance of the structure depends on it, and the sections are made up between the posts. The sections can be smaller or larger only near the corner posts and near the gate. After that, with the aid of a drill or shovel, digging of holes begins. Their depth should be about 1/4 of the height of the column.
")
Assembly scheme for fence from shtaketnik.
Before installing the pillars, it is necessary to treat the lower part with bitumen. This will protect the wood from rotting. At the bottom of the pits themselves, a layer of sand and gravel is poured, after which the pillars are set evenly, and concreting is carried out. In this case, the work is best done by two people, as the support must stand strictly vertically. The first are the corner and the outermost pillars, the rest are already placed between them. Each pillar is carefully placed in a prepared pit, and then poured with concrete. For fasteners, you can use temporary props that will not allow the pillars to bend when the concrete dries.
It takes time for the concrete to dry, usually a couple of weeks are enough, after which you can begin to assemble the fence. A wooden fence with your own hands should be collected from the installation of transverse bars, they are fastened with nails to the posts. It is necessary to drive in nails at a small angle in order to ensure the most reliable fastening.
The pillars themselves are nailed onto the installed bars. The distance of the boards is determined only by the appearance of the fence, there are no special rules. Usually guided by external attractiveness, the level of protection from wind, noise and dust, from entering the site. To make the sections more attractive, it is recommended to use a special method. First, the markings on the crossbars, after which the boards are nailed through one. Thus it turns out to achieve an even step shtaketin. The last step is the installation of the gate or gate, which is mounted on the extreme support pillars. They must be reinforced to support the weight of the structure.
Finishing the finished fence
When the fence is completely ready, you can paint it with paint or varnish it. The choice of finishes depends on the landscape and your own preferences. But you should not forget about the decorative protective coating, because without it the tree will quickly begin to be exposed to the negative influence of the external environment. It is recommended to paint the fence about once every 2-3 years, but it is important to do it the first time right after installation. If the paint is not suitable, then you can use special oils for impregnation or colorless varnish, which allows you to save the natural texture of wood.
When choosing a fence made of wood, it must be remembered that the wood is selected only dry, easy to process, but as reliable as possible. The installation itself usually does not cause any problems, the work can be completed in a couple of days, not counting the drying of the concrete solution for the pillars.
Didn't find the answer in the article? More information on the topic:
-
")
How to build a log house for the sauna? >
Recommendations on how to build a log house for a bath, choose lumber and prepare it. The nuances and technologies of installation of middle, lower and upper rims, as well as methods for their additional fastening.
Search
Related Articles
- characteristics and unique properties of insulation + Video
There is a heater that has many names, various manufacturers call it penoizol, unipole, mipora, mettemplast. However, the essence of this does not change - this heat insulator, which is a modified f...
How to brick a house out of a bar: tools, materials, technology
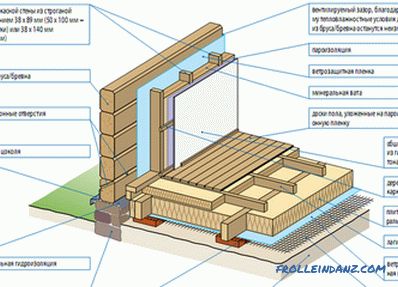
Experts recommend using facing bricks as an improvement in the appearance of the house. This will solve another problem, which is to improve the insulating qualities of the building. You can brick...
How to choose an electric floor heating under the laminate, under the tile
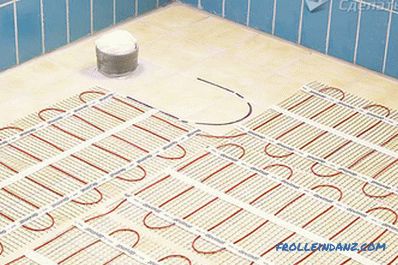
Underfloor heating is no longer a luxury. Modern technologies offer the layman various options for warm floors, for every taste and every budget. Installation of a warm floor is simple and it is qui...
How to fill the foundation for the house with their own hands + photos, schemes
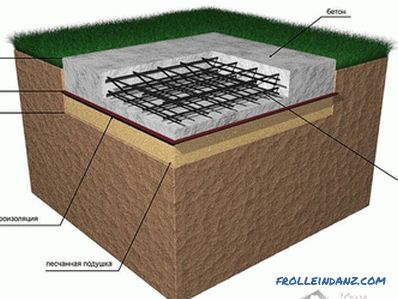
The construction of a private house always begins with the preparation and pouring of the foundation. Arrangement of the foundation of the house - one of the most important and crucial stages of con...
Fence of gabions do it yourself
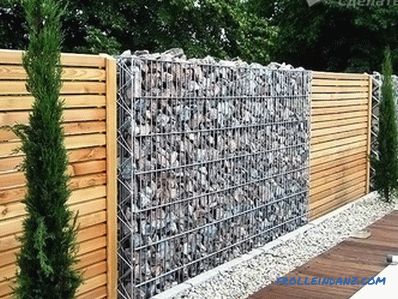
Considering the main options for planning the fence of your territory, you can dwell on modern methods. One of those is the fence from gabions - this is not only a great way to protect your property...